147
3
Using Auto Slide Show
In Auto slide show, all the images displayed
as thumbnails appear in order.
To start Auto slide show, follow the steps
below.
1.
Using one of the steps below,
select [Auto slide show].
• Select [Image] then [slide show] from
the menu bar.
• Click the
button on the tool bar.
• Place the pointer of the mouse on one
of the images you selected, right click
and choose [Auto-slide show] from the
menu.
The slide show begins.
The images advance automatically
according to the display interval (number
of seconds) you specified in the [slide
show] dialog box.
Stop the slide show with the [Esc] Key.
• To automatically switch between images
while viewing an auto slide show, select
[Auto] in [Operating method] in the [slide
show] dialog box.
• When [Manual] is selected in [Operating
method], switch between images by press-
ing the [Enter] key or clicking on images in
auto slide show.
How to Use the Slide Show Dialog
Box
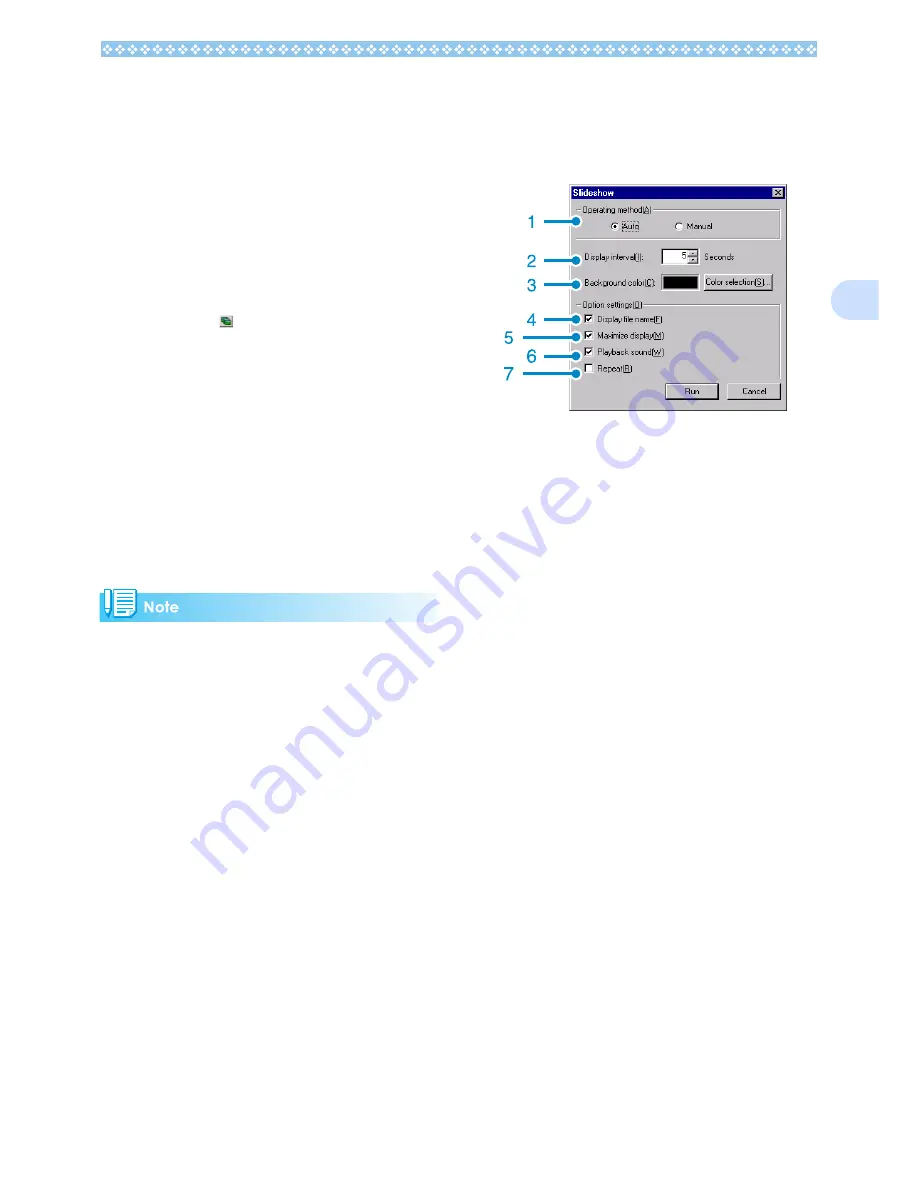
You can make slide show display settings in
the [slide show] dialog box.
1. [Operating method]
Select either Auto slide show (the slides
are played automatically, in order) or Man-
ual (switch frames by clicking the mouse
button or pressing the [Enter] key).
2. [Display interval]
Specify how long in seconds to display
each image, when using Auto slide show.
3. [Background color]
Choose a background color for your
images. Click the [Choose Color] button
and choose a color from the dialog box
that appears.
4. [Display file name]
If you check this box, the file name will
appear in the bottom of the image.
5. [Maximum display]
If you check this box, your images will be
displayed at full-screen size.
6. [Playback sound]
If you check this box, and the images
have associated sounds, the sounds will
also be played back.
7. [Repeat]
If you check this box, the sets of images
will be shown repeatedly, until you press
the [Esc] key to stop. If you uncheck this
box, the images in the folder will be dis-
played through the cycle once, then the
slide show will finish.
Содержание Capio GX
Страница 6: ......
Страница 97: ...Section 5 Direct Printing PictBridge is a registered trademark...
Страница 111: ...Section 7 Changing Camera Settings This section explains how to make changes to the cam era s settings...
Страница 122: ......
Страница 132: ......
Страница 162: ......
Страница 163: ...Section 2 Downloading Images to a Computer...
Страница 169: ...Appendices...
Страница 192: ......


