background image

Connecting the Printer

22

3

C

Connect the other end of the cable to the printer's network, such as a hub.

D

Attach the cable cover.

Reference

For details about network environment settings, see p.25 “Ethernet Con-
figuration”.

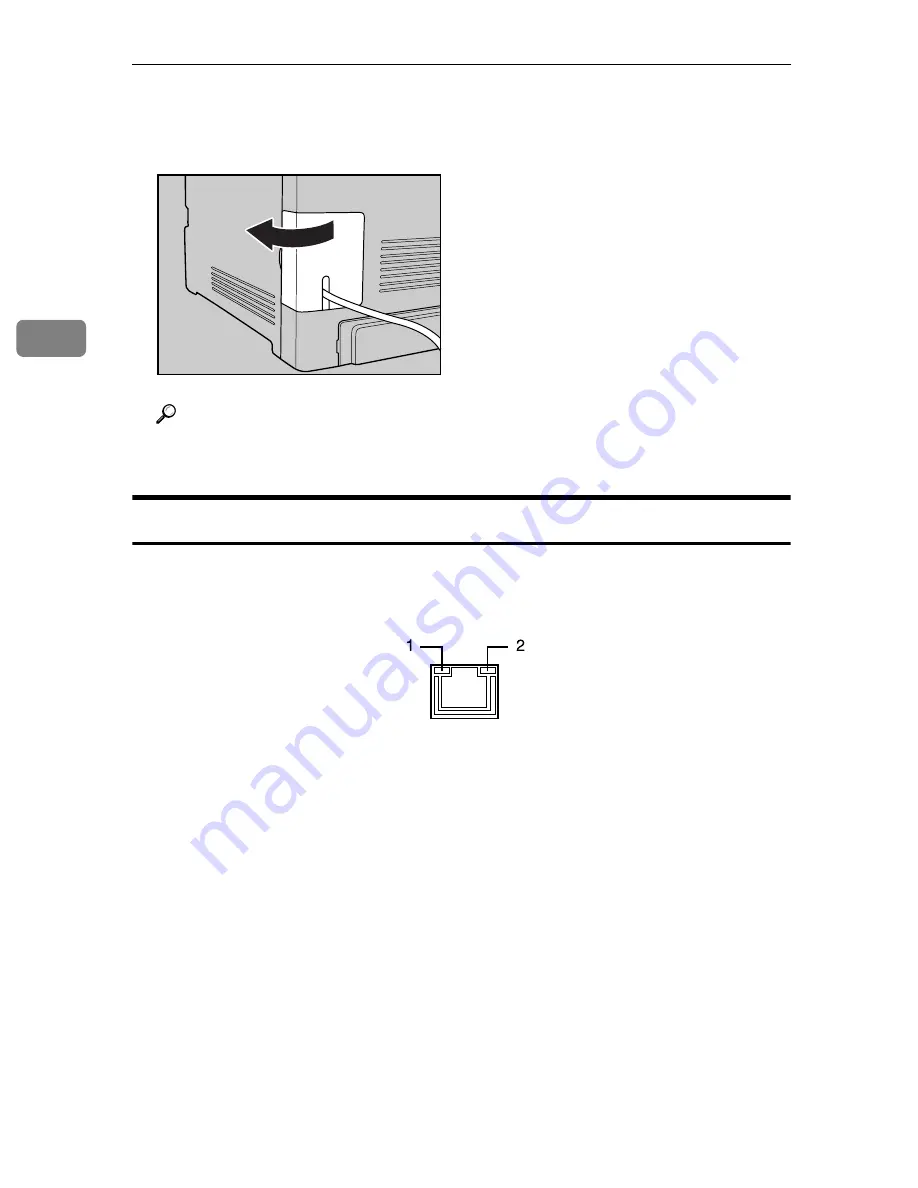
Reading the LED Lamps

1.

Yellow: comes on when 100BASE-

TX is being used. It comes off when
10BASE-T is being used.

2.

Green: comes on when the printer

is properly connected to the net-
work.

ASI082S

AQC070S

Содержание Aficio SP C311N

Страница 1: ...is prohibited by law Copying or printing the following items is generally prohibited by local law bank notes revenue stamps bonds stock certificates bank drafts checks pass ports driver s licenses Th...

Страница 2: ...serious eye damage Caution Use of controls or adjustments or performance of procedures other than those specified in this manual might result in hazardous radiation exposure For good print quality th...

Страница 3: ...t in minor or moderate injury or damage to property Keep the machine away from flammable liquids gases and aerosols A fire or an electric shock might occur Keep the machine away from humidity and dust...

Страница 4: ...Connect the power cord directly to a wall outlet and do not use an extension cord Power sources not specified in this manual and extension cords are electric shock or fire hazards Power cords that are...

Страница 5: ...rom the wall outlet before you move the machine While moving the machine you should take care that the power cord will not be damaged under the machine Do not connect the Ethernet port of the machine...

Страница 6: ...ch parts labelled v indicating a hot surface The fusing section of this machine might be very hot Caution should be tak en when removing misfed paper Lifting the paper feed unit carelessly or dropping...

Страница 7: ...e into a fresh air environment Consult a doctor if necessary If toner or used toner gets into your eyes flush immediately with large amounts of water Consult a doctor if necessary If toner or used ton...

Страница 8: ...d toner or toner containers Toner dust might ignite when exposed to an open flame Dispose of used toner containers in according with lo cal regulations Keep toner used or unused and toner containers o...

Страница 9: ...sed toner or toner containers Toner dust might ignite when exposed to an open flame Dispose of used toner containers in according with lo cal regulations Keep toner used or unused and toner containers...

Страница 10: ...is environmentally friendly Please contact your sales representative for recommended paper ENERGY STAR Program Requirements for Imaging Equipment The ENERGY STAR Program Requirements for Imaging Equip...

Страница 11: ...e to radio communications However there is no guarantee that interference will not occur in a particular installation If this equipment does cause harmful interference to radio or television reception...

Страница 12: ...West Caldwell NJ 07006 Telephone number 973 882 2000 Product Name Laser Printer Model Number SP C311N Aficio SP C311N SP C312DN Aficio SP C312DN Properly shielded and grounded cables and connectors mu...

Страница 13: ...les Consignes de s curit avant d utiliser l appareil Ce manuel d crit bri vement la proc dure d installation de l imprimante Pour plus d informations sur son installation reportez vous au Manuel du ma...

Страница 14: ...e hardware Raadpleeg de Hardwarehandleiding voor meer informatie Para mais informa es consulte o Guia de Hardware Ethernet Configuration Ethernet Konfiguration Configuration Ethernet Configurazione Et...

Страница 15: ...reference For safe and correct use be sure to read Safety Information before using the machine Guide to the Printer Installing the Printer and Options Connecting the Printer Configuration Paper and O...

Страница 16: ...lusive We assume no responsibility for its completeness or accuracy If you have any questions concerning the legality of copying or printing cer tain items consult with your legal advisor Notes Some i...

Страница 17: ...indicated Do not incinerate spilled toner or used toner Toner dust is flammable and might ignite when exposed to an open flame Disposal should take place at an authorized dealer or an appropriate coll...

Страница 18: ...When replacing the Fusing Unit turn the main power switch off and wait at least 30 minutes before proceeding with the replacement Do not touch labelled gray areas The areas can get very hot Be careful...

Страница 19: ...authorized dealer or an appropriate collection site If you dispose of the used toner containers yourself dispose of them according to local regulations Keep toner used or unused and toner containers o...

Страница 20: ...Installation Guide Contains procedures for removing the printer from its box connecting it to a computer and installing its driver Hardware Guide This manual Contains information about paper and proce...

Страница 21: ...ad these notes They can be found in the Safety Information Indicates points to pay attention to when using the machine and explanations of likely causes of paper misfeeds damage to originals or loss o...

Страница 22: ...er You can identify the model by checking the label on the rear of the printer Read if you purchase this model This explains about the 120 V model printer You can identify the model by checking the la...

Страница 23: ...elect an interface language and then click OK D Click Install Manuals E Follow the instructions on the screen to complete the installation F Click Finish when the installation is completed G Click Exi...

Страница 24: ...e 13 Test Printing 14 Installing Options 15 Attaching Paper Feed Unit TK1010 15 Attaching Memory Unit Type F 256MB DDR SDRAM Module 17 3 Connecting the Printer Network Connection 21 Reading the LED La...

Страница 25: ...s on the Control Panel 109 Panel Indicator 112 Printer Does Not Print 113 When the Printer is Directly Connected to a Computer via USB Cable 114 Other Printing Problems 117 Additional Troubleshooting...

Страница 26: ...x...

Страница 27: ...s of plain paper can be loaded 6 Tray 1 Upto500sheetsofplainpapercanbeloaded 7 Top Cover Open Lever 8 Standard Tray Output is stacked here with the print side down 9 Standard tray extension Use this t...

Страница 28: ...nterface cable to connect the printer to the network 7 USB Host Interface Use a USB cable to connect the digital camera to the printer You can print im ages directly from a digital camera with out hav...

Страница 29: ...diate transfer unit Replace Transfer Belt 4 Waste Toner Bottle Collects toner that is wasted during printing If the following message appears on the control panel replace the waste toner bottle Replac...

Страница 30: ...re ceiving data and printing is not possible Press the Stop Start key again to return to the ready condition 4 Job Reset key Press this key to cancel a job that is print ing out 5 Menu key Press this...

Страница 31: ...ic shock or injury Keep the machine away from flammable liquids gases and aerosols A fire or an electric shock might occur The wall outlet shall be installed near the machine and shall be easily acces...

Страница 32: ...ity and temperature can cause an electrical fire hazard Keep the area around the socket free of dust Accumulated dust can become an electrical fire hazard Make sure the room where you are using the ma...

Страница 33: ...he workplace comfortable we recommend that you keep it well ventilated Environments to Avoid Important Areas exposed to direct sunlight or strong light Dusty areas Areas with corrosive gases Areas tha...

Страница 34: ...t cartridge s photo conductor Do not incinerate used toner or toner containers Toner dust might ig nite when exposed to an open flame Dispose of used toner contain ers in accordance with local regulat...

Страница 35: ...he plastic bag B Lift the printer with two people by using the inset grips on both sides of the printer C Remove the adhesive tape D Pull up Top Cover Open Lever to open the top cover E Remove the pro...

Страница 36: ...center carefully pull the print cartridge upward and out When taking out the black print cartridge be sure to place it on at a flat sur face and then remove the protection sheet also G Hold the print...

Страница 37: ...urning the Power On Follow the procedure below to turn the power on R WARNING Important Make sure the power cable is plugged securely into the wall outlet Turn the power switch off when plugging and u...

Страница 38: ...the power cord into the wall socket securely C Turn the power switch to ON The Ready indicator on the control panel lights up Note Wait until the Ready indicator turns on The machine may make a noise...

Страница 39: ...use the display in Eng lish the following procedures are unnecessary Note The default setting is English A Press the Menu key B Press the T or U key to display Language and then press the Enter key C...

Страница 40: ...ey B Press the T or U key to display List Test Print and then press the En ter key C Press the T or U key to display Config Page and then press the Enter key The configuration page will be printed D P...

Страница 41: ...es For details contact your local dealer The printer should always be lifted by two people Do not grip on the tray area when lifting the printer A Check the package contains Paper Feed Unit TK1010 The...

Страница 42: ...e wall outlet C Remove the adhesive tape from the optional paper feed unit D Lift the printer using the inset grips on both sides of the printer E There are three upright pins on the optional paper fe...

Страница 43: ...guration page using control panel see p 14 Test Printing For details about loading paper into the paper tray see p 45 Loading Pa per When adjusting the printing position see Software Guide Attaching M...

Страница 44: ...inner cover by using a coin D Be sure to install the memory unit as shown E To install the recommended memory align the notch of the recommended memory with the protruding part of the vacant slot and...

Страница 45: ...is installed properly the memory capacity will appear under Total Memory on the configuration page Note Before using the new memory unit make settings in the printer driver If the memory unit is not...

Страница 46: ...Installing the Printer and Options 20 2...

Страница 47: ...rt R CAUTION Important Use shielded Ethernet cable Unshielded cables create electromagnetic inter ference that could cause malfunctions The Ethernet cable is not supplied with this printer Select your...

Страница 48: ...ach the cable cover Reference For details about network environment settings see p 25 Ethernet Con figuration Reading the LED Lamps 1 Yellow comes on when 100BASE TX is being used It comes off when 10...

Страница 49: ...ossible under Windows 2000 XP Vista Windows Server 2003 2003 R2 2008 and Mac OS X USB connection with Macintosh is only possible via the printer s USB port A Remove the cable cover B Connect the squar...

Страница 50: ...Connecting the Printer 24 3 D Attach the cable cover Reference For details about settings for USB connection printing see Software Guide ASI082S...

Страница 51: ...wing are settings that can be set at the Host Interface menu and their default values Note If DHCP is in use the IP address subnet mask and gateway address are all set automatically Each printer has a...

Страница 52: ...ay Active Protocol and then press the En ter key E Press the T or U key to display TCP IP and then press the Enter key This example shows how to activate TCP IP F Press the T or U key to display Activ...

Страница 53: ...address Press the T or U key to select Subnet Mask or Gateway Address and then press the Enter key Set values for each setting following the same procedure as for the IP address K After completing the...

Страница 54: ...en press the Enter key E Press the T or U key to select On and then press the Enter key The address detected by the printer will appear F Press the Menu key The initial screen appears G Print a config...

Страница 55: ...you have the IP address subnet mask and gateway address that the printer will use A Press the Menu key B Press the T or U key to display Host Interface and then press the Enter key C Press the T or U...

Страница 56: ...g the left field press the Enter key and then you can enter the next field After completing to enter in the all field press the Enter key H Use this method to assign Subnet Mask and Gateway Address I...

Страница 57: ...you first select Auto Se lect the frame type detected by the printer is adopted If your network can use more than two frame types the printer may fail to select the correct frame type if Auto Select...

Страница 58: ...for Ethernet communication For normal usage the default setting Auto Select is suitable and does not need to be changed This setting allows two connected interfaces to automatically deter mine the opt...

Страница 59: ...o display Ethernet Speed and then press the En ter key E Press the T or U key to select the Ethernet speed and then press the Enter key F Press the Menu key The initial screen appears G Print a config...

Страница 60: ...Configuration 34 4...

Страница 61: ...ion A4 8 1 2 11 Short edge feed direction Size mm Size inch Standard Input Tray 1 Paper Feed Unit TK1010 Tray 2 Bypass Tray Duplex A4 210 297 8 26 11 69 B5 182 257 7 17 10 12 A5 148 210 5 83 8 26 B6 1...

Страница 62: ...ray approximately width 90 216 mm 3 54 8 5 inch length 148 900 mm 5 83 35 4 inch The size is not supported Paper weight and number of sheets to be set Check that the top of the stack is not higher tha...

Страница 63: ...Do not use paper that has already been printed onto by other printers When loading the printer take care not to touch the surface of the paper Do not use dirty or damaged paper Specify the paper size...

Страница 64: ...elp for the driver Types of paper Paper Type Thickness g m 2 Duplex Enabled paper feeding tray Note Tray 1 Tray 2 Bypass Tray Thinner Paper 60 65 Thin Paper 66 74g m2 66 74 Plain Paper 1 75 90 Default...

Страница 65: ...that can be printed in one minute is approximately half that of Plain Paper 1 Envelope The number of envelopes that can be printed in one minute is approximately half that of Plain Paper 1 Paper can b...

Страница 66: ...envelope with the tip of the open flap against the left paper guide To correctly specify the length of an envelope whose flap opens along its short edge be sure to include the open flap when measurin...

Страница 67: ...ow If the curl is severe flatten out the envelopes using your fingers as shown in the illustration below If envelopes are severely curled after printing flatten them by bending them back against the c...

Страница 68: ...Paper that has already been printed onto except a preprinted letterhead Malfunctions are especially likely when using paper printed on by other than a laser printer e g monochrome and color copiers i...

Страница 69: ...for this printer Be sure to set the print mar gins correctly by the application Paper A Print area B Feed direction C Approx 4 2 mm 0 17 inches D Approx 4 2 mm 0 17 inches Note The print area may vary...

Страница 70: ...rox 4 2 mm 0 17 inches D Approx 4 2 mm 0 17 inches Note The print area may vary depending on the paper size printer language and printer driver settings For better print quality we recommend the right...

Страница 71: ...bypass tray is open close it before pulling out Tray 1 Do not move the side paper guides forcefully Doing so can damage the tray Do not move the end paper guide forcefully Doing so can damage the tray...

Страница 72: ...ate down until it clicks into place to lock C Pinch the clip on the side paper guide and slide it to match the standard size When loading custom size paper position the paper guide slightly wider than...

Страница 73: ...custom size paper position the paper guide slightly wider than the actual paper size E Load the new paper stack print side up Make sure paper is not stacked higher than the upper limit upper line mark...

Страница 74: ...tion on the side pa per guides F Check there are no gaps between the paper and the paper guides both side and front end paper guides If there is a gap between the paper and the front end paper guide a...

Страница 75: ...t the paper settings see Software Guide Loading Legal size paper This section describes how to load Legal size paper into the printer The same procedure applies to A4 paper 297 mm or larger Important...

Страница 76: ...with both hands and pull it out Place the tray on a flat surface C Push the metal plate down until it clicks into place to lock D Pinch the extender in the PUSH direction and then pull out the extend...

Страница 77: ...ading Paper 51 5 After extension make sure the arrows on the extender and tray are aligned E Pinch the clip on the side paper guide and then slide it to match the stand ard size ASI085S ASI093S ASI104...

Страница 78: ...it inward to match the legal paper size G Load the new paper stack print side up Make sure paper is not stacked higher than the upper limit upper line marked inside the tray Slide the guides inward u...

Страница 79: ...n on the side pa per guides H Check there are no gaps between the paper and the paper guides both side and front end paper guides If there is a gap between paper and the front end paper guide as in th...

Страница 80: ...pes supported by the printer see p 37 Paper Recommendations For details about the paper settings see Software Guide Setting a paper size by using the control panel To load paper whose size cannot be s...

Страница 81: ...When printing on custom size paper specify the paper size using the control panel or printer driver Custom size paper selected using the printer driver overrides that selected using the control panel...

Страница 82: ...en press the Enter key For example Tray 1 is selected for Tray 1 as shown E Press the T or U key to display Tray 1 Size Custom Size and then press the Enter key F Press the T or U key to select a unit...

Страница 83: ...r types Thinner Paper Thin Paper 66 74 g m2 Plain Paper 1 Plain Paper 2 91 105 g m2 Recycled Paper Color Paper Preprinted Paper Prepunched Pa per Letterhead A Press the Menu key B Press the T or U key...

Страница 84: ...ction of loaded paper is available using the printer driver or control panel Make sure the settings do not conflict Otherwise the paper may jam or the print quality may be affected Load paper with the...

Страница 85: ...5 Open the bypass tray If you load legal or longer size paper pull out the bypass tray extension B Slide the paper guide both sides outward and then load paper print side down until it stops ASI021S...

Страница 86: ...nt Check there is no air in the envelopes before loading Load only one size and type of envelope at a time Before loading envelopes flatten their leading edges the edge going into the printer by runni...

Страница 87: ...Loading Paper 61 5 Open the bypass tray B Set the envelope in bypass tray with the printing side facing down C Adjust the paper guide both sides to fit the envelope width ASI021S ASI086S ASI087S...

Страница 88: ...Paper Input and then press the Enter key C Press the T or U key to display Paper Size and then press the Enter key D Press the T or U key to display Bypass Tray and then press the Enter key E Press th...

Страница 89: ...using the printer driver overrides that select ed using the control panel Do not configure the settings using the control panel if you have already made the settings using the printer driver You cann...

Страница 90: ...en press the Enter key G Press the T or U key to enter the horizontal value and then press the Enter key H Press the T or U key to enter the vertical value and then press the Enter key I Press the Men...

Страница 91: ...r head Bond Paper Cardstock Label Paper Envelope Any Type Important Be sure to select the paper type when you load labels thick paper or enve lopes in the bypass tray The paper type selected using the...

Страница 92: ...en press the Enter key F Press the Menu key The initial screen appears Note The following paper types cannot be printed on both sides Plain Paper 2 91 105 g m2 Thick Paper 2 106 160 g m2 Thick Paper 2...

Страница 93: ...e optional paper feed unit A Lift and pull the optional paper feed unit and then hold the tray with both hands and then pull it out Place the tray on a flat surface B Press down on the bottom plate un...

Страница 94: ...arrow with the paper size E Load the new paper stack print side up Make sure paper is not stacked higher than the upper limit upper line marked inside the tray F Lift and slide the tray then push it...

Страница 95: ...flame Dispose of used toner containers in accordance with local regulations Do not store toner used toner or toner containers in a place with an open flame The toner might ignite and cause burns of a...

Страница 96: ...hite using the printer driver If black toner runs out you cannot print in black and white or color until the black print cartridge is replaced Important Do not allow paper clips staples or other small...

Страница 97: ...K B Gripping its center carefully pull the print cartridge upward and out Do not shake the removed print cartridge Remaining toner may leak Place the old print cartridge on paper or some other materi...

Страница 98: ...om side to side five or six times Even distribution of toner within the bottle improves print quality E Remove the cover from the print cartridge F Check the toner color and location correspond and ca...

Страница 99: ...Put the cover that you removed in step 5 on the old print cartridge Then put the old print cartridge into the bag and then put it into the box Note Make sure to cover the old print cartridge with the...

Страница 100: ...e that the transfer unit is installed If the transfer unit is not installed install it before turning the power on Cooperate with the waste toner bottle Recycling Program whereby used waste toner bott...

Страница 101: ...Bottle 75 6 A Pull Front Cover Open Lever and then open the front cover with both hands carefully B Slide both levers on the front cover outward C Hold both ends of the transfer unit and then lift it...

Страница 102: ...umables 76 6 D Hold the center of the waste toner bottle and then carefully pull it out hor izontally E Pull the waste toner bottle halfway out grab the bottle and then pull it straight out ASI028S AS...

Страница 103: ...ste toner bottle touching the intermediate transfer unit do not lift the bottle while pulling it out F Close the bottle cap G Hold the center of the new waste toner bottle and then carefully insert it...

Страница 104: ...e toner bottle touching the intermediate transfer unit do not lift the bottle while inserting it H Push in the waste toner bottle until it clicks into place Push the green part all the way in I Place...

Страница 105: ...tle 79 6 J Place the transfer unit on the front cover by aligning the mark on the transfer unit with the mark on the front cover Then push on the green PUSH marks until the transfer unit clicks into p...

Страница 106: ...s 80 6 K Close the front cover with both hands carefully Note Before removing the waste toner bottle from the printer spread paper or some other material around the area to keep toner from dirtying yo...

Страница 107: ...on the display replace the intermediate transfer unit Replace Transfer Belt Important When removing the waste toner bottle make sure not to tilt it Do not touch the transfer belt A Pull the right side...

Страница 108: ...es 82 6 B Slide the lever on the front cover outwards C Hold both ends of the transfer unit and lift it up D Hold the center of the waste toner bottle and then carefully pull it out hor izontally ASI0...

Страница 109: ...it 83 6 E Pull the waste toner bottle halfway out grab the bottle and then pull it straight out To prevent the waste toner bottle touching the intermediate transfer unit do not lift the bottle while p...

Страница 110: ...inger screws on both ends of the intermediate transfer unit G Hold the finger screws of sliders and then pull the intermediate transfer unit until it stops H Hold the green parts at both ends of the i...

Страница 111: ...eplacing the Intermediate Transfer Unit 85 6 Be careful not to touch the transfer belt Holding the levers on both side carefully pull out the intermediate transfer unit ASI109S ASI110S ASI111S ASI040S...

Страница 112: ...taining the new intermediate transfer unit and remove the top cover J Remove the covering sheet Then while taking care not to touch the belt ar ea lift the new intermediate transfer unit from its box...

Страница 113: ...e of the transfer unit steady with one hand use your other hand to pull the side tab outwards and then upwards to remove the attachment L Hold both ends of the new intermediate transfer unit and push...

Страница 114: ...6 M Tighten the finger screws on both ends of the intermediate transfer unit N Remove the transfer belt cover O Hold the center of the waste toner bottle and then carefully insert into the printer bod...

Страница 115: ...waste toner bottle touching the intermediate transfer unit do not lift the bottle while inserting it P Push in the waste toner bottle until it clicks into place Push the green part all the way in Q Pl...

Страница 116: ...0 6 R Place the transfer unit on the front cover by aligning the mark on the transfer unit with the mark on the front cover Then push on the green PUSH marks until the transfer unit clicks into place...

Страница 117: ...nsfer Unit 91 6 S Close the front cover with both hands carefully Note Before removing the waste toner bottle from the printer spread paper or some other material around the area to keep toner from di...

Страница 118: ...front cover with both hands carefully B Hold the levers on both sides of the fusing unit and carefully pull it out Place the old fusing unit on a flat surface When replacing the Transfer Unit turn th...

Страница 119: ...nance Kit 93 6 C Prepare a new fusing unit D While supporting both ends of the new fusing unit with your forefingers and pressing down the levers with your thumbs carefully push the unit fully in ASI0...

Страница 120: ...k ings on the levers If the markings are misaligned align them by lowering the levers and once again pushing the fusing unit fully in F Slide the levers on the front cover outwards G Hold both ends of...

Страница 121: ...Replacing the Maintenance Kit 95 6 H Push the lower right part of the transfer unit I Lift the transcription roller to take it out ASI046S ASI047S ASI048S...

Страница 122: ...Hold the new transcription roller and match it with the transcription unit like the illustration shown below K Lift the transcription roller to install it L Place the transfer unit down on the front c...

Страница 123: ...unit on the front cover by aligning the mark on the transfer unit with the mark on the front cover Then push on the green PUSH marks until the transfer unit clicks into place N Close the front cover w...

Страница 124: ...Replacing Consumables 98 6...

Страница 125: ...hinner or spray insecticide on the printer If there is dust or grime inside the printer wipe with a clean dry cloth You must disconnect the plug from the wall outlet at least once a year Clean away an...

Страница 126: ...the con trol panel Toner Den Sensor cleaning req R CAUTION A Pull up Top Cover Open Lever to open the top cover B Lift out the cyan print cartridge C Slide the toner density sensor lever once to the...

Страница 127: ...ner Density Sensor 101 7 D To reattach the cyan print cartridge removed in step 2 Push it all the way in carefully E Close the top cover with both hands carefully Be careful not to trap your fingers A...

Страница 128: ...et Remove all the cables from the printer C Lift and pull Tray 1 carefully and then pull it out with both hands Place the tray on a flat surface When there is paper in the tray remove paper Unplug the...

Страница 129: ...103 7 D Wipe the friction pad with a damp cloth E Wipe the rubber part of the roller with a soft damp cloth After that wipe it with a dry cloth to remove the water F Push the metal plate down until i...

Страница 130: ...interface cables that were removed I Turn the power switch on Note If misfeeds or multi feeds of paper occur after cleaning the friction pad contact your sales or service representative If the optiona...

Страница 131: ...not touch the transfer roller A Turn off the power switch B Pull out the plug from the socket Remove all the cables from the printer Unplug the power cord from the wall outlet before you move the mach...

Страница 132: ...ully and then pull it out with both hands Place the tray on a flat surface When there is paper in the tray remove paper D Wipe the inside of the paper tray with a cloth E Push the metal plate down unt...

Страница 133: ...he print er G Pull Front Cover Open Lever and then open the front cover with both hands carefully The registration roller is set in the position shown by the arrow Clean the registration roller if pri...

Страница 134: ...rinter 108 7 I Close the front cover with both hands carefully J Insert the plug of the power cord into the wall socket securely Connect all the interface cables that were removed K Turn on the power...

Страница 135: ...t Wait a while Warming up The printer is warming up or toner is being supplied Wait until Ready appears on the display Message Explanation Recommended Action Cannot collate The computer does not have...

Страница 136: ...t ting and the paper type set tings Load the indicated tray with the correct paper or change the paper type size using dial or via the special paper size setting menu on the con trol panel Memory full...

Страница 137: ...tridge is set correctly Using a dry cloth carefully wipe the interface area on the print cartridge surface Reset Fusing Unit correctly There is no fusing unit or the fusing unit is not installed corr...

Страница 138: ...he printer alerts to users about its conditions Indicator patterns Cause The Alert indicator is lit The printer cannot be used normally Check the error on the con trol panel The Ready indicator is fla...

Страница 139: ...s or service representative For details about printing the configuration page using control panel see p 14 Test Printing Is the interface cable con nected securely to the printer and the computer Conn...

Страница 140: ...r ties C Click the Port tab D Check the Print to the following port box to confirm that the correct port is se lected If the port such as LPT1 is not correct reinstall the driver Reference For details...

Страница 141: ...sta and Windows Server 2008 A Click Control Panel on the Start menu and then click Printer in the Hard ware and Sound B Click to select the icon of the printer Next on the File menu click Proper ties...

Страница 142: ...e Info C Under Contents for Hardware Select USB Using the printer browser A In the menu bar click Go select Application and then select Utilities B Double click Printer Setup Utility C Click Add The p...

Страница 143: ...in the paper tray Make sure there are no gaps See p 45 Loading Paper Paper is either too thick or too thin See p 35 Paper and Other Media Paper is bent or wrinkled Use paper that have no bents or wri...

Страница 144: ...o thick or too thin See p 35 Paper and Other Media Paper has already been printed on See p 35 Paper and Other Media Number of paper set in the tray exceeds the limit Con firm that the top of the stack...

Страница 145: ...h both hands carefully When cleaning finishes open the top cover and reinsert all the print cartridges If this procedure does not resolve the problem contact your sales or service representative Horiz...

Страница 146: ...printer was in the Energy Saver mode To resume from the Energy Saver mode the printer has to warm up and this takes time until printing starts To disable Ener gy Saver mode Press the Menu key on the...

Страница 147: ...tact your sales or service representative Color changes extremely when adjusted with the printer driver Do not extreme settings for the color balance under the Print Quality tab in the printer driver...

Страница 148: ...nd then press the Enter key Press the T or U key and select Mode 2 or Mode 3 and then press the Enter key If you select Toner Saving on the Print Quality tab in the printer properties dialog box print...

Страница 149: ...etting for thick paper may not be set Check the paper settings of this printer See p 38 Types of Paper and Other Media Check the paper settings of the printer driver See the printer driver Help The to...

Страница 150: ...elect System and then press the Enter key Press the T or U key to display Auto Email Ntfy and then confirm that On is selected Web Image Monitor Confirm that Auto E mail Notification is set to On When...

Страница 151: ...o get toner on your hands or clothes Toner on prints made after removing misfed paper may be loose inadequate ly fused Make a few test prints until smudges no longer appear Do not forcefully remove mi...

Страница 152: ...ove Misfeed Tray 2 There is a paper jam in Tray 2 See p 130 When Remove Misfeed Tray 2 Appears 4 Paper Misfeed Duplex Unit There is a paper jam in the duplex unit See p 130 When Paper Misfeed Duplex U...

Страница 153: ...it Open the front cover and remove the paper Important Since the surrounding temperature is high around the guide check for jammed paper when it gets a little cooler A Pull Front Cover Open Lever and...

Страница 154: ...by lowering the guide s blue levers Check inside the guide for the jammed paper Be sure to fully close the guide after you have checked inside it for jammed paper Attempting to close the front cover...

Страница 155: ...Tray 1 Open the front cover and remove the paper A Pull Front Cover Open Lever and then open the front cover with both hands carefully B Carefully pull the jammed paper upward and out If paper has jam...

Страница 156: ...over check that the error is cleared When Remove Misfeed Tray 2 Appears Remove Misfeed Tray 2 appears when a paper jam has occurred in Tray 2 Open the front cover and remove the paper following the sa...

Страница 157: ...transfer unit If you cannot find the misfed paper look inside the printer C Close the front cover with both hands carefully Note When closing the front cover push the upper side of the cover firmly Af...

Страница 158: ...jam has occurred in the bypass tray Open the front cover and remove the paper A Remove paper loaded in the bypass tray and then close the bypass tray with both hands B Pull Front Cover Open Lever and...

Страница 159: ...of the cover firmly After closing the cover check that the error is cleared When Remove Misfeed Paper Exit Appears Remove Misfeed Paper Exit appears when a paper jam has occurred in the fusing unit O...

Страница 160: ...Removing Misfed Paper 134 9...

Страница 161: ...g the printer Note The printer weighs approximately 28 kg 61 7 lb The printer weighs approximately 28 kg 61 7 lb When moving the printer use the inset grips on both sides and lift slowly in pairs The...

Страница 162: ...g the inset grips on both side of the printer and then move it horizontally to the place where you want to install it D If you remove the option reinstall it Note Be sure to move the printer horizonta...

Страница 163: ...r than indicated above due to deterioration over the period of use Print cartridges consumables are not covered by warranty However if there is a problem contact the store where they were purchased Wh...

Страница 164: ...sed and environmental conditions such as temperature and humidity If the intermediate transfer unit are not changed when necessary printing will become impossible We recommend keeping a stock of bottl...

Страница 165: ...Speed Monochrome maximum 25 pages per minute A4K 8 1 2 11K Color maximum 25 pages per minute A4K 8 1 2 11K Printing speed may vary depending on the setting up environment Resolution 600 600 dpi Speed...

Страница 166: ...71 6 F 1 1 When no error is occurred Dimensions Weight Approximately 28 kg 61 7 lb print cartridges included Standard Paper Tray 500 sheets 1 Bypass Tray 100 sheets 1 Optional Paper Feed Units 500 she...

Страница 167: ...C312DN model printer Printer Language PJL PCL 5c 6 PostScript Level 3 PictBridge Note PictBridge is only available for the SP C312DN model printer Fonts PCL 41 Symbolset 35 Intellifonts 10 TrueType f...

Страница 168: ...K Dimensions W D H 400 450 127 mm 15 8 17 8 5 inches Paper weight 60 105 g m2 16 28 lb Weight Less than 4 kg 8 8 lb Memory Unit Type F 256MB Module Type DDR DIMM Double Data Rate Dual Inline Memory M...

Страница 169: ...32 F Friction pad 102 Front cover 1 Front cover open lever 2 Front view 1 Fusing unit 3 92 138 H How to read this manual v I Inside 3 Installing options 15 Installing the operating instructions vii In...

Страница 170: ...the waste toner bottle 74 S Scroll keys 4 Selecting the display language 13 Setting a paper size tray 1 54 Setting the paper type 38 Specifications 139 Specifying a paper type bypass tray 65 Specifyin...

Страница 171: ...ems are as follows The product names of Windows 2000 are as follows Microsoft Windows 2000 Advanced Server Microsoft Windows 2000 Server Microsoft Windows 2000 Professional The product names of Window...

Страница 172: ...Operating Instructions Hardware Guide GB GB EN USA G163 8603...

Страница 173: ...read Safety Information before using the machine Preparing for Printing Setting Up the Printer Driver Other Print Operations Direct Printing from a Digital Camera PictBridge Making Printer Settings U...

Страница 174: ...istered trademarks of AdobeSystems Incorporated in the United States and or other countries PCL is a registered trademark of Hewlett Packard Company Citrix and MetaFrame are registered trademarks of C...

Страница 175: ...Server 2008 Standard Microsoft Windows Server 2008 Enterprise Note PostScript 3 in this manual stands for Adobe PostScript 3 Emulation Notes Some illustrations in this manual might be slightly differ...

Страница 176: ......

Страница 177: ...ure to read this Quick Installation Guide Contains procedures for removing the printer from its box and connecting it to a computer Hardware Guide Contains information about paper and procedures such...

Страница 178: ...er You can identify the model by checking the label on the rear of the printer Read if you purchase this model This explains about the 120 V model printer You can identify the model by checking the la...

Страница 179: ...read these notes They can be found in the Safety Information Indicates points to pay attention to when using the machine and explanations of likely causes of paper misfeeds damage to originals or loss...

Страница 180: ...r 2008 12 Troubleshooting USB 13 If a Message Appears during Installation 14 Making Option Settings for the Printer 15 Conditions for Bidirectional Communication 15 If Bidirectional Communication Is D...

Страница 181: ...t Menu 46 Paper Input Menu Parameters 46 List Test Print Menu 48 Printing the Configuration Page 48 List Test Print Menu Parameters 49 Maintenance Menu 50 Adjusting the Color Registration 50 Adjusting...

Страница 182: ...n 78 Printer Status Notification by E Mail 82 Mail Authentication 83 SNMP 84 Reading the Configuration Page 85 7 Using a Print Server Preparing Print Server 89 8 Special Operations under Windows Print...

Страница 183: ...nter Information 107 Printer Configuration 109 10 Appendix Software and Utilities Included on the CD ROM 113 Printer Drivers for this Printer 113 Cautions to Take When Using in a Network 114 Using DHC...

Страница 184: ...viii...

Страница 185: ...rovided with this printer Network Connection This printer can be used as a Windows printing port or network printer Using this printer as the Windows printing port Network connections can be establish...

Страница 186: ...er Reference For details about how to use this printer as a Windows network printer see p 7 Installing the Printer Driver to Use As a Windows Network Printer USB Connection This printer can be connect...

Страница 187: ...fault interface language is English D Click PCL 6 Printer Driver or PCL 5c Printer Driver The software license agreement appears E After reading the agreement click I accept the agreement and then cli...

Страница 188: ...rk connection see Hardware Guide If the network printer search fails This section explains how to reconfigure the settings if the network printer search fails during the installation Use the control p...

Страница 189: ...xt F Click Local printer and then click Next In a Windows Vista environment click Add a local printer G Click Create a new port H In the drop down menu select Standard TCP IP Port and then click Next...

Страница 190: ...nd dialog box may ap pear To continue the installation click Yes Auto Run might not work under certain operating system settings If this is the case launch Setup exe from the CD ROM root directory The...

Страница 191: ...rver The following example procedure explains installing the printer driver under Windows XP For details see Windows Help A On the Start menu click Control Panel B Click Printers and Other Hardware an...

Страница 192: ...e agreement appears F After reading the agreement click Iaccepttheagreement and then click Next G In the Method to install printer driver dialog box clear the Search for network printers check box sel...

Страница 193: ...nstalled first To install additional drivers for this printer install them using other ports such as LPT1 Then after the installation change the port settings to the specified USB port Installing the...

Страница 194: ...ver that is installed first To install additional drivers for this printer install them using other ports such as LPT1 Then after the installation change the port settings to the specified USB port In...

Страница 195: ...H Check the printer driver location and then click OK I Click Next J Click Finish If the printer driver has already been installed plug and play is enabled and the icon of the printer connected to th...

Страница 196: ...box appears click Continue C Click Don t search online A message prompting you to insert the provided CD ROM appears D Insert the provided CD ROM into the computer s CD ROM drive The printer driver se...

Страница 197: ...nter reconnect the USB cable and then turn it on again Windows has already configured the USB set tings Open Windows Device Manager and then under Universal Serial Bus controllers or USB Controller re...

Страница 198: ...ns in the Add Printer Wizard For Windows XP Professional and Windows Server 2003 2003 R2 A On the Start menu click Printers and Faxes B Click Install Printer C Follow the instructions in the Add Print...

Страница 199: ...he Ports tab in the printer properties dialog box To support bidirectional communication the following conditions must be met Operating system Windows 2000 XP Vista and Windows Server 2003 2003 R2 200...

Страница 200: ...u When using Windows Vista or Windows Server 2008 click Control Panel on the Start menu and then click Printer B Click the icon of the printer you want to use C On the File menu click Properties D Cli...

Страница 201: ...s groups have Manage Printers permission by default You cannot change the printer default settings for each user Settings made in the printer properties dialog box are applied to all users A On the St...

Страница 202: ...pecific application To make printer settings for a specific application open the Printing Preferences dialog box from that application The following explains how to make settings for the WordPad appli...

Страница 203: ...ion by default You cannot change the printer default settings for each user Settings made in the printer properties dialog box are applied to all users A On the Start menu click Printers and Faxes The...

Страница 204: ...ecific application To make printer settings for a specific application open the Printing Preferences dialog box from that application The following explains how to make settings for the WordPad applic...

Страница 205: ...not change the printer default settings for each user Settings made in the printer properties dialog box are applied to all users A On the Start menu click Control Panel The Control Panel window appea...

Страница 206: ...nter settings for a specific application To make printer settings for a specific application open the Printing Preferences dialog box from that application The following explains how to make settings...

Страница 207: ...sion by default You cannot change the printer default settings for each user Settings made in the printer properties dialog box are applied to all users A On the Start menu point to Settings and then...

Страница 208: ...tings for a specific application To make printer settings for a specific application open the Printing Preferences dialog box from that application The following explains how to make settings for the...

Страница 209: ...n by default You cannot change the printer default settings for each user Settings made in the printer properties dialog box are applied to all users A On the Start menu click Printers and Faxes The P...

Страница 210: ...ngs for a specific application To make printer settings for a specific application open the Printing Preferences dialog box from that application The following explains how to make settings for the Wo...

Страница 211: ...not change the printer default settings for each user Settings made in the printer properties dialog box are applied to all users A On the Start menu click Control Panel The Control Panel window appea...

Страница 212: ...nter settings for a specific application To make printer settings for a specific application open the Printing Preferences dialog box from that application The following explains how to make settings...

Страница 213: ...ng Form Feed Use the following procedure to perform form feed A While an error message is displayed on the control panel press the Stop Start key B Press U or T to select the tray and then press the E...

Страница 214: ...tray 1 or tray 2 and then press the Enter key C Press U or T to select the paper size and then press the Enter key D Press U or T to select the paper type and then press the Enter key Printing starts...

Страница 215: ...owing all print jobs currently queued for printing Check the current status of the job you want to cancel B Select the name of the job you want to cancel C On the Document menu click Cancel Printing N...

Страница 216: ...ordered sets Collate Output can be assembled as sets in sequential order Note If Auto Continue occurs on the first set the Collate will be canceled If a form feed occurs on the first set the Collate...

Страница 217: ...s using paper in a specified tray Note The cover sheet s size and orientation must be the same as those of the body paper This function is available only when using the PCL printer driver Reference Fo...

Страница 218: ...atermark Use the Watermark function to print watermark text Note If the watermark size is larger than the paper size watermarks cannot be printed properly Reference For details about the setting metho...

Страница 219: ...2 x 11 inches or smaller paper sizes With the PS3 printer driver Complex images might fail to print out properly on some paper sizes 384 MB standard and additional 256 MB Printing is possible with al...

Страница 220: ...Other Print Operations 36 3...

Страница 221: ...by operating the digital camera Note Check your digital camera is PictBridge compatible Up to 999 images can be sent from the digital camera to the printer during one print transaction If an attempt...

Страница 222: ...s a PictBridge device C On your digital camera select the images you want to print and then spec ify the printing conditions D The printer receives settings from the digital camera and starts printing...

Страница 223: ...depending on the digital camera For details see the manuals provided with the digital camera Paper Size Use this function to print on paper with the size specified on the digital camera Note For detai...

Страница 224: ...ctBridge Use the following procedure to quit the PictBridge mode Important Do not disconnect the USB cable while data is being sent to the printer If you do printing will fail A Check the printer s Re...

Страница 225: ...en two or more digital cameras are connected the second and subsequent cam eras are not recognized You have connected multiple digital cameras Connect one digital camera only Do not connect multiple c...

Страница 226: ...Direct Printing from a Digital Camera PictBridge 42 4...

Страница 227: ...e parameters included in each menu Paper Input List Test Print Maintenance System Paper Size Paper Type Tray Priority Config Page Menu List Test Page PCL Config Page PS Config Page Color Dens Reg Regi...

Страница 228: ...Panel 44 5 Host Interface PCL Menu PS Menu USB Timeout Network Timeout Network Setup USB Speed Orientation Form Lines Font Number Point Size Font Pitch Symbol Set Courier Font Ext A4 Width Append CR...

Страница 229: ...Menu Chart 45 5 Language English German French Italian Dutch Swedish Norwegian Danish Spanish Finnish Portuguese Czech Polish Hungarian Russian Simp Chinese Trad Chinese...

Страница 230: ...isplay Tray Priority and then press the Enter key D Press U or T to select the tray you want to use E Press the Enter key The selected item is displayed for two seconds with an asterisk and then the T...

Страница 231: ...type for tray 2 Default Plain Paper 1 Thinner Paper Thin Paper Plain Paper 1 Plain Paper 2 Recycled Paper Color Paper Letterhead Preprinted Prepunched Paper Type Bypass Tray Specify the paper type fo...

Страница 232: ...configuration page A Press the Menu key The menu screen appears B Press U or T to display List Test Print and then press the Enter key C Press U or T to display Config Page and then press the Enter k...

Страница 233: ...he menu list showing all available menus Test Page Prints a test page for checking the printing condition The test page contains network settings and counter information PCL Config Page Prints the cur...

Страница 234: ...ration ad justment you can restore optimum print quality If documents show color degradation after the printer is moved perform auto matic color adjustment A Press the Menu key The menu screen appears...

Страница 235: ...n appears B Press U or T to display Maintenance and then press the Enter key C Press U or T to display Registration and then press the Enter key D Press U or T to display Prt Test Sheet and then press...

Страница 236: ...the positive direction and decrease to shift in the negative direction A Feed Direction B Vertical Adjustment C Horizontal Adjustment D Print Area Pressing U or T makes the value increase or decrease...

Страница 237: ...ly Registration You can adjust the printing position of tray 2 Prt Test Sheet You can print the registration test sheet Adjustment Select the start position for printing on a page Horiz Tray 2 Vert Tr...

Страница 238: ...ange the settings for Energy Saver timer A Press the Menu key The menu screen appears B Press U or T to display System and then press the Enter key C Press U or T to display Energy Saver 2 and then pr...

Страница 239: ...r Size You can select Off or Auto to enable the Sub Paper Size function When you select Auto the printer uses an alternative paper size if the currently speci fied paper is not loaded When you select...

Страница 240: ...is applied The Energy Saver mode reduces electric power consumption E Saver2 On Off You can specify whether or not to switch to the Energy Saver mode When the printer switches to Energy Saver mode th...

Страница 241: ...or Pg You can specify whether or not to print error logs on the configuration page Default Off On Off Anti Humidity You can set the printer to produce prints in consistent quality even when hu midity...

Страница 242: ...Setup and then press the Enter key D Press U or T to display DHCP and then press the Enter key E Press U or T to display On or Off according to the network environ ment and then press the Enter key If...

Страница 243: ...ncrease the timeout period Default 60 seconds 15 seconds 60 seconds 300 seconds Network Setup You can make network related settings DHCP Select whether to set the IPv4 address automatically or manuall...

Страница 244: ...t 802 2 Ethernet 802 3 Ethernet SNAP Active Protocol Select active protocols TCP IP Default Active Active Not Active NetWare Default Active Active Not Active AppleTalk Default Active Active Not Active...

Страница 245: ...ct the orientation and then press the Enter key The selected orientation is displayed for two seconds with an asterisk and then the PCL Menu screen appears E Press the Menu key to return to the initia...

Страница 246: ...O L5 PC 8 PC 8 D N PC 850 PC 852 PC 858 PC8 TK Win L1 Win L2 Win L5 Desktop PS Text VN Intl VN US MS Publ Math 8 PS Math VN Math Pifont Legal ISO 4 ISO 6 ISO 11 ISO 15 ISO 17 ISO 21 ISO 60 ISO 69 Win...

Страница 247: ...select the resolution and then press the Enter key The selected resolution is displayed for two seconds with an asterisk and then the PS Menu screen appears E Press the Menu key to return to the init...

Страница 248: ...ds with an asterisk and then the Language screen appears D Press the Menu key to return to the initial screen Language Menu Parameters You can select the language you want to use Available languages a...

Страница 249: ...igher Mac OS X Firefox 1 0 or higher Safari 1 0 1 2 2 0 or higher Note If the previous versions of the Web browser above are used or JavaScript and cookies are not enabled with the Web browser used di...

Страница 250: ...is divided into the following areas 1 Menu area When you select Configuration content of the Configuration page appears on the main area 2 Tab area Contains menus for the Status and Coun ter modes and...

Страница 251: ...he levels of remaining toner Supplies Displays the status of the consumables Input Tray Displays the input tray status and paper settings Counter tab You can check the total number of pages printed to...

Страница 252: ...e 2 Network Click to display the Network page Administrator Mode In this mode users can make input tray and network settings 1 Paper Click to display the Paper page 2 Network Click to display the Netw...

Страница 253: ...word consult your network administrator Log off Click Logout to log off Note When log on and made the settings always click Logout Configuring the Printer Settings From the Configuration page two menu...

Страница 254: ...3 and 8 50 inches Vertical Specify the vertical length between 210 and 356 mm 8 27 and 14 02 inches Paper Type Specify the paper type for tray 1 Thinner Paper Thin Paper Plain Paper 1 Plain Paper 2 Re...

Страница 255: ...hes The additional memory unit is required when using the PCL6 printer driver The additional memory unit might also be required when using the PostScript 3 printer driver depending on the print data P...

Страница 256: ...as Device Name and Active Protocol Interface settings such as setting the timeout and making protocol to active TCP IP port settings Netware settings AppleTalk settings SNMP settings SMTP settings Cha...

Страница 257: ...ar By clicking the Help icon in the main area Help for the setting items in the main area appears Installing Help A Copy the WIMHELP folder on the CD ROM to your computer s hard drive The example proc...

Страница 258: ...t settings Making system access code and language settings Making network protocol settings Making printer settings Reference The Smart Organizing Monitor functions you can use under Windows oper atin...

Страница 259: ...red The problem tray is outlined in red 2 Comments Displays current printer status and in structions for resolving problems 3 Continue button Click to display the Form Feed dialog box which you can us...

Страница 260: ...You can check the following information about the input trays Input Tray Displays the installed input trays Status Displays the input tray status Out of Paper or Status OK Paper Size Displays the size...

Страница 261: ...n the printer is not busy processing jobs To print information about the printer the printer must be monitored from Smart Organizing Monitor via a supported printer driver In the List Test Print list...

Страница 262: ...tant The Printer Configuration is disabled when the printer is not in the ready state or power save mode You can use the Printer Configuration dialog box to change the settings of printers input trays...

Страница 263: ...inches Vertical Specify the vertical length between 210 and 356 mm 8 27 and 14 02 inches Tray 2 Paper Size Specify the paper size for tray 2 A4 210 x 297 mm 8 1 2 x 11 Paper Type Specify the paper ty...

Страница 264: ...e PostScript 3 printer driver depending on the print data Adjusting registrations On the Maintenance tab you can adjust color registration and print starting po sitions Normally you do not have to adj...

Страница 265: ...ocol and other printer information Making interface settings including the timeout setting and protocol settings Checking or making TCP IP settings Checking or making Netware and SMTP settings Checkin...

Страница 266: ...the e mail notification settings You can be notified of the following events Service call Toner cartridge is empty Toner cartridge is nearly empty Waste toner bottle is full Waste toner bottle is near...

Страница 267: ...n to prevent illegal use of the mail server When mail is sent to the SMTP server authentication is performed using the SMTP AUTH protocol by prompting the mail originator to enter the user name and pa...

Страница 268: ...rating on UDP and IPX is built into the Ethernet board that is installed in this printer Important If you change the printer s community name use Web Image Monitor or Smart Organizing Monitor to chang...

Страница 269: ...sion Printer Language Option installation status Toner Remaining Supply Information Paper Input Displays the paper size and type settings Tray Priority Bypass Tray Tray 1 Tray 2 Maintenance Registrati...

Страница 270: ...g PCL Menu Displays settings made under PCL Menu Orientation Form Lines Font Number Point Size Font Pitch Symbol Set Courier Font Ext A4 Width Append CR to LF Resolution PS Menu Displays settings made...

Страница 271: ...panel For details see p 48 Printing the Configuration Page The printed items and the contents might be different according to machine model Reference For details about printing printer configuration...

Страница 272: ...Monitoring and Configuring the Printer 88 6...

Страница 273: ...rs group A Open the Printers window from the Start menu The Printers window appears Under Windows XP or Windows Server 2003 2003 R2 the Printers and Faxes window appears B Click the icon of this print...

Страница 274: ...Using a Print Server 90 7...

Страница 275: ...Install a TCP IP in Windows to set up the network environment Consult the network administrator for the local setting information C To print install Printing service for UNIX as the network applicati...

Страница 276: ...a configuration page see p 77 Printing the printer configurations In other cases Add the IPv4 address and host name of the network printer to the hosts file on the computer used for printing A Open t...

Страница 277: ...ssions is indicated as follows lpr 10 Enter the file name in a format including the path from the directory executing commands Reference The option specified in a command is an intrinsic printer optio...

Страница 278: ...tp bin When printing a binary file in ASCII mode print may not come out correctly D Specify files to be printed The following shows the examples of printing a PostScript file named file 1 in the C PRI...

Страница 279: ...rinter in a Mac OS environment update to Mac OS 10 2 8 or higher A Insert the CD ROM into the CD ROM drive B Double click the CD ROM icon C Double click the Mac OS X folder D Double click the PPD Inst...

Страница 280: ...lities folder D Double click Printer Setup Utility The Printer List dialog box appears E Click Add The Printer Browser dialog box appears F Click Default Browser G Check if the name of this printer ap...

Страница 281: ...ore Printers Then select the zone from the second pop up menu Other Mac OS X Click AppleTalk on the first pop up menu If the zone is set select the zone from the second pop up menu E Select the printe...

Страница 282: ...rinter List dialog box appears D Select the machine you are using and then click Show Info The Printer Info window appears E In the drop down menu select Installable Options and then specify an ap pro...

Страница 283: ...elect the paper size you want to use in Paper Size If this printer is not displayed in Format for select the printer you want to use D Configure the settings and then click OK Reference The Page Setup...

Страница 284: ...g box appears D Double click the name of this printer E Select the name of the job you want to cancel and then click the Delete icon Note If the printer is shared by multiple computers be careful not...

Страница 285: ...A Open System Preference and then click the Network icon B Click Built in Ethernet in the Show list box C Click the AppleTalk tab D Select the Make AppleTalk Active check box E To change AppleTalk zo...

Страница 286: ...Mac OS Configuration 102 9 Configuring the Printer Use the control panel to enable AppleTalk AppleTalk is active by default...

Страница 287: ...Quality or Best Quality Color Profile Use this function to select the color profile pattern In the Feature Sets list select Imaging and then in the Color Profile list select the color profile pattern...

Страница 288: ...ature Sets list select Toner Then set Toner Saving to On Print Blank Pages Use this function to print blank pages To print blank pages in the Feature Sets list select Toner Then set Print Blank Pages...

Страница 289: ...ark position In the Feature Sets list select Watermark Location Then in the Watermark Position Horizontal and Watermark Position Vertical lists select the horizon tal and vertical positions respective...

Страница 290: ...otocol settings Making printer settings Displaying the printer status and supply information Netware Settings SMTP Settings SNMP Settings AppleTalk Settings Installing Smart Organizing Monitor Smart O...

Страница 291: ...us Input Tray You can check the following information about the input trays Input Tray Displays the installed input trays Status Displays the input tray status using a graphic Paper Size Displays the...

Страница 292: ...item you want to print You can print the following Configuration Page Prints the current configurations and general information of the printer Menu List Prints the menu list showing all available menu...

Страница 293: ...ers mode Available tabs in the Printer Configuration dialog box differ depending on the mode you are in Administrator In the Access Code dialog box enter an access code All tabs in the Printer Configu...

Страница 294: ...16K Custom Paper Size Any Size Paper Type Specify the paper type for the bypass tray Thinner Paper Thin Paper Plain Paper 1 Plain Paper 2 Recycled Paper Color Paper Letterhead Preprinted Paper Prepun...

Страница 295: ...be used on factory set defaults but the configuration can be changed depending on the condition of the user The changed condition holds even if the printer is turned off The access code can be changed...

Страница 296: ...Mac OS Configuration 112 9...

Страница 297: ...e computer to communicate with the printer via a printer language The following operating system is supported Windows 2000 XP Vista and Windows Server 2003 2003 R2 2008 PostScript 3 Printer Drivers an...

Страница 298: ...responds first Using AutoNet If the printer IPv4 address is not assigned by a DHCP server automatically a temporary IPv4 address starting with 169 254 which is not used on the network can be automati...

Страница 299: ...M6 RSRC PPD4 For PageMaker 6 5 default installation The directory is C PM65 RSRC USENGLISH PPD4 The USENGLISH may vary depending on your language selection For PageMaker 7 0 default installation The d...

Страница 300: ...MetaFrame versions are supported Windows 2000 Server Advanced Server MetaFrame XP 1 0 SP1 SP2 SP3 SP4 FR1 FR2 FR3 MetaFrame Presentation Server 3 0 Citrix Presentation Server 4 0 Windows Server 2003 2...

Страница 301: ...or errors may occur depending on data transfer rates When using MetaFrame XP 1 0 or higher versions we recommend making settings in Client Printer bandwidth under Citrix Management Console accord ing...

Страница 302: ...erver 92 Duplex printing 35 E E Mail 82 E Mail notification 82 Ethernet 1 EtherTalk 95 101 F Form Feed 29 ftp 91 H Help Source File Setting 73 Host Interface 58 Host name 92 I IP address 4 IPv4 addres...

Страница 303: ...nces 18 20 22 Print server 7 89 PS 3 25 PS Configuration Font Page 77 108 PS Menu 63 R Registration 50 80 111 Resolution 35 S Service call 82 Shared printer 7 Smart Organizing Monitor 74 106 SMTP 72 8...

Страница 304: ...120 GB GB EN USA G163 8609...

Страница 305: ...Copyright 2008...

Страница 306: ...Operating Instructions Software Guide GB GB EN USA G163 8609...

Отзывы: