Ricoh A161 Скачать руководство пользователя страница 157

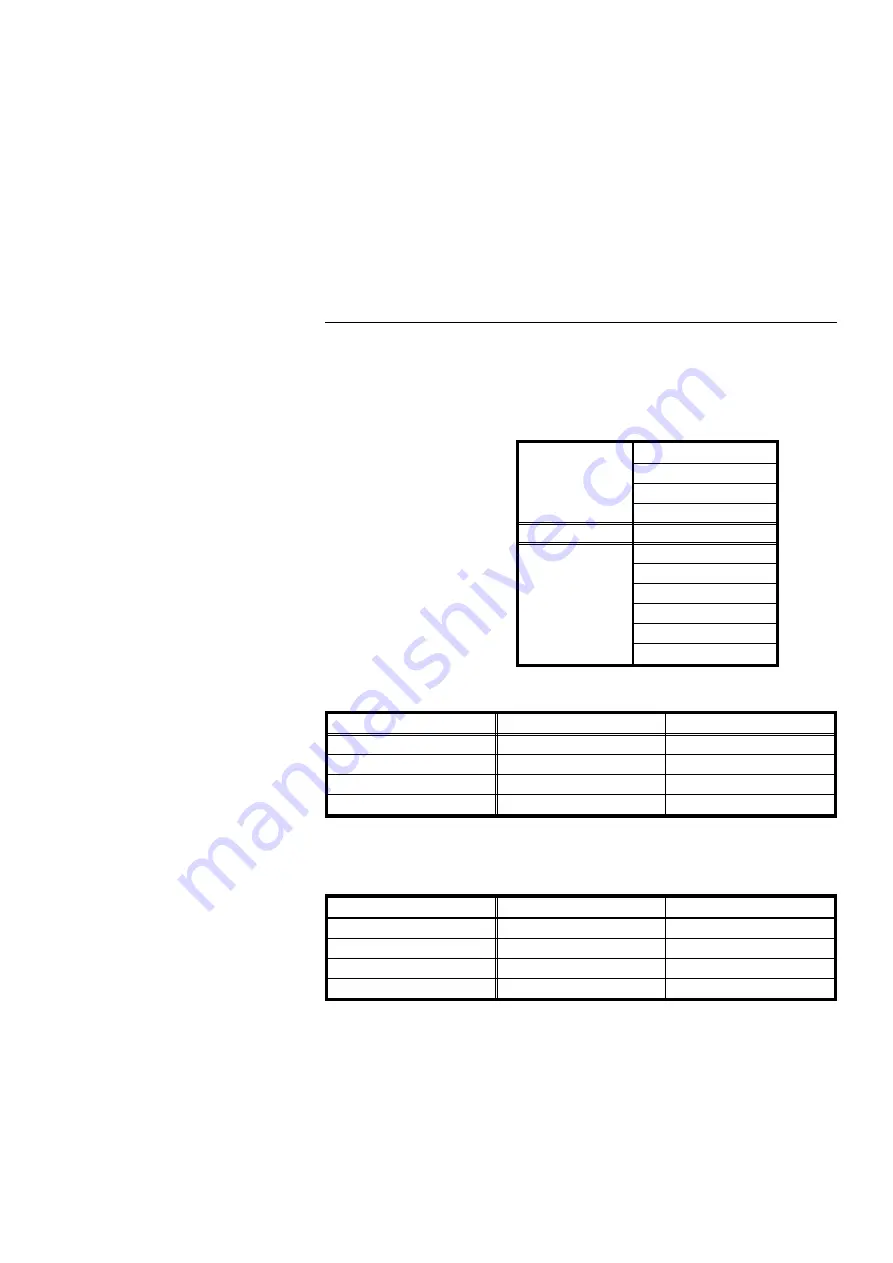
Toner replenishment:

Bottle exchange (415 g)

Power source:

See the inside front cover of this manual.

Warm-up time:

less than 80 seconds (20

°

C)

Reproduction ratio:

4 enlargement and 6 reduction

Enlargement

200%

141%

122%

115%

Full size

100%

Reduction

93%

82%

75%

71%

65%

50%

Power consumption:

Copier only

Full system*

Warm up

0.9 kW

0.92 kW

Stand-by

0.15 kW

0.17 kW

Copying

0.8 kW

0.8 kW

Maximum

1.45 kW

1.5 kW

* Full system: Copier with document feeder, 20-bin sorter
stapler, and paper tray unit

Noise Emission:

*Sound pressure level: The measurements are made according to ISO 7779.

Copier only

Full system*

Warm-up**

29.4 dB (A)

27.6 dB (A)

Stand-by**

29.4 dB (A)

27.6 dB (A)

Copying**

50.0 dB (A)

52.9 dB (A)

Maximum***

56.6 dB (A)

62.8 dB (A)

Full system: Copier with document feeder, 10-bin sorter
stapler, and paper tray unit

**

by stander position

*** by operator position

f-eu-9

COPIER

155

Содержание A161

Страница 1: ...his manual all safety messages are identified by the words WARNING and CAUTION These words mean the following WARNING Important information to alert you to a situation that might cause serious injury...

Страница 2: ...e glass Keep corrosive liquids such as acid off the machine Do not allow paper clips staples or other small metallic objects to fall inside the machine General Safety Information S Always turn the cop...

Страница 3: ...WHERE IS IT WHAT IS IT f eu 2 1...

Страница 4: ...th 1000 sheet large capacity tray and unit for two sided copying A 250 sheet tray A 1000 sheet large capacity tray A unit for two sided copying f eu 2 250 sheet tray 250 sheet tray 250 sheet tray unit...

Страница 5: ...s Platen cover in some areas key counter These options require the optional sorter adapter f eu 2 Document feeder 1000 sheet tray unit two 500 sheet trays 20 bin sorter 20 bin sorter stapler 10 bin so...

Страница 6: ...COPIER EXTERIOR AND INTERIOR f eu 2 4 6 5 7 2 1 3 12 13 8 9 10 11 14 15 COPIER EXTERIOR AND INTERIOR 4...

Страница 7: ...cess the inside of the copier 9 250 sheet tray This tray can hold 250 sheets of copy paper 10 250 sheet tray This tray can hold 250 sheets of copy paper The model with a unit for two sided copying doe...

Страница 8: ...your copier among the illustrations below and on the next page Then when you find paper tray s name ex 1st tray in this manual confirm which paper tray is pointed in the case of your copier f eu 2 Wit...

Страница 9: ...and op tional 1000 sheet tray unit LCT 500 sheets for each tray With large capac ity tray and unit for two sided copying LCT With large capac ity tray unit for two sided copying and optional 500 shee...

Страница 10: ...to enter data 5 Start key Press to start copying Use to set the Auto Start See page 53 6 Clear Stop key Press to cancel the copy num ber entered While copying press to stop copying This key is also us...

Страница 11: ...key Reduces in 1 steps See page 50 18 Size Magnification key Copier sets the magnification for your paper and original sizes See page 51 or 10 Key Zoom key See page 50 19 Erase key See page 66 or Marg...

Страница 12: ...r Indicates the number of cop ies Data display See pages 91 and 118 5 Max indicator See page 93 6 Manual Image Density indi cator See pages 41 and 93 7 Auto Reduce Enlarge indica tor See page 44 8 Thr...

Страница 13: ...icator See pages 90 and 98 14 Check Paper Path indicator See pages 90 and 101 15 Paper Size indicators Show the selected feed sta tion copy paper size and di rection 16 Bypass Feed indicator See page...

Страница 14: ...selected mode 5 Start key Press to start copying Use to set the Auto Start See page 53 6 Clear Stop key Press to cancel the copy num ber entered While copying press to stop copying This key is also us...

Страница 15: ...steps See page 50 18 Size Magnification key Copier sets the magnification for your paper and original sizes See page 51 or 10 Key Zoom key See page 50 19 Erase key See page 66 or Margin Adjustment key...

Страница 16: ...Copy Counter Indicates the number of cop ies Data display See pages 91 and 118 5 Max indicator See page 93 6 Manual Image Density indi cator See pages 41 and 93 7 Auto Reduce Enlarge indica tor See p...

Страница 17: ...98 14 Check Paper Path indicator See pages 90 and 101 15 Paper Size indicators Show the selected feed sta tion copy paper size and di rection 16 Bypass Feed indicator See page 46 17 Check Paper Size...

Страница 18: ...f eu 2 OPERATION PANEL 16...

Страница 19: ...WHAT YOU CAN DO WITH THIS COPIER F EU 3 17...

Страница 20: ...e copier choose the paper size Having the copier choose the reproduction ratios Copying from the bypass feed table Temporarily stopping one job to copy something else F EU 3 See page 42 See page 44 Se...

Страница 21: ...the warm up period F EU 3 See page 49 Reducing and enlarging using preset ratios See page 53 Reducing and enlarging with the Zoom Up and Zoom Down keys Reducing and enlarging with Number keys Fitting...

Страница 22: ...ne sided copies from various originals F EU 3 See page 54 From 2 one sided originals to 1 one sided copy From 1 two sided original to 2 one sided copies From 2 facing pages to 2 one sided copies FUNCT...

Страница 23: ...3 See page 59 Copying the front cover of the originals Copying the front and back covers of the originals Adding a front cover sheet Adding front and back cover sheets Inserting slip sheets between O...

Страница 24: ...of copy image F EU 3 See page 66 Erasing the center margin of the original image Erasing the surrounding area of the original image Erasing the center margin and surround ing area of the original imag...

Страница 25: ...Adding margins for binding Storing your copy settings in memory F EU 3 See page 68 Margin for one sided copying Margin for two sided copying See page 70 FUNCTIONS 23...

Страница 26: ...Making two sided copies F EU 3 See page 73 From an even number of one sided originals From an odd number of one sided originals From two sided originals From facing pages FUNCTIONS 24...

Страница 27: ...Finishing F EU 3 See page 77 Sorting into sets 123 123 123 Stapling copies Stacking together all copies of a page 111 222 333 FUNCTIONS 25...

Страница 28: ...S For copying your material for your clients you ll use the 20 bin or 10 bin sorter stapler options If you make copies following the procedure below sheets will be inserted between OHP sheets to preve...

Страница 29: ...t from your classes for two days and you could not take notes you have to ask your friend to lend you his notebook to make copies of it Making 2 one sided copies from 2 facing pages Erasing the surrou...

Страница 30: ...Your copier has a large capacity tray and a unit for two sided copying and a 20 bin sorter Making two sided copies from an odd number of one sided originals Sorting into sets 123 123 123 Because you...

Страница 31: ...SETTING ORIGINALS f eu 4 29...

Страница 32: ...0 and 52 g m2 the document feeder must be set to Thin Original mode See page 130 S Originals larger than A3 S Originals smaller than B5 S Originals smaller than B5 sideways when you use Combine Origin...

Страница 33: ...en cover or the op tional document feeder 2 Set the original face down on the exposure glass The original should be aligned to the rear left corner 3 Lower the platen cover or the op tional document f...

Страница 34: ...e page 130 1 Correct any curl fold or crease in the originals before setting 2 Confirm that the Insert Original indicator is lit before setting the originals 3 Confirm that no previous originals remai...

Страница 35: ...S Do not stack originals above the limit mark f eu 4 SETTING A STACK OF ORIGINALS IN THE OPTIONAL DOCUMENT FEEDER 33...

Страница 36: ...s lit before setting the originals 3 Confirm that no previous originals remain on the exposure glass 4 Adjust the guide to the original size 5 Set the original face up into the document feeder until t...

Страница 37: ...riginal The original is auto matically fed and copied S If you have set more than two origi nals the Auto Feed indicator is not lit after the last original is fed In this case press the Start key agai...

Страница 38: ...f eu 4 SETTING ONE ORIGINAL AT A TIME IN THE OPTIONAL DOCUMENT FEEDER 36...

Страница 39: ...COPYING f eu 5 37...

Страница 40: ...In The Stand by Position 1 Turn on the main switch 2 Wait for the copier to warm up During the warm up period less than 80 seconds the Wait indicator is on 3 After the warm up the Ready indicator ligh...

Страница 41: ...originals in the optional document feeder Opening or closing the bypass feed table Setting copy paper in the bypass feed table Pressing any key except the Start key When The Copier Is Set For User Cod...

Страница 42: ...ing the Number keys S To change the number entered press the Clear Stop key then enter the new number 3 Confirm that the Auto Paper Se lect indicator is on If not press the Auto Paper Select key or se...

Страница 43: ...als adjust the image density Auto image density If the Auto Image Density indi cator is lit the copier automat ically controls the image density If the indicator is not lit press the Auto Image Densit...

Страница 44: ...pressing the Start key If not the original size might not be detected correctly S Regarding functions that cannot be used together with this function see page 86 Example 1 When making full size copies...

Страница 45: ...e Auto Paper Select indicator is lit If not press the Auto Paper Select key 2 Select 71 using the Reduce key 3 Set your original on the exposure glass or in the optional document feeder See page 31 32...

Страница 46: ...e that the platen cover or optional document feeder is lowered before pressing the Start key If not the original size might not be detected correctly S Regarding functions that cannot be used together...

Страница 47: ...from the bypass feed table S Translucent paper should be fed so that the paper grain is oriented with the paper path S Postcards should be fed from the bypass feed table Correct any curls they might...

Страница 48: ...ides to the pa per width and if necessary swing out the extender to support large size copy paper 5 Insert the copy paper into the by pass feed table S Approximately 40 sheets of copy pa per 80g m2 ca...

Страница 49: ...op ier will stop the copy run and store the present settings in the memory The copier will return to the ready condition 2 Remove the previous original Set your original for interrupt copying on the e...

Страница 50: ...the original table 4 Make your copies 5 After interrupt copying is com pleted press the Interrupt key The copier will recall the previous copy settings 6 Some originals in the exit stack step 2 weren...

Страница 51: ...larging using preset ratios Reducing Press the Reduce key to select the preset reducing ratios The reducing ratio will change as follows 93 82 75 71 65 50 Enlarging Press the Enlarge key to select the...

Страница 52: ...ging with the number keys 10 key Zoom Note Before using the 10 Key Zoom you have to change copier s default settings with the user tools See page 127 If you select the 10 Key Zoom the Size Magnificati...

Страница 53: ...ter key Fitting the original to a copy of a different size Size Magnification Note If you select the 10 Key Zoom using the user tool you cannot use Size Magnification See page 50 The suitable reproduc...

Страница 54: ...999 mm can be entered S To change the number entered press the Clear Stop key and enter the new number 3 Press the Recall Enter key 4 Enter the copy size using the Number keys 5 Press the Recall Enter...

Страница 55: ...Start key during the warm up period the Ready indicator will blink then the copier will start copying after the warm up period Set your copy settings during warm up pe riod then press the Start key S...

Страница 56: ...your originals S Original sizes sideways only that can be used are as follows A4 A5 B5 S Please refer to the following table when you select the copy paper size and re production ratio Original Copy...

Страница 57: ...de down as shown in the illustration to make copies that read from left to right S If you want to make copies that read from right to left set your originals as usual 3 Select the copy paper size usin...

Страница 58: ...eder S Regarding functions that cannot be used together with this function see page 86 1 Press the Single Copies key to light the 2 Sided Original indica tor 2 Set your originals in the optional docum...

Страница 59: ...together with this function see page 86 1 Press the Single Copies key to light the Book Original indicator 2 Start with the last page of your book original and work your way to the beginning Place the...

Страница 60: ...original in the optional document feeder See page 32 or 34 3 Select the copy paper size using the Paper Selection key 4 Press the Start key f eu 5 1 2 3 4 MAKING ONE SIDED COPIES FROM VARIOUS ORIGINAL...

Страница 61: ...tional document feeder Note The copier can also copy the back cover of the originals Set the copier with the user tools See page 126 If you do see page 60 S Regarding functions that cannot be used tog...

Страница 62: ...document feeder See page 32 5 Press the Start key Copying The Front And Back Covers Of The Originals Note This function can be used only when your copier is equipped with the op tional document feede...

Страница 63: ...r that is identical in size and direction with the paper to which you are copy ing step 3 3 Select copy paper using the Pa per Selection key S You cannot select the large capacity tray 4 Set your orig...

Страница 64: ...nctions that cannot be used together with this function see page 86 1 Press the Cover Slip Sheet key to light the Blank Cover indica tor 2 Set paper for cover sheets in the bypass feed table Make sure...

Страница 65: ...See page 126 If you do not select this setting only the front cover is added See page 62 S Regarding functions that cannot be used together with this function see page 86 1 Press the Cover Slip Sheet...

Страница 66: ...ss the Start key Inserting Slip Sheets Between OHP Transparencies OHP Slip Sheet S Regarding functions that cannot be used together with this function see page 86 1 Set the slip sheets in the 250 shee...

Страница 67: ...t air between the sheets before loading 3 Press the Cover Slip Sheet key to light the OHP Slip Sheet indi cator 4 Using the Paper Selection key select the paper tray where you have set the slip sheets...

Страница 68: ...key See page 127 In this case this function cannot be used Erasing The Center Margin Of The Original Image Erase Center Erasing The Surrounding Area Of The Original Image Erase Border Erasing The Cen...

Страница 69: ...ons that cannot be used together with this function see page 86 1 Press the Erase key once to se lect the Erase Center twice to select the Erase Border or three times to select both of them 2 Set your...

Страница 70: ...ent put the sticker key name sheet for Margin Adjustment on the operation panel The sticker is enclosed as an accessory S The width of the margin can be changed with the user tools See page 128 S Rega...

Страница 71: ...Duplex key to set the copier to make two sided copies See pages 73 76 2 Press the Margin Adjustment Erase key once to set the left margin for the front side and the right margin for the back side S If...

Страница 72: ...g press the Program key again 3 While pressing the Recall Enter key press the Number key 1 2 3 4 or 5 that you want to store settings in S PE will be displayed on the copy counter if you select a prot...

Страница 73: ...1 Press the Program key 2 Enter the program number by pressing the Number key 1 2 3 4 or 5 S If you enter a program number not registered EP will be displayed on the copy counter S If you recall a pr...

Страница 74: ...press the Clear Stop key S While holding the Number key the program number P1 P2 P3 P4 or P5 to be unprotected appeared in the copy counter The settings remain as they were but are no longer pro tect...

Страница 75: ...ht 64 105 g m2 S Up to 50 copies 64 80 g m2 paper can be made at one time If you use 81 105 g m2 paper 30 copies can be made at one time S Regarding functions that cannot be used together with this fu...

Страница 76: ...key From An Odd Number Of One Sided Originals 1 Sided Originals odd S A right margin of 5 mm is set on the back side automatically S If you select the Odd Number setting when you have an even number...

Страница 77: ...Two Sided Originals 2 Sided Original Note It is recommended to use this function with the optional document feeder 1 Press the Duplex key to light the 2 Sided Original indicator 2 Set your original i...

Страница 78: ...2 Start with the last page of your book original and work your way to the beginning Place the original face down on the exposure glass and align the last page with the left scale Or set the facing or...

Страница 79: ...ight 93 g m2 157 g m2 90 g m2 90 g m2 Minimum paper weight 52 g m2 52 g m2 52 g m2 64 g m2 Maximum capacity of bins A4 or smaller 30 copies B4 or larger 15 copies A4 or smaller 30 copies B4 or larger...

Страница 80: ...e Note This function can be used only when your copier is equipped with the op tional 20 bin sorter stapler or 10 bin sorter stapler S If you select Stapling Sorting is automatically selected S You ca...

Страница 81: ...with the 20 bin sorter stapler you can select one of two stapling positions by changing the position of the stapler Open the front cover of the sorter stapler and perform the actions illustrated belo...

Страница 82: ...4 or larger 2 10 copies 2 20 copies Paper that cannot be used post cards translucent paper OHP transparencies and adhesive labels Stapling copies automatically after copying Note This function can be...

Страница 83: ...or 2 Place originals on the exposure glass or set originals in the op tional document feeder one sheet at a time S Start with the last page of the origi nals 3 Make your copies 4 After copying is comp...

Страница 84: ...ment change to copy paper with less curl S Regarding functions that cannot be used together with this function see page 86 S For Stacking the following limitations apply 20 bin sorter stapler 10 bin s...

Страница 85: ...Sorter key to light the Stack indicator 2 Set your original on the exposure glass or in the optional document feeder See page 31 32 or 34 3 Enter any other settings and make your copies f eu 5 FINISHI...

Страница 86: ...m others from mak ing copies using your user code press the Clear Stop and Clear Modes Energy Saver key simul taneously after copying S Regarding user codes see page 132 S To set your copier for user...

Страница 87: ...es 124 and 125 S Your service representative can select one of six levels for the saving ratio See page 139 The greater the saving ratio the more time the copier will need to return to the ready condi...

Страница 88: ...8 Auto Reduce Enlarge 9 10 Key Zoom 10 From Even One sided Originals 11 From Two sided Originals 12 From Book Original 13 From Odd One sided Originals 14 From Two sided Original 15 From Book Original...

Страница 89: ...17 18 19 20 21 22 23 24 25 26 1 2 3 4 5 6 7 8 9 10 11 12 13 14 15 16 17 18 19 20 21 22 23 24 25 26 These mode can be used only when you make copies with the same width f eu 5 5 Erase Reduce Enlarge T...

Страница 90: ...f eu 5 5 COMBINATION CHART 88...

Страница 91: ...WHAT TO DO IF SOMETHING GOES WRONG f eu 6 89...

Страница 92: ...t at all After loading a new staple cartridge staples might not be ejected the first few times you try to use the stapler There are jammed staples in the stapler Remove the jammed staples If you use t...

Страница 93: ...s side cover or large capacity tray U code is displayed on the copy counter U2 The copier is set for user codes Enter your user code 3 digits Insert the optional key counter Insert the optional key c...

Страница 94: ...e You cannot select the lengthwise copy paper for the book originals Select sideways copy paper You cannot select Auto Reduce Enlarge You cannot select Cover mode You cannot select Auto Paper Select W...

Страница 95: ...ly Use originals of a standard size If you use translucent or transparent originals or originals with tags the original size might not be detected correctly Do not use such originals Max indicator bli...

Страница 96: ...s dirty Clean them See pages 144 and 145 The reverse side of an original image is copied The image density is too dark Adjust the image density See page 41 Copies are too light The original has a low...

Страница 97: ...r S Load paper with the copy side down in the 250 sheet and 500 sheet trays and with the copy side up in the large capacity tray If copies are curled try turning the copy paper over in the tray If the...

Страница 98: ...aper tray Do not to stack paper above the limit mark inside the paper tray 3 When loading paper in the 250 sheet tray make sure that the leading corners of the paper are under the corners as shown in...

Страница 99: ...om plate The key will blink while the bottom plate is moving down S If the key is lit or blinking proceed to step 2 2 After the Down key stops blinking and lights open the cover 3 Load paper into the...

Страница 100: ...of the used toner bottle according to local regulations NOTE When adding toner do not turn off the main switch If you do your copy settings are cleared NOTE Before setting the new toner bottle shake...

Страница 101: ...wn in the illustration 1 Open the front door of the sorter stapler 2 You can find a sticker with at the top explaining how to add a staple cartridge inside the front cover as shown in the illustration...

Страница 102: ...r tridge push them back into the car tridge as shown in the illustration 1 Open the front cover of the sorter stapler 2 You can find a sticker with on the tab explaining how to add a staple cartridge...

Страница 103: ...When clearing misfeeds do not turn off the main switch If you do your copy settings are cleared NOTE After clearing misfeeds make sure that all units and levers are returned to their original positio...

Страница 104: ...ing how to re move misfed paper inside the front cover as shown in the illus tration 3 Remove misfed paper following the instructions on the sticker When R Is Lit If your copier is equipped with the 2...

Страница 105: ...follow ing the instructions on the sticker If your copier is equipped with the 20 bin sorter 1 Open the top cover of the sorter 2 You can find a sticker with at the top explaining how to re move misfe...

Страница 106: ...llow ing the instructions on the sticker When P Is Lit Original Misfeed 1 You can find a sticker explaining how to remove the misfed paper on the optional document feeder as shown in the illustration...

Страница 107: ...Open the front cover of the sorter stapler 2 You can find a sticker with at the top explaining how to re move jammed staples inside the front cover as shown in the illus tration 3 Remove the jammed st...

Страница 108: ...ver of the sorter stapler 2 You can find a sticker with on the tab explaining how to re move jammed staples inside the front cover as shown in the illus tration 3 Remove the jammed staples fol lowing...

Страница 109: ...CHANGING THE COPIER S SETTINGS f eu 7 107...

Страница 110: ...ustrations below and on the next page Then when you come upon the paper tray s name e g 1st tray as used for example in the user tools section of this manual check the instructions to see which paper...

Страница 111: ...nd optional 500 sheet tray unit LCT With large capacity tray and unit for two sided copying LCT With large capacity tray and optional 1000 sheet tray unit LCT With large capacity tray and unit for two...

Страница 112: ...ct paper of the following size A3 lengthwise B4 lengthwise A4 lengthwise A4 sideways B5 lengthwise B5 sideways A5 sideways 81 2 x 11 lengthwise 81 2 x 11 sideways 11 x 17 lengthwise 81 2 x 13 lengthwi...

Страница 113: ...ion 5 Load paper in the tray S Do not stack paper over the limit mark 6 While pressing the release levers on the front and rear guides slide the front and rear guides to the paper size you want to use...

Страница 114: ...8 Push the paper tray in until it stops f eu 7 CHANGING PAPER SIZE 112...

Страница 115: ...rd tray 1 A3 lengthwise 4th tray 3 A4 sideways 5th tray 3 A4 sideways Bypass feed table 0 Paper size the copier detects S With 1000 sheet large capacity tray and unit for two sided copying Paper feed...

Страница 116: ...81 2 x 11 sideways 12 81 2 x 11 lengthwise 13 267 x 390 mm lengthwise 14 195 x 267 mm sideways 15 195 x 267 mm lengthwise S Bypass feed table The bypass feed table can be set to only one size Setting...

Страница 117: ...when you change the paper size of the optional paper tray 1 Pull the paper tray out until it stops 2 Remove the copy paper 3 Remove the left guide as shown in the illustration 4 Set the left guide to...

Страница 118: ...the front and rear guides to the paper size you want to use When you have a 250 sheet tray unit While pressing the release levers on the front and rear guides slide the front and rear guides to the pa...

Страница 119: ...ill be lit B Enter the required setting paper size using the Number keys and press the Recall Enter key S See page 114 for the settings pa per size S Example Paper size Setting A3 lengthwise 1 A4 side...

Страница 120: ...until the copy counter blinks 3 Enter the required user tool s number using the Number keys S For the user tool s number refer to pages 121 to 138 Example 1 Paper size set S If you input the wrong nu...

Страница 121: ...2 The default setting will blink in the Three Digit indicator Enter the required setting using the Num ber keys S For the settings refer to pages 121 to 138 S If you input a wrong number press the Cle...

Страница 122: ...4 To exit the user tools press the Clear Modes Energy Saver key twice f eu 7 2 3 C USER TOOLS 120...

Страница 123: ...set is turned on or after pressing the Clear Modes Energy Saver key You can cancel this setting and select another tray S For how to change the paper tray see page 119 Basic Default 1st tray Setting 1...

Страница 124: ...selection As a default setting Auto Paper Select is on You can cancel this setting S For how to change modes see page 119 Default Yes APS priority is selected Setting 1 Setting Mode 0 No APS priority...

Страница 125: ...t Yes Auto tray shift is selected Setting 1 Setting Definition 0 No Auto tray shift is not selected 1 Yes Auto tray shift is selected 6 Counter up down The copy counter can be set to show the number o...

Страница 126: ...for two sided copying There are originals in the optional document feeder When the copier detects anyone operating it While waiting for Auto Start While accessing the user tools When the u Wait indic...

Страница 127: ...y is pressed or since the copier detects anyone who operates the copier S To enter Auto off mode manually see page 85 S To exit the Auto Off see page 39 S For how to change settings see page 119 Defau...

Страница 128: ...selected 12 Image density level selection Auto Image Density levels can be adjusted to lighter or darker S For how to change settings see page 119 Default Normal Setting 1 Setting Definition 0 Darker...

Страница 129: ...Default Erase Setting 1 Setting Mode 1 Erase 2 Shift Margin Adjustment 15 10 key zoom size magnification You can switch to the 10 Key Zoom function instead of the Size Magnifica tion function S For h...

Страница 130: ...key you will find 1 blinking in the copy counter You can set the left margin width Enter the required margin width and press the Recall Enter key How to make the right margin After entering user tool...

Страница 131: ...adjust the center margin width in Erase Center mode S The erased center margin change a little depending on the paper size you use S For how to change settings see page 119 Default 20 mm Setting 20 Se...

Страница 132: ...When you make one sided copies from one sided originals using this function the copying speed will be reduced S For how to change settings see page 119 Default No Different sized originals cannot be...

Страница 133: ...r Select Original Size Paper Size to be selected B4 lengthwise 267 x 390 mm lengthwise A4 lengthwise 195 x 267 mm lengthwise B5 sideways 195 x 267 mm sideways S For how to change modes see page 119 De...

Страница 134: ...g 23 User code counter check You can check the number of copies made using each user code How to check the copy count 1 Access user tool 23 See page 118 2 chuired The lowest user code appears on the c...

Страница 135: ...he total copy quantity made under this user code are displayed in the Three Digit indi cator Example when 123456 copies are made under one user code 456 is displayed in the Three Digit indicator while...

Страница 136: ...ks on the copy counter S If you find 2 is blinking press the Zoom Down key 1 will blink on the copy counter 3 Enter the user code for which you want to reset the counter S If you input the wrong code...

Страница 137: ...eset all user code counters 1 Access user tool 24 See page 118 2 Press the Zoom Up key to display 2 on the copy counter 3 Press the Recall Enter key f eu 7 C Max 1 4 7 2 5 8 0 3 6 9 R j Max 0 R USER T...

Страница 138: ...tered How to register user codes 1 Access user tool 25 See page 118 2 Enter the user code with the Number keys S If you input the wrong code press the Clear Stop key Then input the correct code 3 Pres...

Страница 139: ...copy counter S If 2 blinks press the Zoom Down key 1 will appear on the indica tor 3 Enter the user code you want to delete S If you input the wrong code press the Clear Stop key Then input the correc...

Страница 140: ...1 Access user tool 26 See page 118 2 Press the Zoom Up key to display 2 on the copy counter 3 Press the Recall Enter key S The counters for all user codes are also deleted f eu 7 C Max 1 4 7 2 5 8 0...

Страница 141: ...e exposure glass as A5 lengthwise whenever the copier cannot detect it with Auto Paper Select APS size priority 81 2 x 13 As a default setting when you use 81 2 x 13 originals the copier selects the s...

Страница 142: ...l operate The copier keeps a count of the number of copies made under each user code Also your service representative can check how many user codes are stored in the copier S For setting user codes an...

Страница 143: ...unction Your service representative can cancel this setting and the last copy will instead be stored in the unit for two sided copying until you press the Start key Maximum sorter bin capacity With th...

Страница 144: ...f eu 7 SERVICE REPRESENTATIVE SETTING 142...

Страница 145: ...MAINTAINING YOUR COPIER DO S AND DON TS WHERE TO PUT YOUR COPIER REMARKS USE AND STORAGE OF SUPPLIES f eu 8 143...

Страница 146: ...llowing parts and units regularly Copier Exposure glass Clean the exposure glass with a damp cloth and wipe it with a dry cloth Platen cover option in some areas Clean the platen cover with a damp clo...

Страница 147: ...in unit Clean the original table and origi nal guide with a damp cloth and wipe it with a dry cloth Belt Lift the document feeder Clean the belt with a damp cloth and wipe it with a dry cloth f eu 8...

Страница 148: ...ur copy settings are cleared S Before setting the new toner bottle shake it well at least 5 or 6 times S Do not remove the inner cap of the new toner bottle When removing misfed paper S Since some par...

Страница 149: ...ouch moving bins S Do not place object on the sorter when it is open S Do not press the sorter when it is open WHERE TO PUT YOUR COPIER Copier Environment Your copier s location should be carefully ch...

Страница 150: ...ion S Connect the copier to a power source meeting the specifications given on the inside front cover of this manual S Avoid multiwiring S Make sure that the wall outlet is near the copier and easily...

Страница 151: ...t trays and with the copy side up in the large capacity tray If copies are curled try turning the copy paper over in the tray If there is no improvement change to copy paper with less curl S Leading a...

Страница 152: ...e Stack copies in the proof tray 20 bin Sorter Option S To avoid problems caused by curly copies try turning over the paper stack in the 250 sheet 500 sheet or large capacity tray If there is no impro...

Страница 153: ...cies should be fanned to get air between the sheets before load ing S Translucent paper should be fed from the bypass feed table S Translucent paper should be fed so that the paper grain is oriented w...

Страница 154: ...For more information contact your service representative 1 Turn off the main switch and unplug the copier 2 Open the front cover 3 Swing out the toner bottle holder and remove the knob screw with hand...

Страница 155: ...SPECIFICATIONS f eu 9 153...

Страница 156: ...mm for a tray One large capacity tray 1 000 sheets or less than 120 mm Bypass feed table 40 sheets or less than 4 mm With large capacity tray unit for two sided copy ing One 250 sheet tray less than...

Страница 157: ...kW Stand by 0 15 kW 0 17 kW Copying 0 8 kW 0 8 kW Maximum 1 45 kW 1 5 kW Full system Copier with document feeder 20 bin sorter stapler and paper tray unit Noise Emission Sound pressure level The measu...

Страница 158: ...der and 20 bin sorter stapler 1260 mm 655 mm 692 mm With document feeder and 10 bin sorter stapler 1229 mm 655 mm 692 mm With document feeder and 20 bin sorter 1194 mm 655 mm 692 mm With document feed...

Страница 159: ...P P A4 lengthwise P P P P sideways O O O O A5 lengthwise P P P P sideways O O O O B4 lengthwise P P P P B5 lengthwise P P P P sideways O O O O B6 lengthwise sideways O ARDF 2 sided originals ADF 1 si...

Страница 160: ...See page 80 Proof tray capacity 100 sheets 52 80 g m2 50 sheets 81 128 g m2 30 sheets 129 157 g m2 Number of bins 20 bins proof tray Stapling position Staple replenishment Cartridge exchange 3 000 pi...

Страница 161: ...y 100 sheets 52 80 g m2 50 sheets 81 128 g m2 30 sheets 129 157 g m2 Number of bins 10 bins proof tray Stapling position Staple replenishment Cartridge exchange 2 000 pieces cartridge Power source DC...

Страница 162: ...H 346 x 474 x 338 mm S Specifications are subject to change without notice 10 BIN SORTER OPTION Paper size for bins Sorting See page 77 Stacking See page 82 Paper weight for bins Sorting See page 77...

Страница 163: ...x 390 mm S Specifications are subject to change without notice 1000 SHEET TRAY UNIT OPTION Paper size See pages 113 and 114 Paper weight 52 105 g m2 Paper capacity 1 000 sheets 500 sheets 80 g m2 for...

Страница 164: ...Path indicator 90 Check Paper Size indicator 92 Check Paper Size Direction indica tor 93 Combine Originals 54 COPIER EXTERIOR AND INTE RIOR 4 5 copies enlarged 49 copies reduced 49 copies two sided 24...

Страница 165: ...ple reset time set 129 Margin Adjustment 23 68 69 MAX indicator 93 Maximum copy quantity set 123 Misfeeds 93 misfeeds clearing 101 104 MODELS 2 Basic 2 With 1000 sheet large capacity tray 2 With 1000...

Страница 166: ...r Storage 152 toner adding 98 146 two sided copies 73 76 from even number of one sided originals 73 from facing pages book original 76 from odd number of one sided originals 74 from two sided original...

Отзывы: