background image

ESPAÑOL

59

RADIO

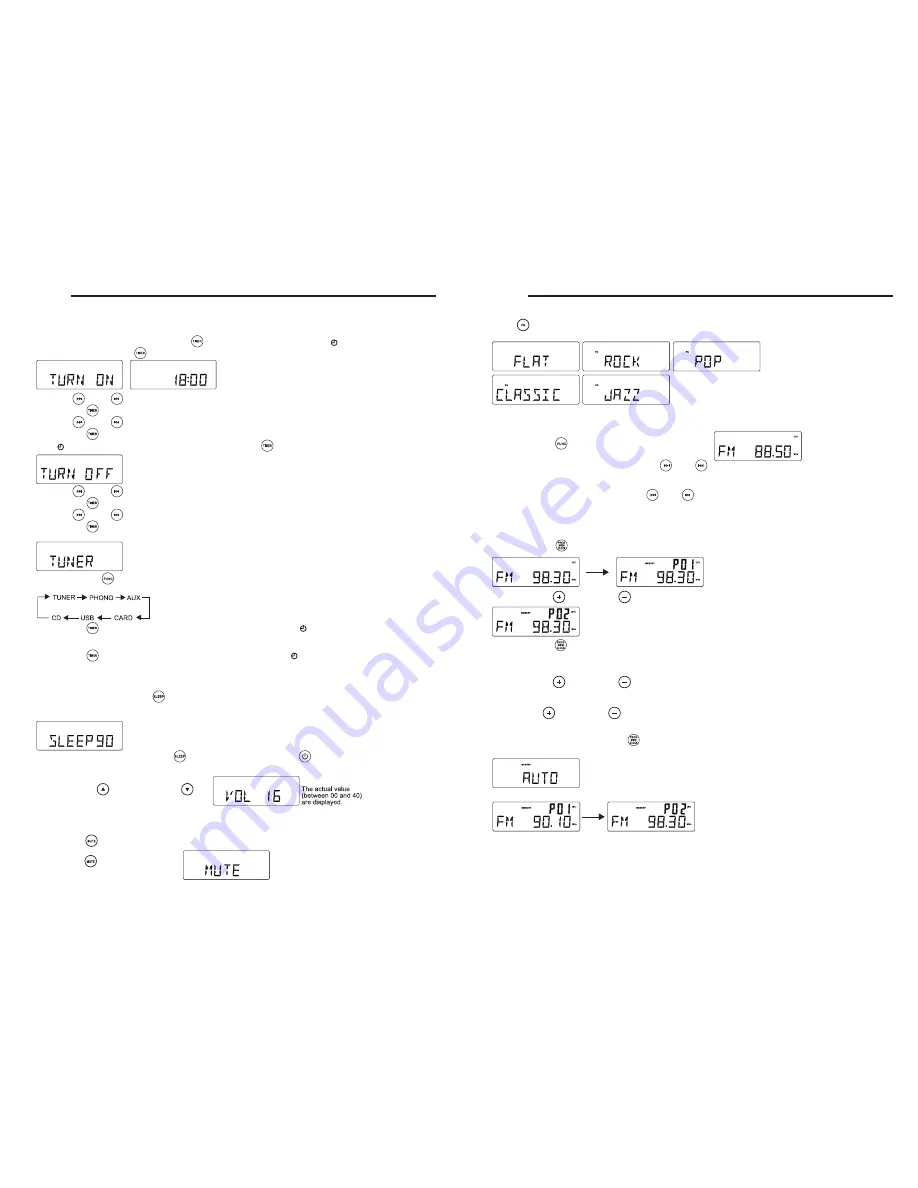
Sintonizador FM

1. Pulse

FUNCTION

/

 para ajustar la unidad al modo FM.

2. Sintonización automática – Mantenga pulsado 

FF

 / 

 o 

FB

/

 hasta que la frecuencia comience a sintonizar 

automáticamente la radio a una emisora con la suficiente recepción. Si una emisora es recibida en estéreo, (ST) será 
visualizado. Si fuese necesario, repita el paso 3 hasta encontrar la emisora deseada.

3. Sintonización manual – Pulse brevemente 

FF

 / 

 o 

FB

/

 y repita hasta encontrar una emisora.

Programación de emisoras de radio

Puede almacenar hasta un máximo de 40 emisoras de radio (FM y AM) en la memoria, manual o automáticamente
(almacenamiento automático)
1. Sintonice la emisora deseada

2. Pulse

PROGRAM

/

 para activar la programación. El icono "MEMORY" y P01 comenzarán a parpadear.

3. Pulse


/

 o 

PRESET – 

/

 para asignar un número de 1 a 20 emisoras.

4. Pulse

PROGRAM

/

 para confirmar. La pantalla muestra el número de banda preajustada y la frecuencia de la estación

preajustada.

5. Repita los pasos 1 a 4 para guardar otras emisoras para escuchar una emisora preajustada.

Pulse


/

 o 

PRESET – 

/

 una o más veces hasta que la emisora preajustada deseada sea visualizada.

Para escuchar una emisora preajustada

Pulse


/

 o 

PRESET – 

/

 una o más veces hasta que la emisora preajustada deseada sea visualizada.

La programación automática de emisoras de radio programará presintonías a partir del número 1 en adelante de forma
automática. Las presintonías antiguas serán eliminadas.

1. Mantenga pulsado el botón 

PROGRAM

/

hasta que aparezca Auto

-

El icono "memory" comenzará a parpadear

-

Las emisoras disponibles son programadas

-

Una vez almacenadas todas las emisoras, la última emisora preajustada será reproducida

ANTENA

Antena: para la recepción FM, la unidad dispone de un CABLE DE ANTENA FM. Mueva el cable hasta que la recepción
sea nítida y sin interferencias.

ECUALIZADOR

Pulse

EQ

/

en el mando a distancia para seleccionar el modo de ecualizador deseado.

Existen disponibles 5 modos de ecualizador preajustados:

ENGLISH

6

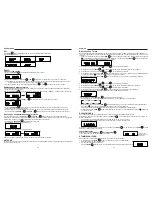
Setting the timer

The unit can be used as an alarm clock, whereby the selected source (CD, TUNER, USB, SD CARD OR PHONO) to start
playback at a preset time. Make sure the clock is set before using the timer.

1. In the standby mode, press and hold 

TIMER

 / 

 on the remote over 1 second, icon " " and message” TURN ON” 

start flashing. Press 

TIMER

 / 

again on the remote to begin the “SYSTEM POWER ON” timer setting.

2. Press

FF

 / 

 or 

FB

/

 repeatedly to set hours.

3. Press

TIMER

 / 

 on the remote to enter minutes setting mode.

4. Press

FF

 / 

 or 

FB

/

 repeatedly to set minutes.

5. Press

TIMER

 / 

 on the remote again to begin “SYSTEM POWER OFF” timer setting.

Icon  " " and message “TURN OFF” start flashing. Press 

TIMER

 / 

 on the remote again to begin timer setting.

6. Press

FF

 / 

 or 

FB

/

 repeatedly to set hours.

7. Press

TIMER

 / 

on the remote to enter minutes setting mode.

8. Press

FF

 / 

 or 

FB

/

 repeatedly to set minutes.

9. Press

TIMER

 / 

 on the remote again to begin setting the source from wake up.

Default at TUNER mode. Message TUNER start flashing.

10. Press

FUNCTION

 / 

 to select wake up source.

The unit will be waked up from last tuned station if TUNER mode is selected.

11. Press

TIMER

 / 

 on the remote again to complete timer on/off setting. Icon " " will keep display on LCD if timer is 

set.
Note: The wake up sound level will be increased gently to preset volume level.

12. Press 

TIMER

 / 

 on the remote control to turn on/off the timer. The icon  " " will be on/off respectively.

SLEEP

You can set a certain period of time after which the set will switch to standby.

On the remote control, press 

SLEEP / 

repeatedly to select the desired time period options (in minutes):

-

Display shows in sequence: SLEEP 90, 80, 70, 60, 50, 40, 30, 20, 10

-

Display shows the selected option briefly and returns to its previous status.

To deactivate the sleep timer, press 

SLEEP / 

again to “00 “ or Press 

POWER

/

 to switch the unit into standby mode.

Volume control

Press

VOLUME UP

 / 

 / 

VOLUME DOWN

 / 

on the remote control to adjust the volume.

MUTE

You can temporarily switch off the sound without switching off the unit.

1. Press

MUTE

 / 

 on the remote control to switch off the sound, playback continues without sound.

2. To switch on the sound , you can:

-

press

MUTE

 / 

 again;

-

adjust the volume controls;

-

change source

Содержание RR3100

Страница 1: ...1 0 44 48 2 5 97 3 86 A...

Страница 2: ...IENTE En caso de dudas o problemas con su producto Ricatech contacte con el servicio de atenci n al cliente de Ricatech Para m s informaci n sobre el procedimiento completo visite el sitio web de Rica...

Страница 3: ...ate normally or exhibits a marked change inperformance or E The appliance has been dropped or the enclosure damaged 18 Servicing The user should not attempt to service the appliance beyond that descri...

Страница 4: ...O Aumentar ROJO Disminuir ROJO Brillo 8 en total VERDE G VERDE CLARO AZUL AZUL CLARO Aumentar VERDE Disminuir VERDE R G B W FLASH STROBE FADE SMOOTH DIY Brillo 8 en total rojo Naranja Amarillo oscuro...

Страница 5: ...l icono del dispositivo objetivo USB o CARD comenzar a parpadear El n mero decimal aumentar a partir de 01 al comenzar la copia MP3 El proceso se detendr una vez alcance 100 5 El archivo MP3 actual se...

Страница 6: ...e PRESET o PRESET para seleccionar el lbum deseado 5 Pulse STOP para detener la reproducci n PROGRAMACI N DE PISTAS Puede almacenar hasta un m ximo de 20 pistas en la secuencia deseada 1 En la posici...

Страница 7: ...antalla 5 Pulse PRESET o PRESET para seleccionar el lbum deseado 6 Pulse STOP para detener la reproducci n Funcionamiento de la tarjeta SD 1 Pulse FUNCTION para ajustar la unidad en el modo TARJETA 2...

Страница 8: ...6 Setting the timer The unit can be used as an alarm clock whereby the selected source CD TUNER USB SD CARD OR PHONO to start playback at a preset time Make sure the clock is set before using the tim...

Страница 9: ...porizador CONEXI N DEL SISTEMA 2 Pulse repetidamente FF o FB para ajustar las horas 3 Pulse TIMER en el mando a distancia para introducir el modo de ajuste de los minutos 4 Pulse repetidamente FF o FB...

Страница 10: ...ar 7 Pulse PROGRAM para seleccionar entre el formato de 12 y 24 horas tal y como se muestra a continuaci n ESPA OL USB SD CARD OPERATION USB operation 1 Press the FUNCTION to set the unit to USB mode...

Страница 11: ...TOP to stop playback PROGRAMMING TRACKS You may store up to 20 tracks in the desired sequence 1 In the stop position press PROGRAM to start programming Icon MEMORY and P0 01 start flashing 2 Press FF...

Страница 12: ...ack 2 icon REC displayed 3 Message COPY 01 will be displayed the proportional copied percentage will be shown on the decimal number 4 The target device icon USB or CARD start flashing the decimal numb...

Страница 13: ...yellow Increase red Decrease red Brightness 8 in all green light green Static cyan light blue Increase green Decrease green DIY adjustment of colour by the user 3 colour slow colour change 7 colour fa...

Страница 14: ...as aberturas de la carcasa 17 Da os que precisan reparaciones Este aparato debe llevarse al servicio t cnico cuando A El cable de la corriente o la clavija est n da ados B Hayan ca do objetos o l quid...

Страница 15: ...Please visit www ricatech com for contact information of our service department ALEM N 52 KUNDENBETREUUNG Sollten Sie eine Frage oder ein Problem mit Ihrem Ricatech Produkt haben k nnen Sie sich an d...

Страница 16: ...het apparaat wordt gebruikt 2 Instructies bewaren De veiligheids en bedieningsinstructies moeten worden bewaard voor raadpleging in de toekomst 3 Aandacht besteden aan waarschuwingen Alle waarschuwing...

Страница 17: ...angezeigt OPTIONALE EXTERNE LAUTSPRECHER 1 Mit Ihrem neuen Radio haben Sie die M glichkeit zus tzliche externe Lautsprecher anzubringen 2 Die Lautsprecherbuchsen zum Anschluss externer Lautsprecher be...

Страница 18: ...n Sie die Taste FUNCTION um das Ger t in den PHONO Modus zu schalten 2 Dr cken Sie die Taste REC um mit dem Kopiervorgang zu beginnen Das System wird den Inhalt des USB Ger ts der SD Karte scannen und...

Страница 19: ...ngezeigt w hrend der CD Spieler den Inhalt der CD scannt 2 Der erste Titel des Root Ordners Ordner 1 wird nach dem Auslesen des Inhalts der MP3 CD automatisch abgespielt 3 Dr cken Sie die Taste FF ode...

Страница 20: ...n Sie ihn an der Stelle ab an der Sie die Schallplatte starten m chten 5 Zum Ende derAufnahme h lt der TONARM automatisch an Sie m ssen den Tonarm per Hand zur TONARMABLAGE zur cksetzen MITGELIEFERTES...

Страница 21: ...zetten Volume control Volumeregeling Druk op VOLUME UP VOLUME DOWN op de afstandsbediening om het volume te regelen DEMPEN U kunt het geluid tijdelijk uitschakelen zonder het apparaat uit te schakele...

Страница 22: ...an und kehrt zum vorherigen Zustand zur ck Dr cken Sie zum Deaktivieren des Sleep Timers erneut die Taste SLEEP bis 00 oder die Taste POWER um das Ger t in den Standby Modus zu schalten Lautst rkeregl...

Страница 23: ...et afspelen van een 45 toerenplaat verwijdert u de adapter door duim wijsvinger in de uitsparingen te plaatsen en de adapter omhoog te trekken Plaats hem vervolgens op de SPIL Daarna kunt u de plaat o...

Страница 24: ...D MP3 afspelen 1 Plaats een CD in MP3 formaat Druk opnieuw op CD OPEN CLOSE om het compartiment te sluiten READ wordt weergegeven terwijl de CD speler de inhoud van een disc scant 2 Track nr 1 van de...

Страница 25: ...s te zetten 2 Druk op REC om het rippen te starten het systeem scant de inhoud van USB SD kaart en maakt een map om de MP3 tracks op te slaan 3 Het pictogram REC en het bericht RIPP TO worden weergege...

Страница 26: ...en wordt verwijderd 2 Het bericht delete wordt weergegeven OPTIONELE EXTERNE LUIDSPREKERS 1 U kunt optioneel externe luidsprekers toevoegen aan uw nieuwe radio 2 De luidsprekeraansluitingen voor exte...

Страница 27: ...rden 3 Beachten Sie die Warnungen Alle Warnhinweise auf dem Ger t und in der Bedienungsanleitung sollten beachtet werden 4 Befolgen Sie die Anweisungen Alle Bedienungs und Gebrauchsanleitungen sollten...

Страница 28: ...vec votre produit Ricatech Pour la proc dure compl te veuillez consulter le site internet de Ricatech l adresse www ricatech com 26 NEDERLANDS KLANTENONDERSTEUNING U kunt contact opnemen met Ricatech...

Страница 29: ...l C L appareil a t expos la pluie D L appareil ne fonctionne pas normalement ou pr sente une modification dans son fonctionnement E L appareil est tomb ou le bo tier est endommag 18 R parations L util...

Страница 30: ...Luminosit 8 au total rouge Orange Jaune fonc jaune Accentuer le rouge Diminuer le rouge Luminosit 8 au total vert Vert clair Bleu cyan Bleu clair Accentuer le vert Diminuer le vert DIY r glage des co...

Страница 31: ...e 3 Le message COPY 01 s affiche le pourcentage proportionnel copi est affich en nombre d cimal 4 L ic ne du p riph rique cible USB ou CARD se met clignoter le nombre d cimal est incr ment partir de...

Страница 32: ...jusqu 20 pistes dans l ordre souhait 1 Sur la position d arr t appuyez sur PROGRAM pour d marrer la programmation L ic ne MEMORY et P0 01 se mettent clignoter 2 Appuyez sur FF ou FB une seule ou plus...

Страница 33: ...t d s que la lecture du contenu du p riph rique USB est termin e 4 Appuyez sur FF ou FB une seule ou plusieurs fois jusqu ce que le num ro de piste souhait apparaisse sur l cran 5 Appuyez sur PRESET o...

Страница 34: ...ntenez appuy e la touche TIMER sur la t l commande plus d 1 seconde l ic ne et le message TURN ON se mettent clignoter Appuyez sur TIMER nouveau sur la t l commande pour commencer le r glage du r veil...

Отзывы: