background image


VSP 1314                User  Manual   


   76


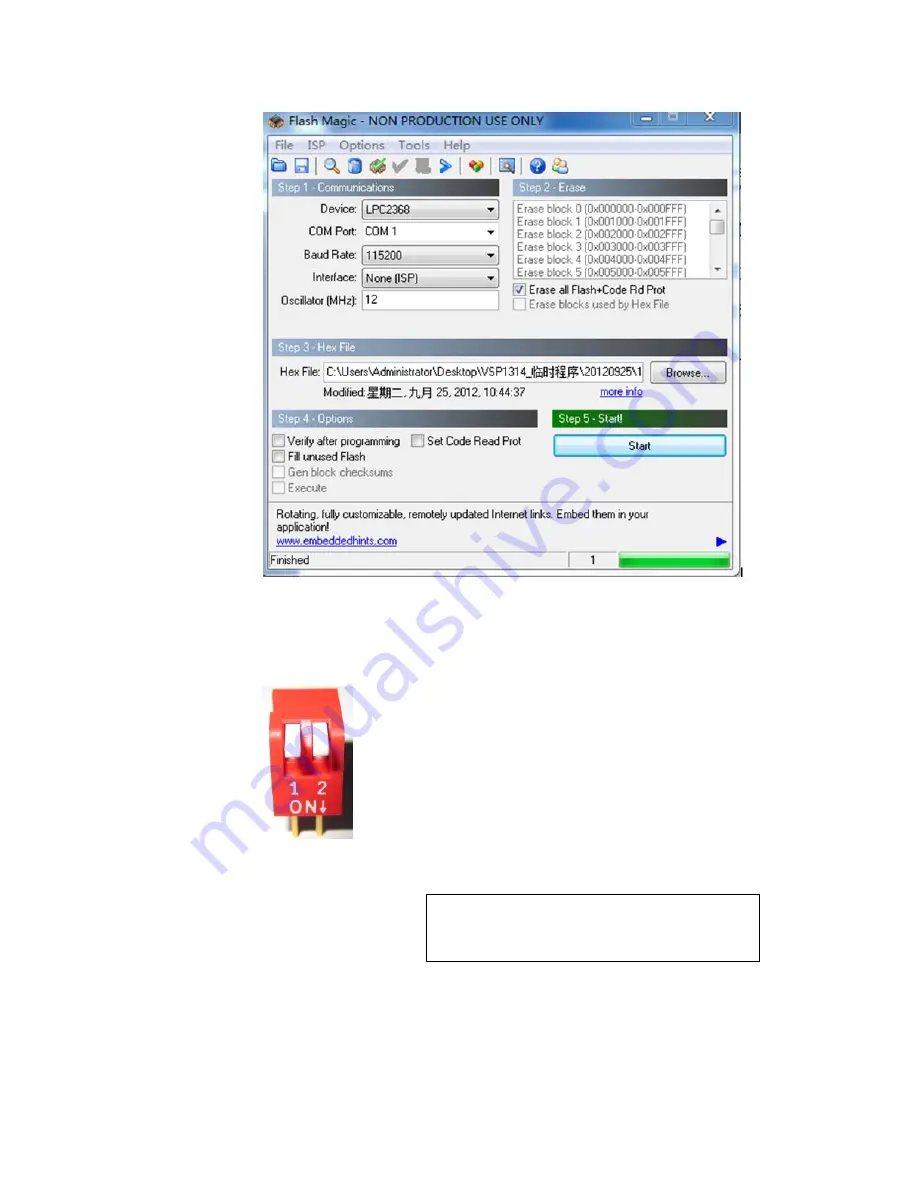
When download is finish, quit, shut the power equipment, reset two dial 

code reset (as shown in figure), restart the power equipment, check 

whether the equipment operate or not.   


Note 

Flash Magic software download website: 

http://www.flashmagictool.com/download.html&d

=FlashMagic.exe


Содержание VSP 1314

Страница 1: ...VSP 1314 User Manual 1 VSP 1314 User Manual Manual RGB RD UM V1314 E001 Revision V1 1...

Страница 2: ...described in this publication at any time without notice This publication could contain technical inaccuracies or typographical errors Changes are periodically made to the information in this publica...

Страница 3: ...ies guaranteed in writing or due to the intent or gross negligence or part of RGBlink If the purchaser or a third party carries out modifications or repairs on goods delivered by RGBlink or if the goo...

Страница 4: ...P R C Shenzhen office Building 3 A Baiwang Plaza Xili Nanshan District Shenzhen Guangdong Province P R C Beijing office Room 602 Building 7 Caimanjie No 69 Chaoyang District Beijing China Shanghai of...

Страница 5: ...ation Grounding the Product This product is grounded through the grounding conductor of the power cord To avoid electrical shock plug the power cord into a properly wired receptacle before connecting...

Страница 6: ...strictly observed could result in injury to or death of personnel Note CAUTION The exclamation point within an equilateral triangle is intended to alert the user to the presence of important operatin...

Страница 7: ...al 7 Change History The table below lists the changes to the Video Processor User Manual Format Time ECO Description Principal V1 0 2012 10 12 0000 Release BIN V1 1 2013 01 07 0001 Buttom modify Chang...

Страница 8: ...15 System Overview 20 Application Questions 21 2 Hardware Orientation 22 In This Chapter 22 VSP 1314 Rear Panel 23 INPUT Interface 23 1 USB Input 23 2 5 CVBS Input 24 6 7 VGA Input 24 17 18 19 DVI Inp...

Страница 9: ...ard 25 16 26 DVI Input 25 20 DVI Output 25 21 DVI VGA DVI Output 25 Switch and Power 26 27 28 Power Interface and Switch 26 VSP 1314 Front Panel 27 LCD panel 28 Menu Buttons 28 3 Hardware Installation...

Страница 10: ...Key Pad Lock 43 MENU Factory Reset 43 EFFECT EFFECT Switching 43 5 System Setup and Operation 45 In This Chapter 45 How to connect equipment 46 How to make equipment normal operation 48 How to preview...

Страница 11: ...as background 60 How to splicing with DVI3 62 How to use BLACK 65 How to use Test Pattern 66 How to save parameter 67 How to load parameter 68 A Specification 69 B Contact Information 71 C Firmware U...

Страница 12: ...nual 12 1 Introduction This chapter is designed to introduce you to the VSP 1314 User Manual Areas to be covered are Chapter Structure How to use this manual Tems and Definitions System Overview Appli...

Страница 13: ...rs provide instructions for all aspects of VSP1314 operations Chapter 1 Introduction Chapter 2 Hardware Orientation Chapter 3 Hardware Installation Chapter 4 Menu Orientation Chapter 5 System Setup an...

Страница 14: ...abilities such as the Find tool and Search lndex tool to perform comprehensive searches as required Table of Contents and Index Use the Table of Contents bookmarks to navigate a desired topic Click an...

Страница 15: ...nts It includes the vertical sync horizontal sync and the chroma burst information Blackburst is used to synchronize video equipment to align the video output One signal is normally used to set up an...

Страница 16: ...igital Display Work Group This connection standard offers two different connectors one with 24 pins that handles digital video signals only and one with 29 pins that handles both digital and analog vi...

Страница 17: ...udio and control data at CD ROM bandwidth The MPEG algorithm provides inter frame compression of video images and can have an effective compression rate of 100 1 to 200 1 NTSC The color video standard...

Страница 18: ...ith the light upness saturation is the amount of pigment in a color and not the intensity Low saturation is like adding white to the color For example a low saturated red looks pink Scaling A conversi...

Страница 19: ...y be conveniently located in a keyboard or monitor USB devices can be attached or detached without removing computer power The number of devices being designed for USB continues to grow from keyboards...

Страница 20: ...multiple save memory and remote control ways for integration VSP1314 is designed to deliver advanced capabilities to high end presentation environments The VSP 1314 uses two editable input structures...

Страница 21: ...4 User Manual 21 Application Questions RGBlink offers solutions to demanding technical problems Any application questions or required further information please contact with our Customer Support Engin...

Страница 22: ...314 User Manual 22 2 Hardware Orientation In This Chapter This chapter provides detailed information about the VSP 1314 hardware The following topics are discussed VSP 1314 Rear Panel VSP 1314 Front P...

Страница 23: ...ard 8 Small push button 16 19 26 DVI Input 9 Remote control Interface 20 21 DVI Input 10 USB Interface 27 Power 11 RS232 Interface 28 Switch INPUT Interface Including 2 USB input 4 composite input CVB...

Страница 24: ...r DVD Computer video signal via DVI connector input supported resolution 1080P50 59 94 60 1080i50 59 94 60 720p50 59 94 60 PAL NTSC VESA 1024 768 60Hz 1280 768 60Hz 1280 1024 60Hz 1440 900 60Hz 1680 1...

Страница 25: ...DVI Input Input the DVI out originating from other video processors This DVI connector does not support hot plugging 20 DVI Output Connect to the monitor or LED screen which has DVI interface This DV...

Страница 26: ...2 Hardware Orientation VSP 1314 Rear Panel VSP 1314 User Manual 26 Switch and Power 27 28 Power Interface and Switch AC 90 264V 3 8A 50 60Hz IEC 3 Power Interface...

Страница 27: ...tup DVI input is default source With front panel keyboard user can operate VSP 1314 through the menus on LCD panel VSP 1314 front panel as shown in figure When startup the system it will enter to menu...

Страница 28: ...multiplexing button Press it and light up green to enter to Menu function the LCD panel shows content of MENU rotate and press the adjust knob select MENU Press again to reback the last Menu LCD pane...

Страница 29: ...ase refer to How to set picture in picture SAVE and LOAD muitiplexing button Press button and light up green to enter to Save mode at the same time CV1 1 CV2 2 USB1 3 DVI1 4 VGA1 5 CV3 6 CV4 7 USB2 8...

Страница 30: ...other infomation Press button again the green light light out it means have exit Load mode LCD shows as following Detail please refer toHow to load parameter SCALE CROP SCALE and CROP setting muitipl...

Страница 31: ...to transverse position setting rotate the adjust knob can adjust the positon of transverse LCD shows as following CROP Press SCALE CROP light up red to enter to scale setting At the same time when H S...

Страница 32: ...e 1 4 picture of full screen at the top right corner as 1024x768 output LCD shows as following The color of signal button Green light means signal output to program Yellow light means signal output to...

Страница 33: ...oad 7 muitiplexing button USB2 8 USB2 signal source and Save 8 and Load 8 muitiplexing button DVI2 9 DVI2 signal source and Save 9 and Load 9 muitiplexing button VGA2 10 VGA2 signal source and Save 10...

Страница 34: ...VSP 1314 User Manual 34 3 Hardware Installation In This Chapter This chapter provides comprehensive installation instruction for VSP 1314 hardware Following is the size of VSP 1314 for your reference...

Страница 35: ...spect it for damage If you find any damage notify the shipping carrier immediately for all claims adjustments As you open the box compare its contents against the packing slip If you find any shortage...

Страница 36: ...menus including how they are accessed the functions that are available and descriptions of each menu tree in block diagram format The following topics are discussed MENU Input Output Split View USB Se...

Страница 37: ...ht up green light that is you can enter the main menu as following rotate the adjust knob can select the up and down menuitem When the munuitem added to a blue bar it means is in a selecred state pres...

Страница 38: ...4 Menu Orientation MENU VSP 1314 User Manual 38 Picture 2...

Страница 39: ...olution Select this option user can select output resolution according need current support 12 kinds of resolution were as following 1024x768_60Hz 1280x768_60 Hz 1280x720_60 Hz 1280x1024_60 Hz 1366x76...

Страница 40: ...tting Screen Height Height setting Window Mode Can switch between Screen Full User can use USB1 USB4 to upgrade firmware Output ratio Proportional setting menu Normal 4 3 aspect ratio 16 9 aspect rati...

Страница 41: ...put The defference between Program and Preview is the Preview picture have effect switching mode and the Program just have cut switching mode Detail please refer to How to set Input matrix Layer setti...

Страница 42: ...ideo at the same time USB Play State Can set playing or stoping mode MENU Test Pattern Automatic color change test enter can set the automatic change time Manual color change test enter can set RGB an...

Страница 43: ...nd Take key to unlock This function mainly in order to prevent the user misoperation MENU Factory Reset Select it press the knob to reset factory It will show Factory Reset Finish if success As pictur...

Страница 44: ...4 Menu Orientation MENU VSP 1314 User Manual 44...

Страница 45: ...make equipment normal operation How to preview input signal source How to adjust output resolution How to adjust size and position of image How to scale image How to switch signal of single image How...

Страница 46: ...RS232 Control Interface 28 Switch 20 System default DVI1 output as program output main connect sending card of larg screen VSP1314 suppor resolution as following 1 024x768_60Hz 1280x768_60 Hz 1280x72...

Страница 47: ...utput via MENU OUTPUT Matrix In addition to CONT and send card and power interface others are signal input interface DVI DVI I Interface can connect DVI output of computer and can connect HDMI output...

Страница 48: ...r on equipment starts self state fan starts scan button 3 After scanning LCD will show as following 4 Afer starting equipment default load factory parameter or save 1 system parameter the function but...

Страница 49: ...signal of green light output from Program can check output if connect monitor or LED screen send card 2 The signal of yellow light output from Preview can check output if connect monitor 3 The signal...

Страница 50: ...on as following 1 Press light up green light to enter to MENU 2 LCD shows the menu mode rotate the adjust knob to select OUTPUT 3 Press knob to make sure Enter to OUTPUT to select Output Format 4 Pres...

Страница 51: ...on Operation as following Three button combination operation as following SCALE 1 Press SCALE CROP light up green light SCALE setting 2 Press H SIZE H POS light up green Height setting rotate the adju...

Страница 52: ...adjust knob can adjust the weith of image 5 Press V SIZE V POS light up red light vertical position setting rotate the adjust knob can adjust the position of vertical DVI2 Scale HSize 1024 Scale HPos...

Страница 53: ...llowing Three button combination operation as following CROP 1 Press SCALE CROP light up red light scale setting 2 Press H SIZE H POS light up green light Height setting rotate the adjust knob can adj...

Страница 54: ...just knob can just width of image 5 Press V SIZE V POS light up red light vertical position setting rotate the adjust knob can adjust the position of vertical DVI2 Crop HSize 100 Crop HPos 50 Crop VSi...

Страница 55: ...ted If need to switch program input signal can select signal button of other layer arbitrarily When DVI2 light up yellow light it means DVI2 output to Preciew other signal button light up red light us...

Страница 56: ...ignal firstly Such as want set VGA1 as big picture size is 960x672 and set DVI2 as small picture size is 384x384 position is X 288 Y 144 Operation as following 1 Set VGA1 as Preview output scale to 96...

Страница 57: ...on The switching effect must be setted in menu After setting press TAKE to switch Operation as following 1 Press and button light up red Rotate the 2 adjust knob to select switch effect There are 4 ki...

Страница 58: ...5 System Setup and Operation How to select switching effect VSP 1314 User Manual 58 3 Press the adjust knob to ensure after selecting then to set switch speed and mode press the adjust knob to ensure...

Страница 59: ...ideos to meet various requirements Operation as following 1 Press and light up green 2 LCD shows the MENU rotate the adjust knob to select Input 3 Press the adjust knob to ensure and rotate the adjust...

Страница 60: ...ution of DVI3 is the same with equipment before set DVI3 as background Operation step as following 1 Press and light up green 2 LCD shows MENU mode press the adjust knob to select Input 3 Press the ad...

Страница 61: ...ation How to set DVI3 as background VSP 1314 User Manual 61 5 Please make sure that input and output formats are consistent if show Input Error DVI 3 Input Error Please Make Sure That Input And Output...

Страница 62: ...tical splicing Such as DVI3 input is1920x1080 so can splicing 3840x1080 or 1920x2160 Operation as following 1 Press and light up green 2 LCD shows MENU mode rotate the adjust knob to select Splicing 3...

Страница 63: ...display range of DVI3 input source That is scale a part image of DVI3 and display on output port Split Switch ON Split Mode H 1 2 Split Output Channel DVI1 Display Width 1024 Split Switch ON Split Mod...

Страница 64: ...s adjust the size and position of output image 9 Parameter correction If splicing is stagger or there is a flower on screen because of DVI3 input interrupt or unstable can correct the parameter Screen...

Страница 65: ...is button 0 is the background Operation step as following 1 Press and light up yellow at preview can 2 check the image 3 If is not background please press and light up green LCD shows the 4 MENU mode...

Страница 66: ...e as a video generator can meet different scene Operation step as following 1 If is not background please press and light up green rotate the adjust knob to select Test Pattern 2 Press the adjust knob...

Страница 67: ...ail please refer to How to make equipment normal operation User save user can load diferent scene directly There are 10 group of save Operation step as following 1 Press and light up green 2 Button1 2...

Страница 68: ...e equipment normal operation User can load saving directly There are 10 groups of load Operation step as following 1 Press and light up green 2 Button1 2 3 4 5 6 7 8 9 10 light up red at the same time...

Страница 69: ...bPr Input Number of inputs 2 Connector Standard DB9 Socket Supported Standard HD analog input Signal Level Y 1Vpp 3dB 0 7V Video 0 3v Sync 75 ohm Pb Pr 0 7Vpp 3dB 75 ohm Supported Resolution 480i 576i...

Страница 70: ...050 60Hz 1920 1080 60Hz Signal Level R G B Hsync Vsync 0 to1Vpp 3dB 0 7V Video 0 3v Sync 75 ohm black level 300mV Sync tip 0V DVI Output Number of inputs 2 Connector Standard DVI I Socket Signal Level...

Страница 71: ...wing circumstances but can charge maintenance 1 No 3 packets of proves and valid invoice 2 The warranty vouchers have altered the serial number of warranty and products of in kind goods or altered ide...

Страница 72: ...e 1 Firstly connect device and computer with reticle input network address of VSP 1314 firmware upgrade in the address bar 192 168 0 100 2 Input your user name admin in the popup dialog box rgblink 12...

Страница 73: ...oose upgrade document the name of document must be xxx bin or xxx fon 5 Click Update to send and wait for upgrading User can check the program loading process rewrite time and whether is success on eq...

Страница 74: ...e upgrade etepsare as following 1 Input USB enter to USB interface 2 After start equipment enter to the menu and find the menu of Video fireware Updata can select USB1 and USB2 3 Select the correspond...

Страница 75: ...line to RS232 control Connector of video processor end access and the other end access PC serial port Double click enter into the procedure Connector of Flash Magic setting in figure First users selec...

Страница 76: ...quit shut the power equipment reset two dial code reset as shown in figure restart the power equipment check whether the equipment operate or not Note Flash Magic software download website http www fl...

Отзывы: