


SNAP2411
CONFIGURING THE SNAP
SNAPs are shipped from the factory with no IP address, no DNS address and no route or
gateway address specified. If a BOOTP or DHCP server is not present an IP address must be
assigned to the access point before connecting it to a network. To allow IP traffic to leave the
particular subnet to which the access point is connected, the IP address of the gateway, bridge,
router or other device that allows access outside the subnet must be entered as the routing
address. If a DHCP server is present on the network, the IP, default route address and DNS
server address can be set up through it. Note that while a BOOTP server can set the IP address in
the SNAP, it cannot set the default router or DNS server IP addresses. See the section
BOOTP
and DHCP
for details.
The network that the SNAP is connecting to must be compatible with 10/100BaseT products.
Before connecting a default configured SNAP to an active network that does not have a BOOTP
or DHCP server, ask the network system administrator for an IP address for the SNAP that will
not cause any problems on the network.
The SNAP is shipped from the factory to try to get an IP address from a DHCP server. If a
DHCP server is present, the SNAP will accept its IP address from the server and can be located
on the server under the host name “Cirronet_AP.” If a DHCP server is not to be used, the IP
address must be set using the Console port.
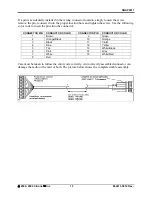
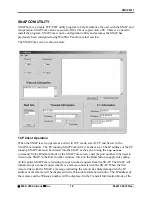
The WinSNAP utility program is included on the CD. Alternatively, terminal programs such as
HyperTerminal can be used. The settings for the serial port are 38400 baud, 8 data bits, 1 stop
bit, no parity and none for handshaking. Once connection is made to the SNAP through the
Console port and power is applied to the SNAP, the SNAP firmware version is displayed
followed by the
TCP>
prompt.
To enter an IP address in the SNAP, use the
ip
command.
ip <xxx.xxx.xxx.xxx> {yyy.yyy.yyy.yyy}
Where x is the IP address, and y is the optional netmask number.
Once a valid IP address has been entered in the SNAP, a second method to complete the
configuration of the SNAP is through a telnet session. Most telnet programs work with the
SNAP. Windows has a telnet program that works with the SNAP. A telnet session can be
started by clicking on Start->Run if the TCP/IP client has been installed. For a SNAP with an IP
address of 192.168.0.254, enter the following information in the dialog box:
telnet 192.168.0.254
A telnet window will open up. The first line is the version of the SNAP firmware followed by the
prompt:
TCP>
The SNAP commands are the same whether they are entered through the Console port or through
a telnet session.
To enter the default routing address use the
route
command.
route add default <xxx.xxx.xxx.xxx> {yyy.yyy.yyy.yyy}
Where
x
is the IP address of the gateway device and
y
is the optional netmask number.
©
2000- 2004 Cirronet
™
Inc
13
M-2411-0012 Rev -