


Operation and Maintenance Manual – Steam sterilizers mod. Sterilix 2 Plus & Vacuum Plus & Star & Star Fast
Rev. 09 of 18-04-02 - E:\Documenti1\Manuali superati non in uso\Vacuum Star GB-R09.doc
Page 13 of 42
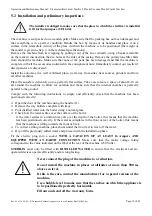
DESCRIPTION OF THE REAR PART
1)
Can tube to connect
to the used water
drain tube “3”
2)
Screws to fix the
casing.
3)
Used water drain
tube to connect to
the can by means of
tube "1"
4)
Label with the
following data:
Model, CE marking,
power supply
voltage and
frequency ratings,
power draw, serial
number, year of
manufacture,
manufacturer's
generalities.
5)
Power cable with
Shuko France plug.
6)
Protective casing
for the safety valve.
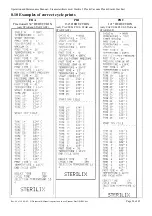
5.3 Printer connection
Purchase Reverberi printers code M9002 without date stamp or code M9003 with date stamp, from one of
our authorized centers.
To install the printer, just connect its jackplug to socket N° 15 of the autoclave.
Now connect the printer plug to a power socket.
Car
efully read the supplied printer operation manual.
Power the printer by means of its switch.
Power the autoclave.
During the sterilizing cycle, the printer will automatically indicate the progressive number of the cycle
and the various operations in progress. If it is equipped with a date stamp, it will also indicate the date
at the end of the cycle, by means of the multi-function button.
The installer should file the first sterilizing cycle prints obtained during the dry-run tests in the purchaser's
surgery conducted with the autoclave completely empty (without a load in the chamber).
This printer coupon should be sent to the manufacturer along with the warranty form in order to validate
the actual warranty itself.