background image

5.

6.

7.

8.

4.

2.  Set the TSG volume

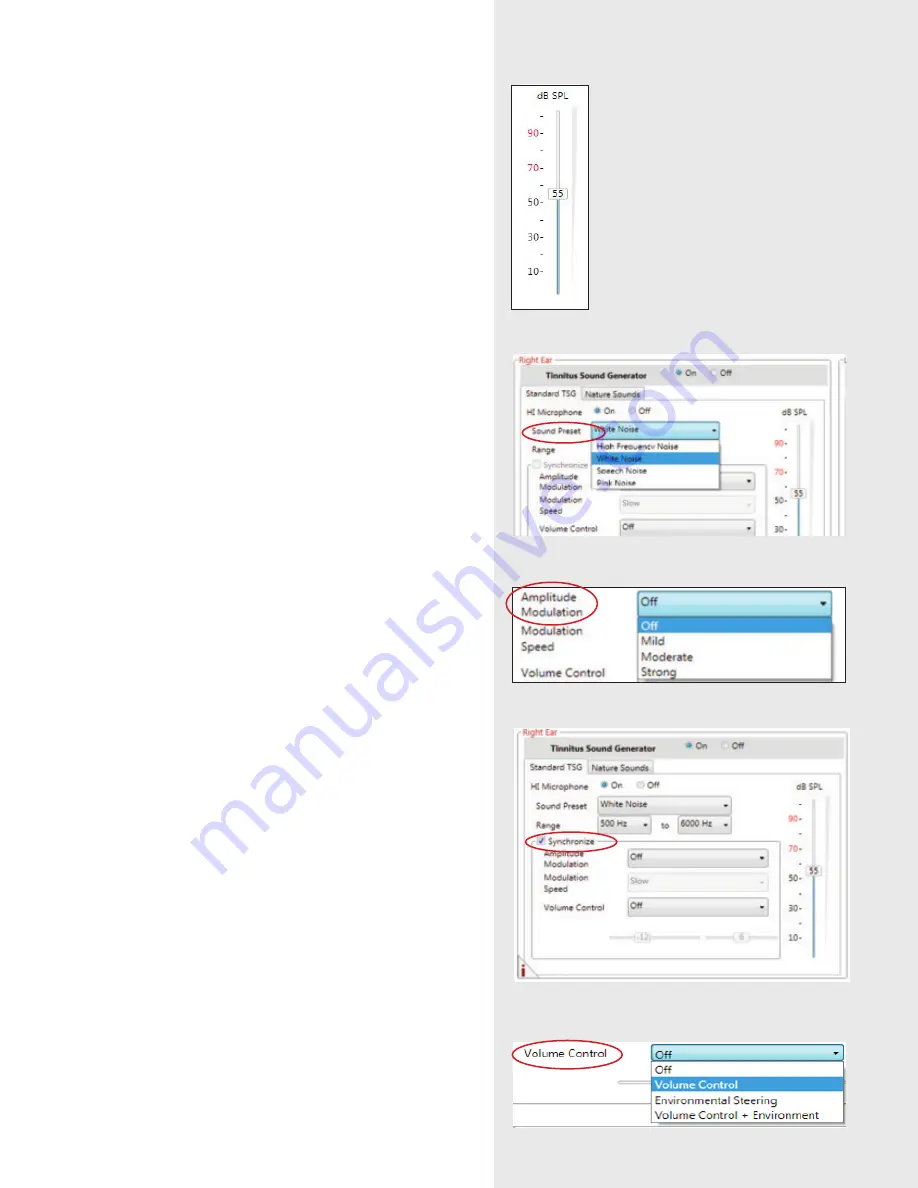
The volume of the TSG is set using the volume slider. The 
volume should be set to a level that provides relief, but does 
not completely mask the tinnitus. (Figure 4.)

Below is a suggestion on how to first fit the TSG. It uses the 
threshold of audibility as a starting point. 

Find the TSG threshold of audibility (three steps)

•  Using the volume slider, turn up the volume until the 

patient reports that they can just barely hear the TSG 
white noise. This is the TSG threshold of audibility. 

•  Increase the volume slider until the patient reports they 

can no longer hear their tinnitus over the TSG sound. 
This is the level at which their tinnitus is completely 
masked. This is the minimum masking level (MML).

•  Set the volume 5–10 dB above the threshold level. 

(You can go higher than 10 dB if necessary, but do not 
completely mask the tinnitus signal. This is where the 
MML is important.) 

3.  Set the TSG bandwidth

•  Our TSG defaults to a broadband white noise setting. 

There are 4 sound preset options to choose from. They 
can be customized using the Range option to adjust 
the frequency shaping. Note: any change in volume or 
frequency shaping setting will default the sound preset to 
a “Custom” label. (Figure 5.) 

4.  Customize the TSG features according to patient 

preference

•  “Amplitude Modulation” can be activated if the patient 

finds it to be comfortable. (Figure 6.)

•  “Amplitude Modulation” causes the TSG to fluctuate 

in volume, creating an “ocean-like” noise sequence. A 
“Mild” setting offers less fluctuation, whereas a “Strong” 
setting offers more fluctuation.

•  “Modulation Speed” controls how quickly the volume 

fluctuations occur. A “Slow” setting allows more time 
between fluctuations, whereas a “Fast” setting allows 
less time between fluctuations.

•  Selecting “Synchronize” will enable ear-to-ear 

commu nication, ensuring the features of the TSG are 
automatically functioning symmetrically. (Figure 7.) 

5.  Customize the Volume Control options

•  The “Volume Control” options determine how the volume 

of the TSG will be controlled. (Figure 8.)

•  Selecting “Volume Control” will reassign the function 

of the manual volume control to the TSG only for that 
program.

•  Selecting “Environmental Steering” will allow the volume 

of the sound generator to automatically adapt to the 
listening environment, ensuring comfort in all situations.

•  Selecting “Volume C Environmental Steering” will 

combine the use of these two features. It allows manual 
volume adjustments while the Environmental Steering 
features is also active.

1510_LN2_FittingGuide_MK604304_rB_8.5x11.indd   13

10/16/15   9:55 AM

Содержание AVENTA 3.9

Страница 1: ...ReSound Aventa 3 9 fitting guide resoundpro com SMART HEARING...

Страница 2: ...fitting interface and connection to the hearing aids is done in the upper part of the Start screen Remove the stickers from the size 13 batteries to activate them Wait for 2 minutes for best results...

Страница 3: ...ring instrument Assign hearing instrument to right or left ear A window will appear showing the status of the connection and will alert you to recommendations for venting Choose receiver and vent conf...

Страница 4: ...is selected If fitting a UP receiver a progress window will alert you to the capability of the hearing instrument to exceed 132 dB SPL Click Continue Next a window will appear to prompt calibrating DF...

Страница 5: ...two shaded grey areas visible on the graph in most cases The darker grey shaded area indicates unavailable gain while the light grey indicates added maximum stable gain provided by DFS UltraTM II If S...

Страница 6: ...user with the optimal combination of speech understanding in noise plus a more natural sense of surroundings even in the most difficult listening situations Natural DirectionalityTM II The Focus and M...

Страница 7: ...e Auto DFS options On and Off are automatically grayed out Sound ShaperTM Sound Shaper is ReSound s proportional frequency compression system Its default setting is Off The recommended setting based o...

Страница 8: ...guration can be changed in Physical Properties Selections in this screen affect the display of gains in the Fit screen For example when venting is changed the amount of roll off in the low frequencies...

Страница 9: ...loss of one hearing instrument during the acclimatization time as this will prevent the remaining hearing instrument from progressing more than 10 past the progression of the lost hearing instrument i...

Страница 10: ...sory alone Bluetooth Smart enabled devices Up to 5 Bluetooth Smart enabled devices can be paired to the hearing instruments but pairing must occur outside of ReSound Aventa Saving and completing the f...

Страница 11: ...o activate the TSG 1 Activate the TSG two options Option A Activate the TSG in combination with the All Around program Click on the All Around program tab Select the On option to activate the TSG in c...

Страница 12: ...y shaping setting will default the sound preset to a Custom label Figure 5 4 Customize the TSG features according to patient preference Amplitude Modulation can be activated if the patient finds it to...

Страница 13: ...ds are selected between instruments Advanced Settings allows you to adjust the low mid and high frequency bands of the Nature Sound Figure 11 Note It is only recommended to use this if necessary 7 Pro...

Страница 14: ...NOTES...

Страница 15: ...NOTES...

Страница 16: ...affected by hearing loss ReSound LiNX2 is the new benchmark in Smart Hearing giving your clients exceptional sound quality speech understanding and spatial awareness They will be able to stream stereo...

Отзывы: