background image


5 Maintenance  


  5-2 

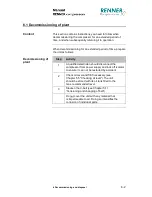
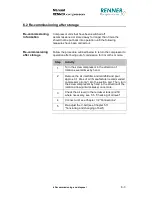
5.1 What to take into account 

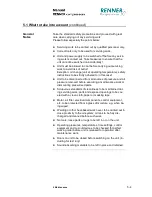
This section contains general information to be heeded during 
servicing and maintenance work. 


Servicing and maintenance work may only be carried out by 
duly qualified personnel. 
 
The specific personnel requirements are set out in Chapter 0. 


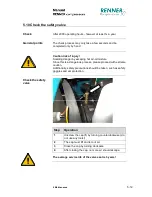
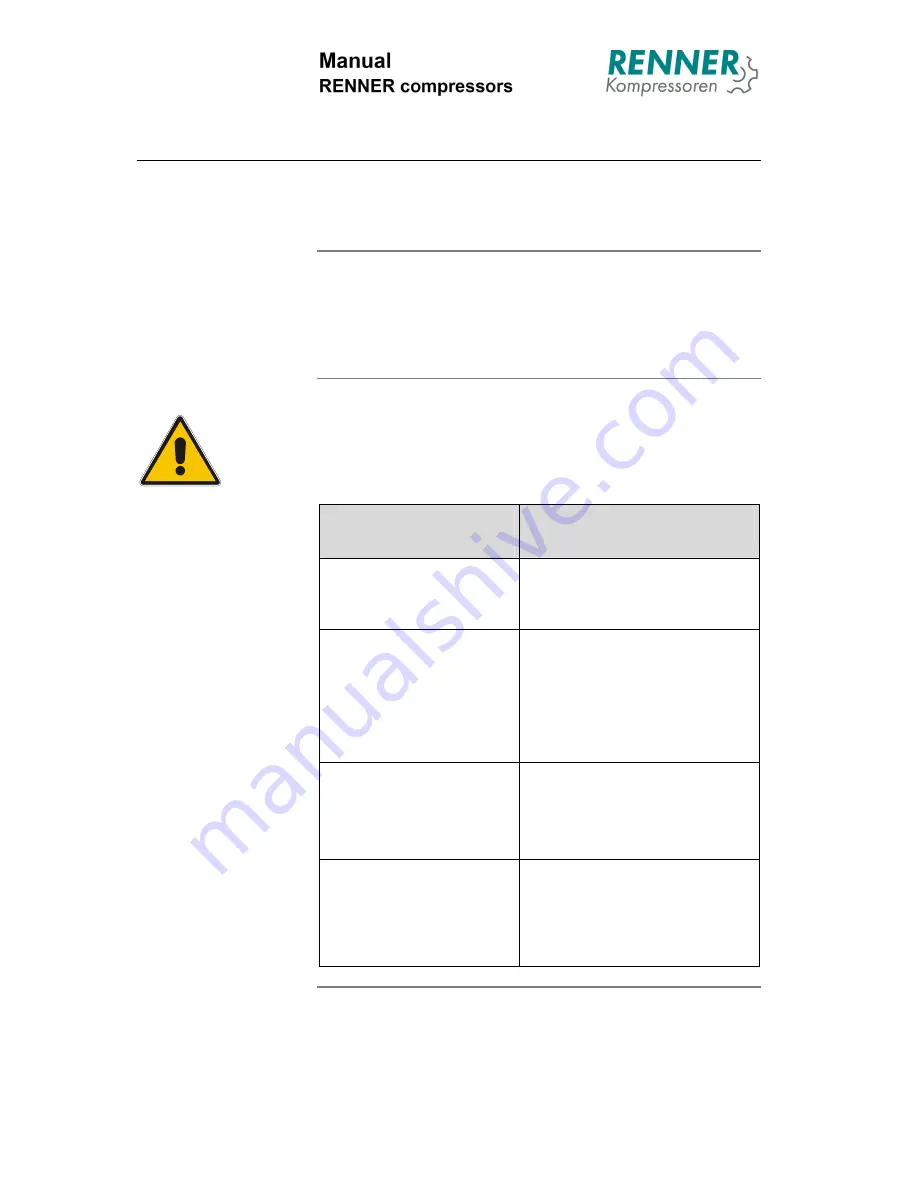
Danger! 

 
It is essential to adhere to the following safety instructions in 
order to avoid all risks of personal injury or death: 
 

Potential Source of Dan-
ger 

Preventive Measures 

Crushing from moving 
parts 


Always maintain a safe dis-
tance from all moving parts 
when carrying out test runs  

Electric shock 


Switch off all voltage sources 
before starting work.  


Take measures to prevent 
power  
sources from being switched 
on again by accident  

Inappropriate spare parts  


Always replace self-locking 
nuts and screws  


Only use spare parts includ-
ed in the approved lists  

Unauthorised/premature 
approval of unit for opera-
tion  


Do not release the unit for 
operation until the safety de-
vices are fully functional.  

Only then is the work com-
pleted! 


Content 

Personnel 
requirement 


Содержание RS-B

Страница 1: ...in a safe place for future use Installation Operation Maintenance Manual RS B RENNER GmbH Kompressoren Emil Weber Str 32 D 74363 Gueglingen Tel 49 0 7135 931 93 0 Fax 49 0 7135 931 93 50 info renner...

Страница 2: ...Nr Subject page 1 1 Symbols 1 2 1 2 Basic safety advice 1 3 1 3 Accident conduct 1 6 Nr Subject page 2 1 Authorised access points 2 2 2 2 Safety devices 2 4 2 3 Compressor unit 2 5 2 4 Instrumentation...

Страница 3: ...eration 3 5 Nr Subject page 4 1 Control instrumentation RENNERlogic 4 2 4 2 Control instrumentation RENNERtronic 4 3 4 3 Control instrumentation RENNERtronic plus 4 5 4 4 Compressor startup normal use...

Страница 4: ...l 5 7 5 6 Change of oil filter 5 8 5 7 Changing oil 5 9 5 8 Cleaning oil level sight glass 5 10 5 9 Cleaning oil cooler 5 11 5 10 Checking safety valve 5 12 5 11 Tensioning and changing drive belt s 5...

Страница 5: ...of contents Content IV Nr Subject AT Data sheet ACE CE Conformity Declaration AW1 Maintenance check AW2 Motor bearings AW3 Maintenance work ADS Pressure switch AKT Refrigeration dryer optional Append...

Страница 6: ...n of the INSTALLATION OPERATION MAINTENANCE MANUAL Compressor Operation and Usage Personnel responsibilities This chapter relates to the following subjects No Subject Page 0 1 General information 0 2...

Страница 7: ...ocation RENNER GmbH compressors Emil Weber Strasse 32 D 74363 Gueglingen June 2016 This manual should be kept in a clean safe condition and should be readily available to authorised personnel at all t...

Страница 8: ...he man ufacturer If modifications are made without the prior agreement of the manufacturer all warrantees and manufacturers responsibilities will be invalidated In these cases the process for conformi...

Страница 9: ...anual its usage personnel responsibilities 1 Definition of the symbols used Basic safety instructions 2 Description and function of the compressor 3 Operating the compressor 4 Maintenance hints A xy A...

Страница 10: ...must be below 40 C Authorized persons only are allowed to work on the compressor The machine must only be operated with the safety devices installed The safety and operating advice contained in this...

Страница 11: ...he personal protective equipment required is available for the operating personnel the service and maintenance personnel the maintenance and repair personnel and that it is used accordingly The operat...

Страница 12: ...the operating company as to the labor protection law The operator must have a clear understanding of the instructions given by the operating company and must carry them out The service and maintenance...

Страница 13: ...rly understood that the safety advice given in this manual should only be used as an additional aid to the national safety accident prevention rules and laws currently in force Existing accident preve...

Страница 14: ...ates to danger for life and health of people due to electric voltage Attention This symbol is a sign of danger for machine material or the environment Advice This symbol is to indicate important advic...

Страница 15: ...dangers will be explained in this chapter Endangerment of people due to lack of qualification and or operational faults of the service personnel Explanation Operational faults may cause personal inju...

Страница 16: ...onding precautions are required Do not touch live cables or connections In case of damaged cables report immediately to the maintenance personnel Ensure all doors to electrical installations are close...

Страница 17: ...ed the technical limit values stipulated Burns through hot compressor parts Do not touch compressor parts immediately after having opened the doors of the canopy Burns through hot lubrication oil when...

Страница 18: ...ired as well as the contact person At an accident proceed in the following sequence Action If Then 1 there are injured people administer first aid if you are a trained first aider 2 there are injuries...

Страница 19: ...ompressor and its control instrumentation and technical data This chapter is subdivided as follows No Subject Page 2 1 Authorised access points 2 2 2 2 Safety devices 2 4 2 3 Compressor unit 2 5 2 4 I...

Страница 20: ...nance work Other access points are not intended for operating the com pressor and are therefore not permitted as operator stations Safe operation can only be guaranteed from the operator termi nals sp...

Страница 21: ...on of the machine No Operation Actions permitted 1 of the control panel Check working pres sure Check oil and operating temperature Read operating hours Switch compressor on Emergency stop or shut dow...

Страница 22: ...tion 1 Emergency stop Stops compressor immediately in emergency 2 Electric panel door Guard door on control box to be opened by qualified electricians only CAUTION Danger to life Electrical voltage 3...

Страница 23: ...rator cartridge Filters the finest residue oil from the compressed air after pre separation 8 Air end Generate air pressure 9 V belt Power transfer 10 Safety valve Pressure limitation 11 Electro motor...

Страница 24: ...uthorised personnel must only carry out adjustments to the pressure switch Suction regulator The suction regulator is directly connected to the air end It con trols the air volume sucked in by the com...

Страница 25: ...is screwed on to the filter support of the oil re claimer see illustration below Illustration oil separator cartridge Oil return scavenge window oil return scavenge non return valve The oil return wi...

Страница 26: ...l unit It is built into the instrument panel It monitors the maximum permissible service temperature of the unit which is set at 110 C red mark When this temperature is reached the electric circuit is...

Страница 27: ...pressor off 3 Emergency stop Switches the compressor off in case of emergency 4 Operating hour meter Counts the number of hours op erated by the compressor 5 Pressure gauge Working pressure Indicates...

Страница 28: ...g instrumentation controls Item Description Function 1 Compressor ON Switches the compressor on 2 Compressor OFF Switches the compressor off 3 Multiple function keys Navigates in the menus sets parame...

Страница 29: ...g instrumentation controls Item Description Function 1 Compressor ON Switches the compressor on 2 Compressor OFF Switches the compressor off 3 Multiple function keys Navigates in the menus sets parame...

Страница 30: ...nt vapour or come into contact with liquid refrigerant Smoking is not permitted when working around the refrigerant drier since ash from cigarettes or any other naked flame e g when welding combines w...

Страница 31: ...using a condensate separator Attention Please see the explanations in chapter 4 and the KT Appendix as well as the manufacturer s instruction manual Please note that the float of the steam trap is ch...

Страница 32: ...n tip over at an inclination of more than 10 Use suitable transport means such as a forklift lifting gear or loading harness Support it from the side Unpacking the machine has no special requirements...

Страница 33: ...ry out maintenance work9 Lifting work Secure any loose swinging or pivoting parts before lifting the compressor Use suitable lifting gear weight acc to data sheet Always remain outside the danger zone...

Страница 34: ...wing must be observed when connecting to the com pressed air system Key word Ensure that Pressure Suitable screws and conduits are used for the operating pressure The end pressure of the system is not...

Страница 35: ...he rotational direction is observed under all circumstances Based on the attached arrows Checking the rotational direction see chap 3 3 3 4 Not necessary for frequency controlled compressors Fuses Cus...

Страница 36: ...ed out before the first start up Step Task to be carried out Points to be observed 1 Have an electrician tighten all screw and terminal connections in the control cabinet 2 The motor bearings of compr...

Страница 37: ...control must be carried out as a two hand opera tion An incorrect rotation for longer than 2 seconds will lead to faults in the screw compressor There is a danger from moving parts when checking the r...

Страница 38: ...a test run so that the oil can be distributed throughout the machine Step Operation Figure Expl 1 Open the shut off valve Press the start button and let the machine run for approx 5 seconds 2 Press t...

Страница 39: ...s chapter is subdivided into the following sections No Subject Page 4 1 Control instrumentation RENNERlogic 4 2 4 2 Control instrumentation RENNERtronic 4 3 4 3 Control instrumentation RENNERtronic pl...

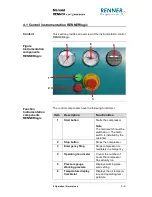
Страница 40: ...ed on The main switch is installed by the customer 2 Stop button Stops the compressor 3 Emergency Stop Stops compressor im mediately in emergency 4 Operating hour meter Counts the number of hours the...

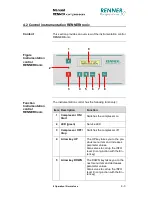
Страница 41: ...D 3 Compressor OFF Stop Switches the compressor off 4 Arrow key UP The UP key takes you to the pre vious menu item and increases parameter values Also serves to call up the INFO level in conjunction w...

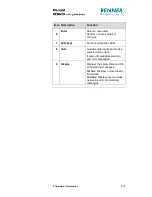
Страница 42: ...7 LED red Fault maintenance LED 8 Quit Quit discards inputs and ends a selected menu item It also acknowledges warning and error messages 9 Display Displays the parameters and the error warning messag...

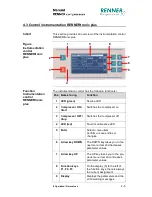
Страница 43: ...ult maintenance LED 5 Enter Select a menu item Confirm or save entries or changes 6 Arrow key DOWN The DOWN key takes you to the next menu item and decreases parameter values 7 Arrow key UP The UP key...

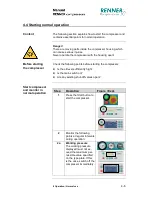
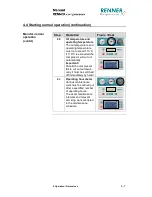
Страница 44: ...ore starting the compressor Is the oil level sufficiently high Is the main switch on Are any existing shut off valves open Step Operation Figure Expl 1 Press the Start button to start the compressor 2...

Страница 45: ...f 110 C is exceeded the compressor will cut out automatically Important Should the compressor fail to cut out automati cally it must be switched off immediately by hand 2c Operating hour meter Various...

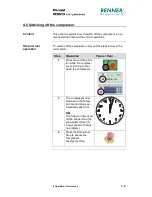
Страница 46: ...the order listed Step Operation Figure Expl 1 Press the red Stop but ton while the compres sor is running to shut down the compressor 3 The compressor now switches to the follow on time and stops au t...

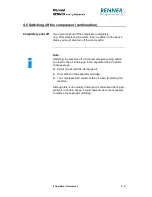
Страница 47: ...achine off via the red emergency stop button can lead to the oil frothing up in the separator tank Possible consequences Exit of oil exit with the discharge air Oil overflow in the separator cartridge...

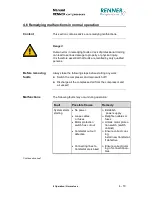
Страница 48: ...the compressor and main switch off Discharge all the compressed air from the compressor and air vessel The following faults may occur during operation Fault Possible Cause Remedy System starts startin...

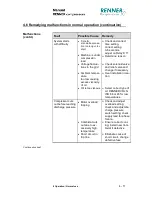
Страница 49: ...K 1T Determine reason Check solenoid valve and relief valve and change if necessary Heat installation loca tion Select correct type of oil RENNER VDL N ISO 68 or 46 for low temperatures Compressor cut...

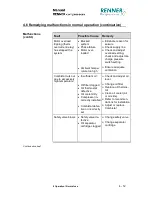
Страница 50: ...switch setting Ensure adequate ventilation Combistat cuts out due to excessively high temperature Insufficient oil Oil filter clogged Oil thermostat defective Oil cooler dirty Compressor in correctly...

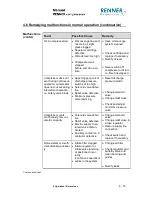
Страница 51: ...gh Solenoid valve defec tive Relief valve defective Minimum pressure valve jamming Reset discharge pressure switch Change solenoid valve Change relief valve Check and adjust minimum pressure valve Com...

Страница 52: ...c tion in oil line Check seal on oil drain plug Machine is shut off if under load e g emergency stop switch Check condition and fit of O ring on intake regula tor Tighten connection Tighten screw seal...

Страница 53: ...ct Page 5 1 What to take into account 5 2 5 2 Remove faults 5 5 5 3 Venting the compressor system 5 6 5 4 Cleaning work 5 7 5 5 Checking oil level 5 8 5 6 Changing oil filter 5 9 5 7 Changing oil 5 10...

Страница 54: ...Source of Dan ger Preventive Measures Crushing from moving parts Always maintain a safe dis tance from all moving parts when carrying out test runs Electric shock Switch off all voltage sources before...

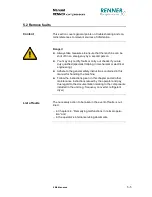
Страница 55: ...around 5 Carry out a test run and check the function of the ser viced components 6 If you leave the machine before completing the work keep the keys safe and inaccessible to unauthorised persons Only...

Страница 56: ...l pressure removed before executing a maintenance work or dismounting pressurised parts Scrupulous standards of cleanliness to be maintained dur ing servicing work parts and exposed openings to be cov...

Страница 57: ...al or electrical engineering Adhere to the general safety instructions contained in this manual for handling the machine Follow the instructions given in this chapter and all other maintenance instruc...

Страница 58: ...handling the oil filler plug When the oil filler plug is unscrewed the residual pressure may cause hot oil to squirt out It is therefore essential to wear safety goggles It is essential to adhere to...

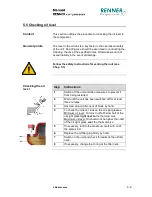
Страница 59: ...t compressed air at living beings Misuse of the compressed air unit can cause serious tissue damage or even fatal injuries Step Operation 1 Switch off the unit and take measures to prevent it from bei...

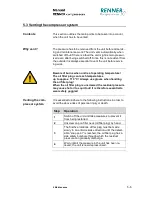
Страница 60: ...prevent it from being restarted 2 Wait until the unit has been switched off for at least three minutes 3 Unscrew cap on filler neck of block by hand 4 To check the oil level look on the oil sight glas...

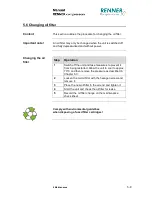
Страница 61: ...t from being restarted Allow the unit to cool to approx 70 C and then remove the pressure as described in Chapter 5 3 2 Loosen the old oil filter with the hexagon screw and remove it 3 Place the new o...

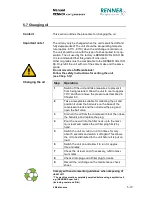
Страница 62: ...as described in Chapter 5 3 2 Take a receptacle suitable for collecting the oil and position it under the ball valve on the base of the compressor block and then unscrew the plug and open the ball val...

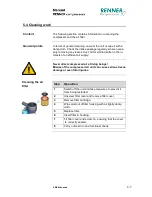
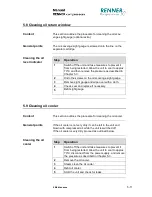
Страница 63: ...ce if necessary 5 Refit sight gauge 5 9 Cleaning oil cooler This section outlines the procedure for cleaning the oil cooler If the oil cooler is not very dirty it can be left in the unit and blown wit...

Страница 64: ...oil mixture Since this is a dangerous process please proceed with extreme caution Additionally safety precautions should be taken such as safety goggles and ear protection Step Operation 1 Unscrew the...

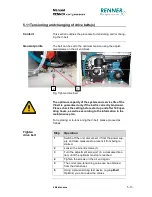
Страница 65: ...ating hours as well as according to the information in the maintenance plan For replacing or re tensioning the V belt please proceed as follows Step Operation 1 Switch off the unit disconnect it from...

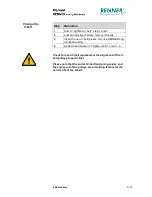
Страница 66: ...please only use RENNER orig inal spare parts 4 As described above in Thighten belts step 3 6 Check for each V belt replacement the alignment of the V belt pulleys to each other Please note that the co...

Страница 67: ...ter contains important advice for temporarily decommissioning or disposing of your compressor This chapter is divided into the following sub sections No Subject Page 6 1 Decommissioning of plant 6 2 6...

Страница 68: ...y 1 A qualified electrician should disconnect the compressor from power supply and lock off isolator to ensure it can not be restarted by accident 2 Check oil level and fill if necessary see Chapter 5...

Страница 69: ...Turn the screw compressor in the direction of rotation several times by hand 2 Remove the air inlet filter and manifold and pour approx 0 1 litres of oil manufacturer recommended compressor oil only...

Страница 70: ...following disassembly work be aware of sharp corners and edges which may cause cuts For this reason always wear protective gloves Environment The following instructions must be observed properly to p...

Страница 71: ...ets Tubes Cables Tin Boards Polyester Boards The following parts materials and fluids must be disposed of separately Denomination Application LCD displays Note LCD displays contain highly poisonous fl...

Страница 72: ...RS B 11 11 0 81 3 15 1950 35 6 776 x 556 x 597 207 x 500 RSK B 2 2 2 2 direkt 66 1 95 600 16 2 5 971 x 536 x 705 160 x 500 RSK B 3 0 3 0 direkt 70 1 95 600 16 2 5 971 x 536 x 705 169 x 500 RSK B 4 0 4...

Страница 73: ...EU The following harmonised standards were applied in its current version EN 1012 1 Compressors and vacuum pumps Safety requirements Part 1 Compressors EN 286 1 Simple unfired pressure vessels designe...

Страница 74: ...ment replace if necessary Clean replace the filter mats Check replace the safety valve Changing the oil filter Change the oil Change the fine separator cartridge Check the follow on time 3 min Replace...

Страница 75: ...ck air filter element replace if necessary Clean replace the filter mats Check replace the safety valve Changing the oil filter Change the oil Change the fine separator cartridge Check the follow on t...

Страница 76: ...st frequent switch ons and high ambient tem peratures as well as operations at 60Hz the maintenance inter vals must be adjusted accordingly 1 Switch off unit and prevent it from being restarted by acc...

Страница 77: ...t 60Hz the maintenance intervals must be shortened Please carry out the following steps to re lubricate the mo tor bearings 1 Switch off unit and prevent it from being restarted by accident 2 Thorough...

Страница 78: ...A side B side Grease quantity grams Re lubrica tion in terval 90 1 5 2 2 6205 ZZ 6204 ZZ 112 3 7 6307 ZZ 6206 ZZ 112 3 4 5 5 6207 ZZ 6206 ZZ 132 4 4 5 5 5 7 5 9 1 11 6308 ZZ 6207 ZZ 160 11 15 6309 C3...

Страница 79: ...ed replenished replaced checked retensioned replaced regreased replaced Please tick the work which has been done and or record measured data which confirm by signature Signature and date Oilfilling Dr...

Страница 80: ...he service life of your system The legal warranty will expire if making changes that have not been discussed in advance with RENNER Kom pressoren GmbH The pressure switch controls the switch on and sw...

Страница 81: ...AADS Appendix Pressure Switch AADS 2 Appendix ADS End Pressure Switch...

Страница 82: ...s when getting in touch with the glowing end of a cigarette or oth er open flame e g welding work The refrigerant air drier contains a cooling system for cooling the compressed air The compressed air...

Страница 83: ...rigerant drier cont Figure Refrigerant drier Figure control panel 1 Compressed air inlet 6 Electrical connections 2 Compressed air outlet 7 Maintenance access 3 Cooling air inlet 8 Fixing holes 4 Cool...

Страница 84: ...the setting mode the blinking LED shows which data will be displayed 5 Yellow LED Condensate magnetic valve is active 6 Yellow LED Ventilator is turned on 7 Setting switch Multi function key for edit...

Страница 85: ...ly depend on the utilisation type and the conditions oft he installation site The following maintenance work must be completed daily 1 Check the function of the steam trap check if water is drained va...

Страница 86: ...Please take care for a condensate drain system Please take the necessary mesures as to discharge the condensate if no automatic system Caution To grant the functionality of the air receivers all flex...

Отзывы: