background image

19

RHAON & Beam steering Workflow

The ICLive X Series is controlled and beam steered with 
RHAON II software. The following instructions assume an 
understanding of RHAON II software and beam steering work 
flows. If you are unfamiliar with RHAON II, the user manual is 
accessible from the RHAON II Help menu.  
Unlike other Iconyx models, which build arrays of master and 
slave units, ICLive X arrays are all master, every loudspeaker 
is addressed individually in the software. In order to control 
and beam steer an array of multiple ICLive X loudspeakers, 
they are grouped in RHAON II. 
RHAON II offers two different group types, “Device Groups” 
for group processing traditional point-source, line-array, and 
subwoofer systems; and “Array Groups.” Array groups allow 
controlling, steering, and monitoring an “ICLive X Array” as 
a single entity. IC Live X arrays must be grouped in order to 
beam steer them. 

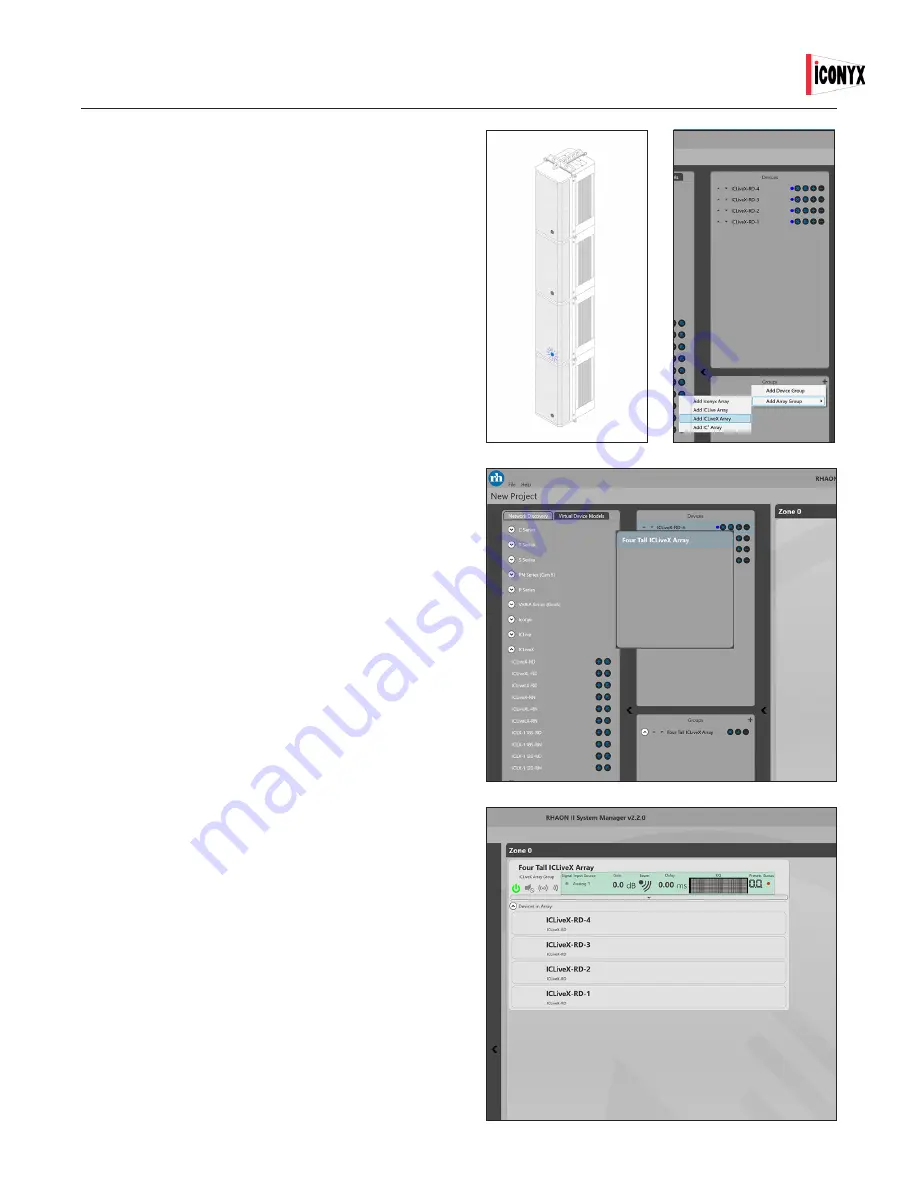
•  To create an array group of ICLive X loudspeakers, first 

identify and name the loudspeakers in each array. The 
blue wink LED’s on the front of the loudspeaker can be 
switched on in RHAON II to identify individual loud-
speakers. 

See image 1.

•  When naming individual loudspeakers in an array, 

we recommend an alpha-numeric name, where the 
numbers ascend in order from the bottom of the array 
to the top; meaning the bottom most box should be 
named XXX-1, the next one up would be XXX-2, and so 
on. ICLive X array groups must be built from bottom to 
the top in RHAON II. 

See image 2.

•  Once the individual loudspeakers in each array have 

been identified and named build the ICLive X array 
group. 

1.  Create an ICLive X Array Group in the Groups 

Pane. 

See image 2.

2.  Starting with the bottom loudspeaker in the 

array, add the individual loudspeakers from the 
Devices Pane, to the new ICLive X Array Group. 

See image 3.

3.  If necessary, reorder the devices in the array to 

match the physical array.

4.  Name the ICLive X Array Group
5.  Add the Array Group to the active Zone. 

See 

image 4.

6.  Repeat for any additional arrays in the system.

Image 1

Image 2

Image 3

Image 4

Содержание iConyx IC Live X Series

Страница 1: ...Digitally Steerable Line Array Loudspeaker Systems IC Live X Series User s Manual...

Страница 2: ...UCTIONS ARE FOR USE BY QUALIFIED SERVICE PERSONNEL ONLY TO REDUCE THE RISK OF ELECTRIC SHOCK DO NOT PERFORM ANY SERVICING OTHER THAN THAT CONTAINED IN THE OPERATING INSTRUCTIONS UNLESS YOU ARE QUALIFI...

Страница 3: ...rnings servicing instructions are for use by qualified personnel only To avoid electric shock do not perform any servicing other than that contained in the Ope ration Instructions unless you are quali...

Страница 4: ...s manual 4 Introduction 5 General Information 5 ICLive X versions and models 6 Understanding ICLive X series model numbers 6 Mobile Version Connections 7 Fixed Install Connections 8 Dante RD units 8 A...

Страница 5: ...d service personnel We recom mend that it be returned to the factory in its original pack ing carton if factory service is required General Information The IC Live X system is a flexible digitally ste...

Страница 6: ...with RHAON II software All RN models have the following features Analog audio inputs Fixed versions have two analog inputs mobile versions one AES 3 audio inputs Fixed versions have two AES 3 inputs m...

Страница 7: ...connection on an etherCON connection Standard RJ45 CAT5e or CAT6 patch cables may be used etherCON shell is recommended for all mobile applications Secondary Ethernet RHAON II Dante connection on an...

Страница 8: ...en 1800F or equivalent 110 ohm digital audio cable Ethernet RHAON II connection on an RJ45 connec tor CAT5e or CAT6 wiring Reset Button Push and hold for 3 5 seconds to re set unit to factory default...

Страница 9: ...WN buttons to scroll through AnA Analog AES 1 AES 2 dAn 1 Dante 1 and dAn 2 Dante 2 input selections Press ENTER to confirm the selection If no selection is made after 7 8 seconds the display will ret...

Страница 10: ...ttom of the upper unit 3 Insert the three quick release pins into the holes in the array bars 4 Important Pull back on the pins to insure that they are securely locked into place 5 Repeat with all of...

Страница 11: ...arge single point of attachment allows for horizontal aiming of the array without turning the subwoofer 1 Attach the ICLX GSA to the subwoofer with the hand screw and tighten securely 2 Remove the QR...

Страница 12: ...own in red in the accompanying drawings Hinge Kit Guidelines and Instructions The maximum number of cabinets in an array that will be supported by the hinges is six ICLX or a combina tion of ICLX and...

Страница 13: ...e wall is to use a story stick 1 Assemble the array as instructed on page 10 2 Install the hinges on the loudspeakers at the desired locations 3 Cut a length of board a 1 x 4 works well to the length...

Страница 14: ...vailable from Renkus Heinz Audio Looping The CBL ICLX XLR cable provices analog or AES signal looping Ethernet Looping The CBL ICLX DLK cable loops RHAON data and Dante Audio if equipped Power Looping...

Страница 15: ...als AC mains power looping is not available each cabinet in an array must have its own power cable Ethernet cannot be looped when using RN RHAON only units a star network topology is required with eac...

Страница 16: ...have its own power cable Ethernet Dante can be looped by utilizing the Dante Secondary port as a Loop Out In this application the Dante ports act as a two port gigabit switch Each looping connection...

Страница 17: ...te Controller Connections are similar to the RN units but the network connections are doubled Analog or AES signal if desired can be looped by paralleling the wires at the Phoenix terminals Note not s...

Страница 18: ...must be flown not mounted on the hinges Arrays using ICLive XL or ICLive LX modules are lim ited to the equivalent array length of a six unit tall ar ray of ICLXs If you have a project that you feel n...

Страница 19: ...ICLive X loudspeakers first identify and name the loudspeakers in each array The blue wink LED s on the front of the loudspeaker can be switched on in RHAON II to identify individual loud speakers See...

Страница 20: ...entered referenced to the finish floor level The ear height simulation plane is then added automatically The ear height is selectable for seated or standing audiences or a custom value can be entered...

Страница 21: ...ination from the top of the HF array to the back of the room Just grab the red handle and drag it to the end of the audience area at ear height Be sure to aim at ear height not the floor level 2 Read...

Страница 22: ...ote of the angle in this case 21 6 de grees 6 Find the difference between the Top to Back angle and Bottom to Front angle In our example 21 6 4 6 degrees is 17 degrees 7 Select the beam size with the...

Страница 23: ...the Bottom of the High Frequency Array The Top acoustic center which allows greater down angles of inclination will often reduce reflections off side and rear surfaces Additionally the Top acoustic c...

Страница 24: ...19201 Cook Street Foothill Ranch CA USA Phone 1 949 588 9997 Fax 1 949 588 9514 sales renkus heinz com www renkus heinz com RH 894 Rev A January 2020...

Отзывы: