N N
L L
OUT
IN
N N
L L
OUT
IN
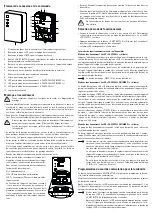
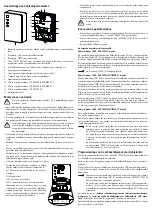
Connections and control elements
1
13
12
11
10
9
8
3
2
4
5
6
7
1 Fastening screw (for fixing the cover on the twilight switch)
2 Control knob “LUX” for brightness adjustment
3 Control knob “TIME” for time adjustment
4 “SHIFT BUTTON” for selection of operating modes and programming brightness
switching threshold
5 Screw terminals for mains voltage and consumer
6 Opening for wall mounting
7 Openings for cables (closed for shipping)
8 Cable strain relief to fixate the connection cable
9 Opening for wall mounting
10 LED for operating mode 3 (“PHOTOCELL W/TIMER P2”)
11 LED for operating mode 2 (“PHOTOCELL W/TIMER P1”)
12 LED for operating mode 1 (“PHOTOCELL”)
13 Brightness sensor
Installation and connection
Please refer to the section “Safety instructions” and “Preparations for in-
stallation”.
• Open the housing of the twilight switch first by screwing out a Phillips-head screw
(1) at the bottom side so that the front cover can be removed (the screw may already
be removed for shipping, so in this case just remove the cover).
• The twilight switch can be mounted on a vertical wall via two openings (6 + 9). To do
this, appropriate screws and, if necessary, plugs must be used.
When mounting on the wall it is essential to ensure proper position of the
twilight switch. The cable entries (7) should be directed downwards.
Pay attention when drilling and tightening the screws that no cables and
pipes are damaged.
• Depending on whether the cable is to be laid on or underneath plaster, you need to
break out two openings to lead the cables through. At that, do not use force.
• Unscrew 2 screws of the bracket for strain relief (8) and remove it.
• Pass the connection cables (mains cable and cable for consumer load) through
each rubber seal supplied.
Cut them short so that connection cables can be passed through and sealing against
moisture is ensured. The rubber seals are then to be inserted into the cable entries.
• Remove approx. 6 mm from the insulation of each wire of the cable.
• Connect the connection cables (mains cable
and cable for consumer load) with the terminal
clamps (5).
For this purpose, observe the symbols on the ter-
minals.
N = Neutral wire
LIN = L/phase of the mains supply line
LOUT = switched L/phase to consumer
Depending on the consumer, it is also possible to
connect the mains supply line and the consumer
by a protective conductor. However, there is no
relevant screw terminal in the twilight switch
housing for this purpose.
• Screw down again the bracket of the strain relief (8) so that both cables are fixed
securely.
• Before the twilight switch cover is replaced and fixed by a small screw (1), the
mains voltage is to be switched on, control knob setting performed and desired op-
erating mode selected, see next chapter.
Never touch the inside of the screw terminal, danger to life by electrical
shock.
Selecting the operating mode
• If not yet done so, switch on the power supply. The twilight switch is active now in
operating mode “1”, the LED “PHOTOCELL” lights up.
• Press briefly (for shorter than 3 seconds!) the “SHIFT BUTTON” (4), to select one of
the 3 operating modes.
• The relevant LED lights up.
The following three operating modes are available
Mode 1 (LED “PHOTOCELL” is lit)
The consumer is switched on or off only through the brightness sensor (13). Using the
control knob “LUX” (2), you can set the desired switching threshold for the ambient
brightness at which the twilight switch shall be activated.
Turning the knob counter-clockwise towards the moon symbol makes the consumer
activate when it is darker, while turning clockwise towards the sun symbol activates
it in brighter conditions.
The knob “TIME” (3) is non-functional.
Mode 2 (LED “PHOTOCELL W/TIMER P1” is lit)
Using the control knob “LUX” (2), you can set the desired switching threshold for the
ambient brightness at which the twilight switch shall be activated.
The knob “TIME” (3) enables setting switch-on time of the consumer after activation
of the twilight switch.
Turning the knob counter-clockwise in direction of the moon symbolactivates the
consumer when it is darker, while turning clockwise in direction of the sun symbol
activates it in brighter conditions.
Rotate the knob “TIME” (3) counter-clockwise towards “-” symbol to reduce, and
clockwise towards “+” symbol - to increase the switch-on time. Adjustment range
makes from min. 4 minutes (tolerance ±1 minute) to max. 8 hours (tolerance ±0.5 hours).
Mode 3 (LED “PHOTOCELL W/TIMER P2” is lit)
In transition from brightness (day) to dark (night) this operating mode corresponds to
the mode 2.
In addition, the consumer is activated for the period of 2 hours, when it gets brighter
again (about 2 hours before the preset switching threshold of the ambient brightness
is reached).
During the first switching cycle (i.e. in the morning of the first day after mode
3 is selected) this activation does not occur as the twilight sensor needs to
measure and save the brightness profile and the duration.
Only on the second day the twilight sensor switches on the consumer about
2 hours before reaching the preset brightness switching threshold.
In this way, a lamp is activated both at twilight (time setting by the knob
“TIME” in the range from approx. 4 minutes to approx. 8 hours) and at day-
break (approx. 2 hours).
Programming the brightness switching threshold
Current brightness may be programmed as a switching threshold using the recessed
“SHIFT BUTTON“ (4).
Press and hold the button for more than 3 seconds to save the current brightness.
After the button is released the respective active LED (for the mode 1, 2 or 3) flashes
once briefly and remains continuously lit. The brightness is saved as switching thresh-
old.
If it is necessary to return to setting the switching threshold via “LUX” (2),
press and hold the “SHIFT BUTTON” (4) again for longer than 3 seconds.
After the button is released the respective active LED (for the mode 1, 2 or 3)
flashes twice briefly and remains continuously lit. The switching threshold
setting procedure should now follow as per description for the knob “LUX”
(2).
Thus switching between “
applying/programming current brightness switching
threshold
” and “
setting brightness switching threshold by “LUX” knob
” occurs if the
button (4) is pressed for more than 3 seconds.
Irrespective thereof, operating modes are selected by short pressing the button (4)
(less than 3 seconds).

