I. Reloop-Anzeige
Diese Anzeige gibt an, ob ein Loop gesetzt wurde, wel
-
cher durch die Reloop-Funktion aktiviert werden kann.
J. Auto-Cue-Status
Zeigt an, ob die Auto-Cue-Funktion aktiviert ist. Um
die Auto-Cue-Funktion ein- und auszuschalten, ist
es nötig die SGL/CTN-Taste -20- länger als eine Se
-
kunde zu drücken.
K. Zeit-Anzeige
Stellt die gewählte Zeit-Anzeige in Minuten, Sekun
-
den und Frames dar.
L. Informationsanzeige
Zeigt Trackinformationen und Systemeinstellung an.
M. Zeit-Modus
Zeigt die abgelaufene (elapsed) oder verbleibende (re
-
main) Zeit eines Tracks an. Durch Betätigen der Zeit-Tas
-
te -8- kann man zwischen den beiden Modi umschalten.
N. Repeat-Anzeige
Zeigt an ob sich das Gerät im Repeat-Modus befin
-
det. (Siehe Kapitel Systemeinstellungen / Repeat)
O. Single-Anzeige
Zeigt an, ob die Wiedergabe auf Single- („Single“
leuchtet auf) oder Continuous-Betrieb (Display
leuchtet nicht auf) eingestellt wurde.
P. Track-Anzeige
Zeigt die Nummer des aktuellen Tracks an.
Q. Play/Pause-Anzeige
Zeigt an, ob sich der Player im Wiedergabe- oder
Pausebetrieb befindet.
Anschlüsse
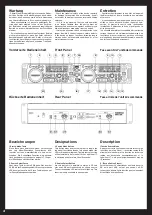
1. Verbinden Sie die Ausgangsbuchsen -23- mit den
Line Buchsen Ihres Mischpultes oder Verstärkers.
2.Verbinden Sie die Netzanschlussbuchse -21- mit
dem Netzkabel und schließen Sie es an eine Steck
-
dose an.
3.Verbinden Sie bei Bedarf die Anschlussbuchse für
Fader-Start -22- mit der entsprechenden Buchse ei
-
nes anderen Reloop SMP-1 USB.
Bedienung
1. Strom einschalten
Nachdem alle Anschlüsse vorgenommen wurden,
das Gerät mit der Ein/Aus-Taste -18- einschalten.
2. SD-Karte laden
Die SD-Karten werden vorsichtig in das SD-Karten-
Einschubfach -7- geschoben. Soll eine SD-Karte
entfernt werden, muss die SD-Karte vorsichtig ge
-
drückt werden. Die SD-Karte schaut nun ein kleines
Stück aus dem Einschubfach heraus und kann nun
entfernt werden.
3. USB-Speichermedium laden
Verbinden Sie Ihr USB-Speichermedium mit dem
USB-Anschluss.
Source-Select-Funktionen
1.LED-Anzeige für Card-Select
Beim Einschalten des Gerätes leuchten die LED-An
-
zeigen für Source-Select wie folgt auf, egal ob sich
SD-Karten im Gerät befinden oder nicht.
SD1 LED leuchtet für Player A rot auf.
SD2 LED leuchtet für Player B grün auf.
I. Reloop Indicator
Indicates if a loop has been set which can be
activated with the reloop function.
J. Auto Cue Status
Indicates if the auto-cue function is activated. Press
and hold the SGL/CTN Button -20- for more than
one second in order to turn the auto cue function
on and off.
K. Time Display
Indicates the time of the chosen time mode in
minutes, seconds and frames.
L. SD Information Indicator
Indicates track info and system settings,.
M. Time Mode
Indicates the elapsed and remaining time of the
currently playing track. By pressing the Time Button
-8- one can switch between these two modes.
N. Repeat Indicator
Indicates whether the unit is in repeat mode.
O. Single Indicator
Indicates whether playback is set to single (“single”
is lit) or continuous mode (display is not lit).
P. Track Indicator
Indicates the number of the currently playing track.
Q. Play/Pause Indicator
Indicates whether the player is set to play or pause
mode.
Connections
1.Connect the outputs -23- with the line inputs of
your mixer or amplifier.
2.Connect the power connector -21- with the power
cord and connect it to a socket.
3.If required connect the fader start plug to the
corresponding plugs of another Reloop SMP-1 USB.
Operation
1. Switching power on
After having arranged all connections, turn on the
device by pressing the Power Switch Button -18-.
2. Loading SD cards
The cards have to be carefully inserted in the SD
card slots -7-. If you wish to remove an SD card,
gently push the SD card. The SD card will eject and
can then be removed.
3. Loading USB storage media
Connect your USB storage medium to the USB port.
Source Select Functions
1. LED display for card select
When turning on the device the LEDs for source
select will be lit as follows, whether SD cards have
been inserted or not.
SD1 LED will be illuminated red for player A
SD2 LED will be illuminated green for player B
8
I. Témoin Reloop
Indique si une boucle, pouvant être lancée au moyen
de la fonction Reloop, est programmée.
J. État Auto-Cue
Indique si la fonction Auto-Cue est activée. Pour
activer et désactiver la fonction Auto-Cue, il faut
enfoncer la touche SGL/CTN -20- pendant plus
d‘une seconde.
K. Affichage de la durée
Représente l‘affichage de durée sélectionné en
minutes, secondes et Frames.
L. Informations
Affiche les informations de la piste et le paramétrage
du système.
M. Mode Time
Affiche la durée écoulée (elapsed) ou restante
(remain) d‘une piste. Appuyer sur la touche Time -8-
pour commuter entre les deux modes.
N. Témoin Repeat
Indique si le lecteur est en mode Repeat. (voir
chapitre paramétrage du système / Repeat)
O. Témoin Single
Indique si la lecture est réglée sur le mode Single
(„Single“ s‘allume) ou Continuous (écran éteint).
P. Témoin Track
Indique le numéro de la piste actuelle.
Q. Témoin Play/Pause
Indique si le lecteur est en mode de lecture ou en
mode Pause.
Connectique
1. Ces prises de sortie -23- doivent être raccordées
aux prises Line de la console ou de l‘ampli.
2.Raccorder la prise d‘alimentation électrique -21-
au câble secteur et le brancher sur une prise de
courant.
3.Le cas échéant, raccorder la prise de connexion
pour Fader-Start -22- à la prise respective d‘un
autre lecteur Reloop SMP-1.
Utilisation
1. Mise sous tension
Après avoir effectué tous les branchements, allumer
l‘appareil avec la touche Marche/arrêt -18-.
2.Charger la carte SDInsérer les cartes SD avec
précaution dans la fente d‘insertion des cartes SD
-7-. Pour retirer une carte SD, enfoncer la carte SD
avec précaution. La carte SD sort un peu de la fente
d‘insertion et peut alors être extraite.
3.Charger le support de données USB :
Brancher le support de données USB sur le port
USB.
Fonctions Source-Select
1.Témoin à DEL pour Card-Select
À la mise en marche de l‘appareil, les témoins à DEL
pour Source-Select s‘allument comme suit, que des
cartes SD soient insérées ou non.
La DEL SD1 s‘allume en rouge pour le lecteur A.
La DEL SD2 s‘allume en vert pour le lecteur B.
Содержание SMP-1
Страница 12: ......


