background image


8

 
4.0  PTO. 

The PTO is a very important item. It drives the machine from the tractor and ensures the safe operations when 
correctly maintained and installed.  
The PTO shaft has its own CE certification. Read the PTO shaft manual, which is connected to the shaft itself

 
     4.1  PTO LENGTH. 

 The length of the PTO is very important. When too long, the transmission of the tractor and/or VERTI-
DRAIN may be damaged. When the overlap length of the tubes drops under 150 mm (6") anytime, the 
PTO may be damaged.  

* the length changes when the machine is raised or when another tractor is used. 

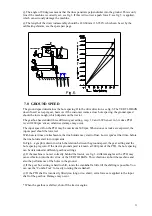
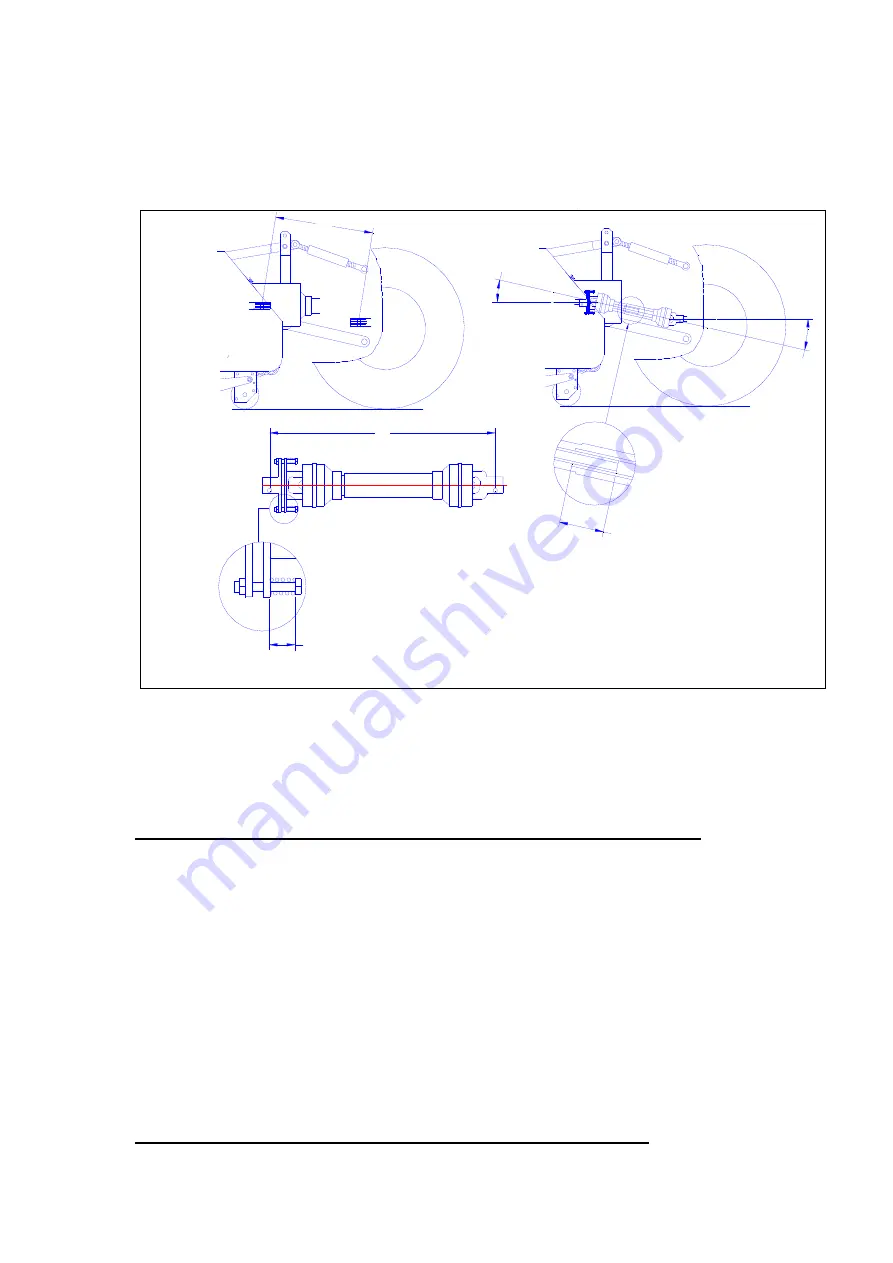
To cut the standard PTO from new or for another tractor, work as follows (see fig. 3): 
1. Measure the distance between tractor PTO shaft and VERTI-DRAIN PTO shaft from groove to 
groove when  machine is on the ground at correct angle and attached to the tractor. 
2. Measure the length B of the PTO in its shortest position from lock pin to lock bolt. 
3. Split PTO in two pieces and remove safety cover from each end 
4. Both tubes and safety cover ends should be shortened: (B - A) + 75 mm (3"). 
5. Deburr all items, use some grease and put all parts together. 
6. Assemble the slip clutch side of the PTO to the VERTI-DRAIN transmission. * Torque for lock 
bolt should be 80 Nm (700 lb.in.)and checked every 40 hours 
7. Connect other side to the tractor. 
8. Check overlap of tubes. 

  * Never run machine with a damaged PTO safety cover. Replace it first. 

150 mm (6")

 min

L

A

B

M

ax

 3

M

ax

 3

L minimum= 31.5 mm  1.250"

L standard = 33 mm  1.300"

Fig.3.

Содержание Verti-Drain 7316

Страница 1: ...MANUAL IS CAREFULLY READ BEFORE THE VERTI DRAIN IS USED 1735 English 911 120 441 Operator and Parts manual Verti Drain Model 7316 Serial number Translation of the original operating instructions Kweke...

Страница 2: ...tions are given which are stated in a number sequence The user must follow the instructions according to this sequence If the appears this refers to safety instructions If the is used this refers to a...

Страница 3: ...ler from the ground and unstable behaviour of the VERTI DRAIN 10 Check the VERTI DRAIN once a week to ensure there are no loose screws or nuts and bolts 11 The VERTI DRAIN may never be used without pr...

Страница 4: ...coupling of the Verti Drain 13 12 0 Problem analysis 14 13 0 Maintenance 15 14 0 EU Declaration 15 15 0 Technical information 16 15 1 Torque settings 16 15 2 The crankshaft 17 15 2 1 Replacing the tra...

Страница 5: ...m 1 7 1 2 Recommended tractor size 28 HP with lift capacity of minimum 825 Kg 1815 lbs Capacity maximum Spacing 65 mm 2 1 2 Spacing 130mm 5 Spacing 195mm 7 1 2 Up to 1360 sq mtr 12300 sq ft hour Up to...

Страница 6: ...ing it to rotate on its front roller 7 Gently lower the machine till it stands on the front and rear roller 8 Connect the machine to a tractor Use correct tractor see specifications 9 Lift the machine...

Страница 7: ...related to maximum tine length 6 Tine angle adjustment lever 7 Knurled nuts for securing the rear access door of the VERTI DRAIN rear access door should always be closed and free of any damage 8 Rubb...

Страница 8: ...ws see fig 3 1 Measure the distance between tractor PTO shaft and VERTI DRAIN PTO shaft from groove to groove when machine is on the ground at correct angle and attached to the tractor 2 Measure the l...

Страница 9: ...the machine Loosen up all bolts nuts two turns Run the machine in the field at very low rpm s If the clutch slips stop after 10 seconds If it doesn t slip loosen bolts more or go to annual maintenance...

Страница 10: ...tual decal reading Clean and spray the spindle and nut with anti sticking grease oil every 100 hours to prevent dirt sticking on the nut 6 0 TINE ANGLE ADJUSTMENT The adjustment of the angle of all ti...

Страница 11: ...rocks are expected the input speed should be lowered With heavier tines or attachments the tine holders may start to float Lower rpm s at that time before the tine holders start to turn upwards In Fi...

Страница 12: ...achine further till the lowest tines are at least 120 mm 5 above the ground 5 Move to the next spot and start again as described above It is absolutely necessary to proceed as described above If the m...

Страница 13: ...nd is very compacted use shorter thinner tines to penetrate or adjust working depth 10 0 TRANSPORT OF VERTI DRAIN The user is responsible for the transport of the VERTI DRAIN behind the tractor along...

Страница 14: ...circumstances Change tine size Adjust working depth Use other size tines Adjust working depth Irrigate first Do job not in one pass PTO breakage Slip clutches slips often Tubes are cracking Check set...

Страница 15: ...ely at machine 4 shots each EP 2 After every 100 hours Grease PTO and rollers Check bolts nuts Look closely at machine Grease spindles front roller 4 shots each EP 2 After every 500 operating hours Re...

Страница 16: ...questions please contact your dealer who is willing to assist you 15 TORQUE SETTINGS In fig 8 the torque settings of the most important bolts nuts are given For the ones the torque setting is not men...

Страница 17: ...lide crank VI away from the gearbox using a hammer and hitting is slightly at the centre until big end pin VII is free 5 Rotate crank VI and slide big end IX from the big end pin VII 6 Remove handle X...

Страница 18: ...e of possible tension in the crankshaft parts It is necessary to remove these as follows see fig 9 1 Tap the centre of the crank adjacent to the gearbox alternately left and right 2 Feel whether the c...

Страница 19: ...semble the bridge V in between T and AD V is bolted with two bolts nuts U to T at one side and with one bolt W nut N one bolt nut U to AD at the other side The hydraulic cylinder O bottom side is asse...

Страница 20: ...verything can be tightened BE SURE that all tubes and hoses are fully inserted into the connectors before tightening them 10 Assemble both supply hoses B to the machine and the quick connectors A If t...

Страница 21: ...the machine all the time Use washers 16 to align the bushes to the rear roller scraper support Assembling the core collector itself Assemble supports 17 with eye bolts 9 and nuts 10 11 to the main co...

Страница 22: ...ted when the machine is raised When the working depth on the machine is adjusted the chain length need to be checked The rubber seal strip 12 is the first and major shovel that should hold the cores I...

Страница 23: ...ain beam can be hooked onto the machine The cut outs on the plate at each side of the main beam 7 should fit the mounted bushes 2 When the main beam is hooked up fit bolt 9 and square nut 13 When asse...

Страница 24: ...ate any tine motion in the ground with 75 degrees we have the maximum tine action in the ground When tines are new they may disrupt the turf specially when the root system is weak Clean the tines firs...

Страница 25: ...ow coring reduce your rpm s or irrigate first The dirt may wear your machine When the turf is damaged use the solid tines first to establish a healthy root system first or adjust the working depth The...

Страница 26: ...number of tines like is shown in I II and III Also try adjusting the working depth All tines are fitted with grub screws B The grub screws of the centre row can only be accessed when the outer row ha...

Отзывы: