d
c
b
35mm
①
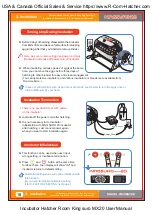
Cut the silicone tube exactly to 35mm, and insert to nipple as picture 1-2.
(When you purchase, product is originally assembled as
ⓐ
-1.)
②
Cut the silicone tube of 1.5m to half, and insert to assembled nipple
ⓐ
.
③
It is normal if you assembled as pic.1-3. If you do not insert silicon tube to the nipple
completely as pic.1-4, pumping will not work well.
④
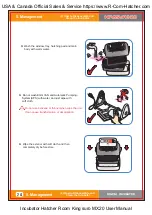
Loose two bolts of APS case as picture 1-0, and insert the assembled silicone tube and
nipple as pic.1-3 to the side of pic. 1-5
ⓑ
.
⑤
Grip the part
ⓒ
on Pic.1-5, and pull the silicone tube so that fit to
ⓓ
.
(If silicon tube should be assembled tightly.)
⑥
Spread IN and OUT of tube so that the silicone tube is not tangled. Insert tube on the groove,
and cover the case.
Here, be sure to check not the silicone tube or wire get jammed. Refer to the Pic.1-6.
[Pic.1-1]
[Pic.1-3]
[Pic.1-4]
1.5m
* Is not required with first use
a
a
a
- 1
[Pic.1-6]
[Pic.1-0]
[Pic.1-2]
[Pic.1-5]
회전방향
OUT
How to Assemble APS (Automatic Pumping System)
Turning
Direction
Turning
Direction
DIGITAL INCUBATOR
13
2. Before use
(4) APS Assembly / Speed Control /
Tube Replacement/ Storage and Cleaning
2. Before use
(4) APS Assembly / Speed Control /
Tube Replacement/ Storage and Cleaning
USA & Canada Official Sales & Service https://www.R-Com-Hatcher.com
Incubator Hatcher Rcom King suro MX20 User Manual


