background image

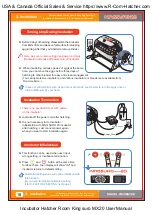
 Insert aluminum pipe to the frame exactly. 

 Place the EGG VAN on the flat surface, and tighten

 the bolts.

 Incubator can drop in case of wrong assembling.

1

Assemble opposite side with same way.

2

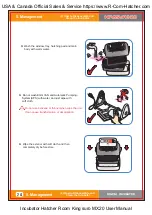
 EGG VAN turns the incubator and eggs very slowly

     about 90

°

 per an hour. 

     The device can turn irregular intermittently, it is normal.

Do not turn the incubator manually when

the incubator is on the EGG VAN. 

(It can cause egg turning device failure.)

Spray lubricating oil such as WD 40 on the gear part or

operation part of EGG VAN for helping smooth

operation.

20mm

How to Assemble the EGG VAN

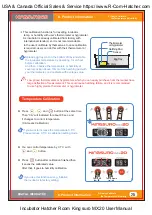
Place eggs and cover view window.

8

         If view window is not closed completely,

         temp. fails to go up.

12

DIGITAL INCUBATOR

2. Before use

      (2) How to Assemble Main Body /

(3)  How to Assemble the EGG VAN

2. Before use

       (2) How to Assemble Main Body /

(3)  How to Assemble the EGG VAN

USA & Canada Official Sales & Service https://www.R-Com-Hatcher.com

Incubator Hatcher Rcom King suro MX20 User Manual

Содержание KINGSURO MAX 20

Страница 1: ... 20 REV 3 0 Love of life begins with Rcom DIGITAL EGG INCUBATOR USER S MANUAL PUMP POWER POW ER IN LET USA Canada Official Sales Service https www R Com Hatcher com Incubator Hatcher Rcom King suro MX20 User Manual ...

Страница 2: ...USA Canada Official Sales Service https www R Com Hatcher com Incubator Hatcher Rcom King suro MX20 User Manual ...

Страница 3: ...to Disassemble and Clean the Incubator 23 24 3 Incubation 1 Incubator Installation 2 Incubation start How to Stop Egg Turning Incubation Termination 16 17 18 Incubation Function Settings Management Caution Caution mark against a fault that can cause damage trouble or failure of incubation Tip References or useful suggestions in using KING SURO 20 Mark Explanation Warning of actions which may be da...

Страница 4: ...at insulation to the minimum Not required to have a balance weight with the optimized incubator design considering the centroid of incubator s top and bottom when eggs are placed Different kinds of egg can be placed on egg tray and Egg divider made of ABS material which has perfect elasticity The bottom of the egg tray is made with embossed skid resistance floor to prevent young birds from deformi...

Страница 5: ...ock Do not use any other non standard parts except those provided Risk of damage or hatching failure Please ensure that no small objects get into the holes on the incubator Risk of electric shock or fire Do not disassemble or modify the incubator in any way Risk if electric shock or fire If the incubator sounds strange or emits smoke contact your service center Risk of electric shock or fire If th...

Страница 6: ...TOR 1 Introduction 3 Identification of Parts and Composition 1 Introduction 3 Identification of Parts and Composition Ventilation Control Lever Egg tray Bottom body ABS Divider View Window Main Controller Power cover OUT IN Automatic pumping system APS USA Canada Official Sales Service https www R Com Hatcher com Incubator Hatcher Rcom King suro MX20 User Manual ...

Страница 7: ...wer cover Be sure to check this before connecting power Product serial No is indicated inside of main controller Be careful not to remove the serial No ex RCM0950278 Silicon Tube Expendables Pumping Motor Pump Frame gear 12 5cm diameter Ø2 6 3 5 Silicon Tube and Nipple 2pcs 3 5cm diameter Ø2 6 3 5 Humi Pad Clip 2pcs Humidity Pad Fixing Use DIGITAL INCUBATOR 7 1 Introduction 3 Identification of Par...

Страница 8: ...arts Function Key Function Temp 37 5 C tEP rH HI LO 45 2 C 3 C C C F Humidity Centigrade Fahrenheit Dispaly Default Setting Setting Mode Press two buttons at the same time to go to Setting Mode Select Menu Quick Movement Cancellation Setting value check during incubation Value APS is forced to operate if press 5sec APS is forced to operate for 2min if press 10sec Value Factory Initialization Abnor...

Страница 9: ...le noise and vibration around and temperature ranging 28 82 4 F with small variation in temperature Especially if there are frequent occasions when the temperature drops suddenly at night compared with daytime be sure to check from time to time and pay attention so that the incubator is not directly exposed to sunlight during daytime When the temperature of incubation room is lower than recomended...

Страница 10: ... tube is not folded Nipple Insert the nipple which is connected with view window to the hole of main controller and assemble view window and main controller with two bolts 4 Loose two bolts connecting main controller and view window After that disassemble main controller from view window by pulling 4 hooks on main controller USA Canada Official Sales Service https www R Com Hatcher com Incubator H...

Страница 11: ... eggs and divider optimally so the eggs are not interrupted for incubation Ensure hatching pad is placed in egg tray After hatching finished be sure to wash and dry tray mat completely for next use It is recommended to place eggs with sharp end side down Over60 humidity Cutto70mm 75mm Over60 humidity Cutto70mm 75mm Under50 humidity Cutto50mm 55mm Under50 humidity Cutto50mm 55mm Egg Hatching Pad Eg...

Страница 12: ... is on the EGG VAN It can cause egg turning device failure Spray lubricating oil such as WD 40 on the gear part or operation part of EGG VAN for helping smooth operation 20mm How to Assemble the EGG VAN Place eggs and cover view window 8 If view window is not closed completely temp fails to go up 12 DIGITAL INCUBATOR 2 Before use 2 How to Assemble Main Body 3 How to Assemble the EGG VAN 2 Before u...

Страница 13: ... that fit to ⓓ If silicon tube should be assembled tightly Spread IN and OUT of tube so that the silicone tube is not tangled Insert tube on the groove and cover the case Here be sure to check not the silicone tube or wire get jammed Refer to the Pic 1 6 Pic 1 1 Pic 1 3 Pic 1 4 1 5m Is not required with first use a a a 1 Pic 1 6 Pic 1 0 Pic 1 2 Pic 1 5 회전방향 OUT How to Assemble APS Automatic Pumpin...

Страница 14: ...icone tube wear out and it does not pump water effectively you should replace silicone tube Refer to the page 13 If it failed in pumping water check direction of IN and OUT again and also check if motor is turning with anti clockwise Also length of silicon tube should be 35mm and inserted correctly Refer to the page 13 Be sure to use the silicon tube supplied from Autoelex Ø2 6 3 5 If water does n...

Страница 15: ...her 1 2 days before hatching than the early and middle incubation periods Humidity requirements during incubation are 45 55 for waterfowl 40 45 for poultry and 35 45 for parrot in general One day before hatching all kinds of birds need about 65 humidity and sometimes need higher than that However in areas of high ambient humidity lower levels of humidity may be needed during incubation Rcom Pro20 ...

Страница 16: ... connecting power cord to outlet Connect silicon tube end of APS Automatic Pumping System into the nipple of incubator and the other end into PET bottle 3 If you do not insert silicon tube exactly it will not work properly Refer to the page 13 How to replace silicon tube Press button for about 10 sec for pump operation and it automatically stop after 2min If you want to stop pump operation press a...

Страница 17: ...keeping optimum temperature and temperature can move up slowly at the first stage Notice of Power Failure If power is turned off and then on again because of power failure or by mistake first dot will blink The first time you connect power FND light will blink and pump will work for about 2sec Then incubator version will be indicated on FND for about 1 sec After version indication buzzer sounds fo...

Страница 18: ...t take off the power cord after hatching It is not necessary to do Incubator Initialization with KING SURO 20 incubator after hatching Just connect power again when you want to start incubation again There is no specified ON or OFF button on the incubator Incubator Initialization Calibrated setting value will not be initialized with this function If you need to initialize calibrated setting refer ...

Страница 19: ...will blink Just press button if you do not need to change setting Calibrated temperature and humidity will also return to factory setting Return to Factory Setting Unplug power cord Replug during button is pressed Then rSt AL will indicated in display and incubator return to factory setting Default setting This function is for return incubator to factory setting DIGITAL INCUBATOR 19 4 Function Set...

Страница 20: ...her than setting temperature because of abnormal ambient temperature increase When room temperature is higher than incubator temperature this function works with buzzer Here HI and temp gap are displayed alternatively Press OK button to remove buzzer How to SetAbnormal High TemperatureAlarm Adjust abnormal high temperature value with or button Default setting 2 C After setting required value press...

Страница 21: ...e next stage C F change How to SetAbnormal Low TemperatureAlarm How to change Centigrade value to Fahrenheit C 5 9 F 32 After selecting C or F press button to save Default setting C How to change Centigrade Fahrenheit Select C or F with or button DIGITAL INCUBATOR 21 4 Function Settings 3 How to Set Abnormal Low Temp Alarm How to change Centigrade Fahrenheit 4 Function Settings 3 How to Set Abnorm...

Страница 22: ... website www Rcom co kr Maintenance after Hatching How to Work Automatic Pumping System APS by Force Press button for about 5sec during incubation process Then PUMP will operate by force with LED light on Press button for about 10sec then pump motor works for 2min by force It still works for 2min even if you remove your finger from the button If you press button for about 10sec pump will operate f...

Страница 23: ... main controller from view window Refer to the page 10 Wipe the main controller smoothly with soft brush Be careful not to give impact to sensor part or heating part Temp Humidity sensor is assembled with connector for easy replacement in case of trouble Be sure to take off power cord before cleaning the incubator DIGITAL INCUBATOR 23 5 Management 2 How to Disassemble and Clean the Incubator 5 Man...

Страница 24: ...y hatching pad and main body with warm water Do not use benzene or thinner when wipe the unit It can cause transformation or decoloration 24 DIGITAL INCUBATOR 5 Management 2 How to Disassemble and Clean the Incubator 5 Management 2 How to Disassemble and Clean the Incubator USA Canada Official Sales Service https www R Com Hatcher com Incubator Hatcher Rcom King suro MX20 User Manual ...

Страница 25: ...actory setting This calibration function is for resetting incubator temp or humidity with user s thermometer or hygrometer As incubator is already calibrated from factory with international standard so it is not recommendable to the user s calibrate by themselves In case calibration is required users can do this with their thermometer or hygrometer You can control temperature by 0 1 C with and but...

Страница 26: ...mode Servicing 26 DIGITAL INCUBATOR 6 Product Information 1 How to Calibrate the Temperature Humidity 2 How to Replace the Fuse 6 Product Information 1 How to Calibrate the Temperature Humidity 2 How to Replace the Fuse Increase Decrease All our Rcom digital incubators of Autoelex Co Ltd are made by precision systems under strict quality control But occasionally some defective products are found o...

Страница 27: ...k Temperature difference in the incubator sunlight temp of incubation room etc Mark hatching date on eggs and move them to other incubator brooder just on the marked date In case of putting in many eggs at the same time it s convenient to prepare a spare incubator available as a brooder Lower temp setting of the incubator about 0 5 1 ex 37 5 37 0 Check if egg turning function is OFF Raise temp set...

Страница 28: ... in bottom body Ensure the incubator is not touching any other items and nothing is on top of the unit Move the incubator to a flat and even surface Unplug the power supply and disassemble the main body for cleaning the egg turning tray and gear Check whether you put anything on the incubator Check if there is any vibration or check the incubator set on a table Check if there is any hatching debri...

Страница 29: ...ck CUSTOMER on the top of right corner 3 Click REGISTER PRODUCT 4 Fill in your information on the blanks 5 Completed to register If you already registered your information on Rcom website 1 Log on www Rcom co kr 2 Click Sign up on the top right corner 3 Check YES to the question Did you purchase Rcom products 4 Fill in your information on the blanks Humidity Limits 20 70 Itcanbechangedaccordingtot...

Страница 30: ...iles MAX 60 MX R60 Rcom reptiles PRO 90 PX R90 Rcom Incubator Series WATER PUM P POW ER POW ER INL ET Rcom BROODER ICU MX BS500 N Rcom MARU MAX 500 MX 500S Rcom MAX 50 MX 50 WATER PULL OPEN WATER PULL OPEN Rcom PRO 50 PX 50 USA Canada Official Sales Service https www R Com Hatcher com Incubator Hatcher Rcom King suro MX20 User Manual ...

Страница 31: ...USA Canada Official Sales Service https www R Com Hatcher com Incubator Hatcher Rcom King suro MX20 User Manual ...

Страница 32: ...gun Gyeonggi do Korea MANUFACTURER North America Sales Serivce https www R com hatcher com Rcom is designed for user s easy and convenient use It can be changed without notice for improvement in performance design treatment and software etc https www R com hatcher com USA Canada Official Sales Service https www R Com Hatcher com Incubator Hatcher Rcom King suro MX20 User Manual ...

Отзывы: