Chapter 1
11
Connections & Setup
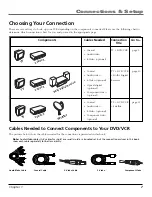
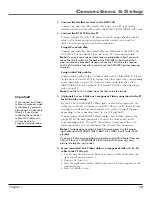
Using Audio/Video cables:
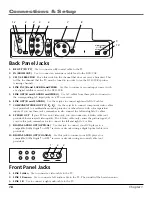
Connect audio cables to the L (white) and R (red) AUDIO LINE OUT jacks on
the back of your DVD/VCR. Connect the other end to the corresponding audio
input jacks on your TV. Connect a video cable from the yellow VIDEO LINE
OUT jack on the back of your DVD/VCR to the video input jack on your TV.
Note
: Tune the TV to it’s Video Input Channel to see the DVD/VCR’s image.
3.
(Optional) Use an S-Video or Component Video connection to the TV
for DVD-only viewing.
If your TV has COMPONENT VIDEO jacks or an S-Video input jack, use either
(but not both) to connect your DVD/VCR to your TV for DVD-only viewing
(you will need to use channel 3 or 4 or the A/V input channel– depending on
the connection used– to see VCR playback).
Connect either COMPONENT VIDEO cables or an S-Video cable to the proper
DVD/VCR back-panel jacks. Connect the other end(s) to the corresponding
jack(s). If your TV doesn’t have Component Video or S-Video input jacks, it is
not mandatory that you use this connection.
Notes
: This optional connection is for DVD viewing only. Use the proper input
channel (COMPONENT VIDEO INPUT OR S-VIDEO input) to view DVD playback.
If you use a DVD-only connection, you must connect AUDIO cables from the
DVD/VCR to the TV (COMPONENT VIDEO AND S-VIDEO jacks only carry picture
information, not sound).
4.
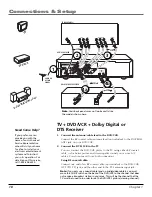
Connect Audio cables from the DVD/VCR to a Dolby Digital receiver.
To run sound from the DVD/VCR to the Dolby Digital Receiver, you have
three choices: standard AUDIO cables, SPDIF (Optical) Digital Audio cables,
or Coaxial Digital Audio cables.
a. To connect standard AUDIO cables, connect the ends of Audio cables to the
AUDIO LINE OUT jacks on the DVD/VCR player.
b. To connect a SPDIF (Optical) Digital Audio cable, connect one end to the
OPTICAL DIGITAL AUDIO OUT jack and the other end to the Optical
Digital Audio input jack on the Dolby Digital receiver, OR connect one of a
digital audio cable to the COAXIAL DIGITAL AUDIO OUT jack and the
other end to the corresponding coaxial digital audio input jack on the
Dolby Digital receiver.
6.
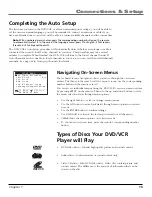
Enable the features in the menu system.
First, turn on the DVD/VCR and tune to the TV to the DVD/VCR viewing
channel. Then, press the SETUP button on the remote and enter the menu.
a. If connecting an optical or coaxial digital cable to the receiver (Step 4b):
1. Use the up and down arrow buttons to point to
DVD Setup
. Press the
right button to select it.
2. Point to
Language/Audio Setup
, then press the right arrow button.
3. Point to either
Dolby D Decoder
or
DTS Decoder
, then press the right
arrow button until
Yes
appears.
4. Press GO BACK to exit.
b. If you connected an S-Video cable or a component video (Y, P
B
, P
R
)
cable to the TV (Step 3).
1. Use the up and down arrow buttons to point to
DVD Setup
. Press the
right arrow button to select it.
2. Point to
Alt Video Out
.
3. Press the right arrow button until
Component
or
S-Video
appears as the
selected choice.
4. Press GO BACK to exit.
About Dolby Digital
®
and DTS
®
Both Dolby Digital
®
and DTS
®
are audio formats used to
record 5.1-channel audio
signals onto the digital track
of film (while the film is being
made). Both of these formats
provide up to six separate
channels: left, right, center,
left rear, right rear, and
common subwoofer.
The disc will play 5.1-channel
sound only if you’ve
connected a DTS
®
or Dolby
Digital
®
receiver or decoder
and if the original movie the
disc was recorded from was
encoded in the Dolby Digital
®
or DTS
®
format.
Please Read This Before
Using either DIGITAL
AUDIO OUT Jack!
This player’s DIGITAL AUDIO
jacks are designed for a
connection to a Dolby Digital
®
or DTS
®
receiver or decoder.
Older digital equipment may
not be compatible with the
Dolby Digital bitstream. Such a
connection can create a high
level of noise that may be
harmful to your ears, and could
damage headphones or
speakers.
It is important to choose the
correct output setting in the
DVD/VCR’s menu, especially
when you use the DIGITAL
AUDIO OUTPUT jack. For more
information, see step 6.
Содержание VC125HF
Страница 1: ...DVD VCR User s Guide Changing Entertainment Again ...
Страница 63: ...This page left blank intentionally ...


