background image

Chapter 1

3

Chapter 1: Connections and Setup

Illustrations contained in this document are for representation only.

Things to Consider Before Connecting Components

Protect Components From Power Surges

Connect all components before plugging any power cords into the wall outlet.

Always turn off the TV and other components before you connect or disconnect any cables.

Position Cables to Avoid Audio Hum or Interference

Insert all cable plugs firmly into their jacks.

Place any Audio/Video (A/V) cables to the side(s) of the TV’s back panel instead of straight down the back after connecting components.

Try not to coil any twin-lead antenna cables and keep them away from all cables as much as possible.

Make sure all antennas and cables are properly grounded. Refer to the 

Safety Tips 

sheet packed with your unit for detailed information.

Protect Components From Overheating

Never block ventilation slots in any component. Arrange the components so that air can circulate freely.

Do not stack components.

Allow adequate ventilation when placing components in a stand.

Place an amplifier or other hot component on the top shelf of a stand so heated air rising from it will not flow around other components.

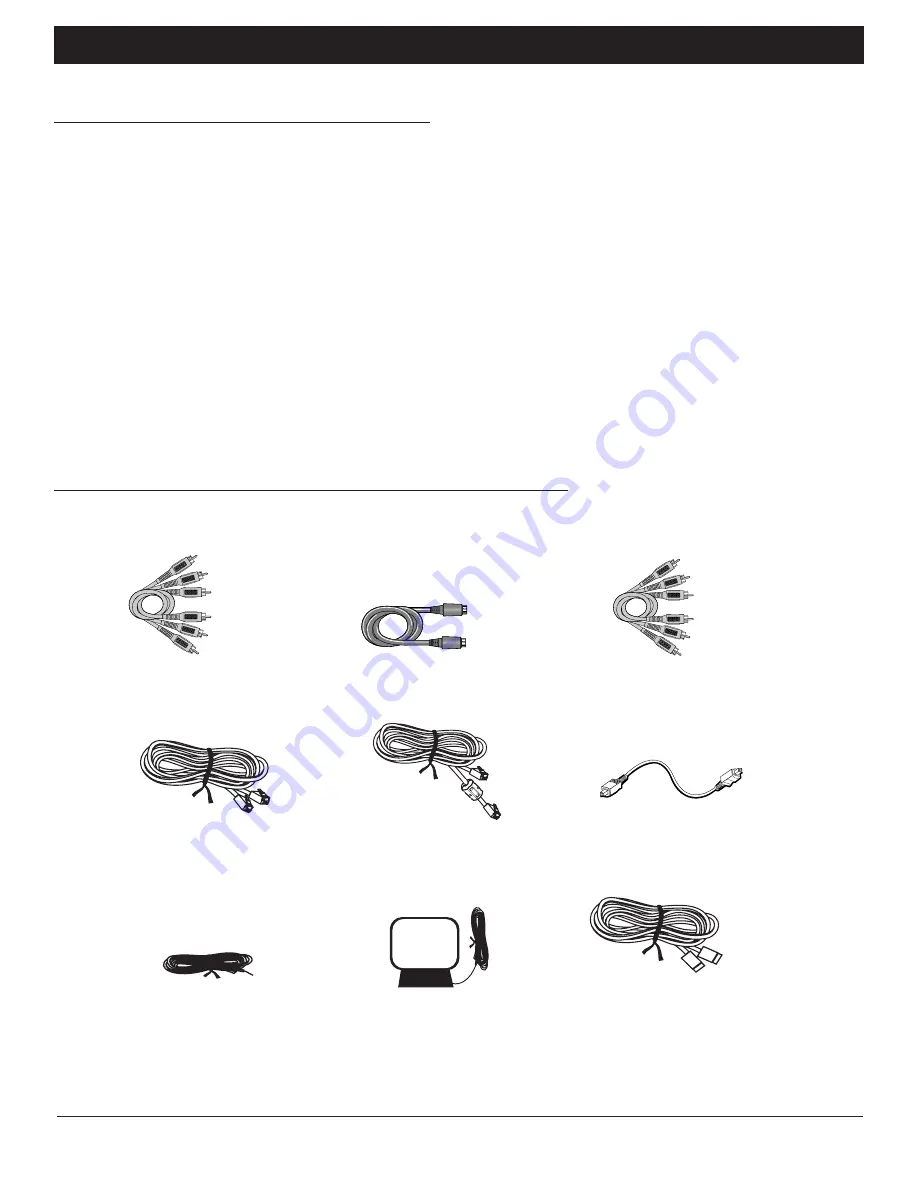
26 AWG modem telephone line cord (included)

Cables to Connect Components to Your Home Theater Music Jukebox

The pictures below show the cables that can be used for the connections represented in this book.

Audio/Video cables (included)

Component Video (Y•Pb•Pr) cables

S-Video cable (included)

Digital Optical cable

Ethernet cable with attached
ferrite core filter (included)

FM antenna (included)

Am loop antenna (included)

USB cable

Содержание RTD750

Страница 1: ...Home Theater Music Jukebox User s Guide RTD750 Changing Entertainment Again ...

Страница 2: ...oduct Registration Please fill out the product registration card packed separately and return it immediately For U S customers Your RCA Consumer Electronics product may also be registered at www rca com productregistration Registering allows us to contact you if needed Product Information Keep your sales receipt to obtain warranty parts and service and for proof of purchase Attach it here and reco...

Страница 3: ...Preferences 16 Zip Code 16 The Buttons on the Remote Control 17 Frequently Used Buttons 17 Other Buttons on the Remote Control 18 continued on the next page Chapter 2 Music Features Playing Music 19 Some Terms and Definitions You ll See in the Following Chapters 19 Navigating the Music Player Screen 19 Selecting and Listening to a Music Title 19 Sorting Music by Artist Title Song Alphabetically 19...

Страница 4: ...ed Features Advanced Settings 39 User Information 39 Network Configuration 40 Preferences 42 Audio and Video Settings 44 Security and Parental Controls 47 Utilities 48 Chapter 6 Additional Information Troubleshooting 50 Care and Cleaning 53 Handling Cautions 53 Maintenance of Cabinet 53 Formation of Condensation 53 Handling Discs 53 Cleaning Discs 53 Programming the Remote to Operate Other Compone...

Страница 5: ...ll antennas and cables are properly grounded Refer to the Safety Tips sheet packed with your unit for detailed information Protect Components From Overheating Never block ventilation slots in any component Arrange the components so that air can circulate freely Do not stack components Allow adequate ventilation when placing components in a stand Place an amplifier or other hot component on the top...

Страница 6: ...vie chapters 9 Display 10 Disc tray 11 Open Close Opens and closes the disc tray 12 Stop Stops the current function record play etc 13 Play Pause Plays or pauses playback 14 VCR2 S Video input jack Allows you to connect an S video component 15 MENU Displays the on screen menu system 16 VCR2 audio video input jacks Allows you to connect an external audio or video component such as a camcorder or vi...

Страница 7: ... VIDEO jack 5 S VIDEO IN jacks If your video source component e g cable box or satellite receiver has an S Video output jack connect it to this S Video input for better quality than composite video 6 VIDEO IN and OUT jacks Allows you to connect a VCR and send the signal to your TV 7 Audio Input jacks VCR SAT TV AUX Connects to your audio input sources 8 DIGITAL AUDIO IN OUT jacks Connects to your ...

Страница 8: ...er you won t be able to access artist information CD cover art buy CDs from OpenGlobe services radio information etc If you re not connected through Ethernet make sure you select the modem in the setup menus see page 12 3 Connect your Cable Box or Satellite Receiver to the Music Jukebox If you have a cable box or satellite receiver you may want to connect it to your Music Jukebox Connect the audio...

Страница 9: ...ry to align the center speaker and two main speakers or set the center speaker slightly behind the left and right main speakers otherwise the sound separation may be affected 3 Aim the rear speakers directly at the two main speakers matching height to height If the room is sparsely decorated slightly tilt the speakers down to increase sound quality If the room is densely decorated face the speaker...

Страница 10: ...ng the speakers make sure the colors of speaker wires and terminals are matched If the cords are reversed the sound will be distorted and lack bass Connecting the Antennas The AM and FM antennas connect to the AM and FM terminals on the system s back panel They must be hooked up in order to receive clear reception Uncoil the antenna wires and locate the bare ends Press down on the tab to open the ...

Страница 11: ...MUSIC RADIO or MOVIES button on the remote or press the POWER button on the front of the unit Note The front of the unit displays STARTING when the system is first plugged in and initializing The POWER indicator comes on when the Music Jukebox is ready for use 3 Tune the TV to the correct Video Input Channel see the next page for more information You will not see any of the Music Jukebox s menus i...

Страница 12: ...on INPUT button The Video Input Channel for TVs varies by brand and model Below are some steps to try to find your TV s video input channel If your TV brand is RCA GE or Proscan press the TV button on the Music Jukebox s remote control then press the INPUT button If you have another brand of TV see page 54 to see if the Music Jukebox s remote can be programmed to control your TV If so once complet...

Страница 13: ...can select and configure your connection on an existing account Most other ISPs are supported if they use standard PPP type connections If you do not know if your ISP supports this standard Point to Point Protocol simply call the provider and ask If you don t have an Internet Service Provider ISP please sign up for one before proceeding on to the next step To set up an account with AOL so that you...

Страница 14: ...ialup connection go to page 15 Important If you re not connected through Ethernet make sure you select one of the dialup connection methods Internet Access through an ISP This screen asks if you currently have an Internet Service Provider ISP or if you are an AOL member If you do yes is selected and next is highlighted so just press OK SELECT If you don t have an ISP highlight no and press OK SELE...

Страница 15: ...ight save and press OK SELECT To enter text press the desired number button repeatedly and scroll through the letters assigned to that button until you see the desired letter To delete a character press REV DEL To move the cursor use the arrow buttons When finished highlight next and press OK SELECT to continue to the next screen Broadband Access Provider Once you set up your ethernet settings you...

Страница 16: ... the Quick Start process and you can now start enjoying your Home Theater Music Jukebox Note All advanced setup options are explained in Chapter 5 Note You may need to run this test more than once to verify your connection Explanation of Connection Test Check ethernet link Verifies that there is a physical connection to an Ethernet network This test will fail if there is no Ethernet cable connecte...

Страница 17: ...n the password text is hidden Some popular ISP access formats AOL Simply enter your username password and access number You don t need to enter AOL username etc Earthlink There are two methods a Login name ELN username OR b Login name username earthlink net Then enter your password and access number information MSN Login name MSN username Then enter your password and access number information When...

Страница 18: ...ed dial tone you hear when you have messages Before the Music Jukebox dials your ISP it checks the line for a regular dial tone If you have messages the Music Jukebox will disconnect and allow you to listen to your messages or you can set it to ignore the dial tone and dial automatically Highlight next and press OK SELECT to continue to the next screen Testing the Dialup Connection In the Dialing ...

Страница 19: ...MENU Displays the Music Movies or Radio Options menus MOVIES Puts the unit in DVD mode and displays the Movie Guide MUSIC Puts the unit in Music mode and displays the Music Guide OK SELECT When a menu is on the screen selects the highlighted item Also selects individual tracks of a CD or MP3 title or playlist OpenGlobe Takes you to a specialized information area to explore your favorite artists an...

Страница 20: ...e Music Jukebox In satellite cable mode changes audio input from analog to digital MUTE Reduces the volume to a minimum level on some compatible products ON OFF Turns the unit on or off Also turns other compatible components on or off PAUSE Pauses playback or recording modes Press PAUSE again to return to active playback or recording PLAY Plays a DVD disc REV DEL Searches backward if pressed durin...

Страница 21: ...ss the MUSIC button on your remote 2 Press GUIDE The Music Guide screen appears 3 To sort by artist title or song highlight and select the View Mode button on the screen and then highlight and select the desired view 4 To sort alphabetically press the number buttons on the remote for the desired letter Navigating the Music Player Screen The Music Player screen appears whenever you insert a CD or s...

Страница 22: ...e title of the CD and press GO BACK all tracks will be checked or unchecked To remove or add a single track use the up and down arrow buttons to highlight a track then press OK SELECT to remove or add it the track will be checked or unchecked To exit the Music Record screen press STOP 3 When finished selecting or deselecting tracks press RECORD all of the selected tracks are recorded to the hard d...

Страница 23: ...Recording Music from an External Audio Device This feature lets you record external audio sources radio tape LPs as MP3 files on the hard drive 1 Connect your external device to the Home Theater Music Jukebox 2 Press MUSIC the Music Guide appears 3 In the Music Guide navigate to the External Group highlight the external input you want to record and press the RECORD button on the remote or front of...

Страница 24: ...the name for the new playlist 4 When you have finished press OK SELECT to continue the Edit Playlist screen appears 5 Use the arrow buttons to highlight what songs you want to include in the playlist and press OK SELECT to checkmark them 6 When finished press RECORD to save the playlist Note Up to 200 songs can be added to a single playlist or favorites playlist There is no limitation to the numbe...

Страница 25: ...e the EDIT MUSIC GROUP screen appears 7 Use the arrow buttons to highlight what CD titles you want to remove from the group and press OK SELECT to uncheck them 8 When finished press RECORD to save the updated group Deleting a Playlist 1 Press the MUSIC button on your remote 2 Press MENU the MUSIC OPTIONS MENU appears 3 Highlight and select delete playlist the DELETE PLAYLIST screen appears 4 Use t...

Страница 26: ...d all titles within the current group until stopped No track will be repeated until all tracks have been played Selecting a play mode will close the Play Mode menu and display the Music Guide with the new play mode in effect To cancel and exit this screen without changing the play mode press STOP Note In the player screen press the GO BACK button to toggle the play modes Deleting Music This featur...

Страница 27: ...t the track information such as artist name title label name and year of release Or you can have the Home Theater Music Jukebox contact the OpenGlobe server 1 Press the MUSIC button on your remote 2 Use the arrow buttons to highlight the CD title you want to edit 3 Press MENU the MUSIC OPTIONS MENU appears 4 Highlight and select edit disc the EDIT DISC INFO screen appears 5 Use the arrow button to...

Страница 28: ...pears d Highlight and select transfer to portable the TRANSFER MUSIC screen appears 2 Use the arrow buttons to highlight the tracks you want to transfer and press OK SELECT to checkmark them 3 When finished press RECORD to transfer the tracks to the portable player Note If a warning appears stating that there isn t enough space on your portable player you will need to remove some of the songs from...

Страница 29: ... following types of discs DVDs audio CDs DVD Audio and MP3 CDs Before you put a disc in the player make sure it is compatible You can t play the following types of discs Laserdiscs CD I CD ROM computer only discs DVD ROM WMA discs or discs recorded using other broadcast standards i e PAL or SECAM Note Some discs may not be compatible due to laser pickup and disc design To Load and Play a DVD Disc ...

Страница 30: ...e on screen Info Display contains many playback features To see the Info Display press the INFO button on the remote while a disc is playing the Info Display appears across the top of the screen Each feature is illustrated with an icon Use the left and right arrow buttons to move through the different icons in the Info Display When an icon is highlighted use the up and down arrow buttons on the re...

Страница 31: ... press OK SELECT The movie starts playing at the beginning of the chapter you entered You can also se the up and down arrow buttons to go to the next or previous chapter Note The Chapter feature won t work if the disc isn t formatted with separate chapters Shortcut While you re playing a disc you can use the CH buttons to go to the next chapter previous chapter Changing the Audio Language If the d...

Страница 32: ...ing specified through the Music Jukebox s Preferences menu The subtitle language can also be changed through the DVD s disc menu If the disc doesn t contain the language you want to use the disc s default language is automatically selected Some discs are programmed to only allow you to access the subtitle feature through the disc s menu Changing the Camera Angle Some discs contain multiple angles ...

Страница 33: ...ays the title running time and cover art in the Movie Guide 2 Press the GUIDE button on your remote the Movie Guide screen appears 3 Use the left and right arrow buttons to highlight the group of your choice 4 Use the up and down arrow buttons to highlight the desired movie title 5 Press OK SELECT or PLAY the movie plays The MOVIE OPTIONS MENU Managing Movies Creating a New Movie Group 1 Press the...

Страница 34: ...een appears 6 Use the arrow buttons to highlight what DVD titles you want to remove from the group and press OK SELECT to uncheck them 7 When finished press RECORD to save the updated group Deleting a Movie Group 1 Press the MOVIES button on your remote 2 Press MENU the MOVIES OPTIONS MENU appears 3 Highlight and select delete group the DELETE GROUP screen appears 4 Use the arrow buttons to highli...

Страница 35: ...dit 3 Press MENU the MOVIE OPTIONS MENU appears 4 Highlight and select edit disc the EDIT DISC INFO screen appears 5 To connect to the OpenGlobe server for the disc info highlight and select lookup this disc if the info is available it will automatically fill in info 6 To enter the disc information manually use the arrow button to move to the desired field title actors year then enter the informat...

Страница 36: ... 2 Press MENU the RADIO OPTIONS MENU appears 3 Highlight and select auto tune am fm a screen appears to ask what radio band you want to tune 4 Highlight and select am or fm a confirmation screen appears 5 To continue highlight and select ok the unit searches for all the available stations To cancel and exit this screen without autotuning any stations press STOP Adding a New AM FM Station This feat...

Страница 37: ...ontinue the EDIT AM FM STATION screen appears 6 Enter the new information 7 When finished press RECORD to save these settings To cancel and exit this screen without editing the station information press STOP Deleting a Radio Station 1 Press the RADIO button on your remote 2 Press MENU the RADIO OPTIONS MENU appears 3 Highlight and select delete stations the DELETE STATION screen appears 4 Use the ...

Страница 38: ...tations Use this feature to automatically set the available internet radio stations 1 Press the RADIO button on your remote 2 Press MENU the RADIO OPTIONS MENU appears 3 Highlight and select get radio info a screen appears to ask which station list you want to download from the OpenGlobe server 4 Highlight and select internet a confirmation screen appears 5 To continue highlight and select ok the ...

Страница 39: ...ete the selected stations To cancel and exit this screen without deleting any stations press STOP Creating a New Radio Group 1 Press the RADIO button on your remote 2 Press MENU the RADIO OPTIONS MENU appears 3 Highlight and select new group a screen appears so you can enter the name for the new group 4 When you have finished press OK SELECT to continue the Edit RADIO Group screen appears 5 Use th...

Страница 40: ...e MUSIC OPTIONS MENU appears 3 Highlight and select delete group the DELETE GROUP screen appears 4 Use the arrow buttons to highlight the group s you want to delete and press OK SELECT to checkmark them 5 Press RECORD to delete the selected groups To cancel and exit this screen without deleting any groups press STOP ...

Страница 41: ...OK SELECT the SETUP USER INFORMATION menu appears 3 Press the down arrow button to highlight time zone and press OK SELECT the TIME ZONE screen appears 4 Press the up or down arrow button to highlight the time zone where you live then press OK SELECT 5 When finished highlight save and press OK SELECT User Information The User Information menu includes zip code time zone and privacy policy informat...

Страница 42: ... SELECT 5 When finished highlight return and press OK SELECT Network Configuration The network settings allow you to change some of the more advanced dialup and ethernet settings Internet Connection Choose how you connect to the internet 1 Press SETUP the SETUP menu appears 2 Press the down arrow button until network configuration is highlighted then press OK SELECT the SETUP NETWORK CONFIGURATION...

Страница 43: ...ce you move from the password field or whenever you return to this screen the password text is hidden 5 Highlight test connection and press OK SELECT The test results are displayed 6 When finished highlight save and press OK SELECT Ethernet Settings Choose your Ethernet connection Internet Protocol method dynamic or manual If you choose manual static enter all of the IP information provided by you...

Страница 44: ... SELECT 5 When finished highlight save and press OK SELECT Preferences The Preferences menu includes settings for music recording the screen saver software updates and DVD preferences Music Recording You can choose the bitrate quality of your mp3s 96k 128k 160k 192k and 320k The higher the bitrate the better the quality of the compressed song 1 Press SETUP the SETUP menu appears 2 Press the down a...

Страница 45: ...ired time then press OK SELECT 5 When finished highlight save and press OK SELECT DVD These preferences allow you to set the DVD player default languages and screen type 1 Press SETUP the SETUP menu appears 2 Press the down arrow button until preferences is highlighted then press OK SELECT the SETUP PREFERENCES menu appears 3 Press the down arrow button until dvd is highlighted then press OK SELEC...

Страница 46: ...se the arrow buttons to highlight subwoofer then press OK SELECT to toggle it on or off 7 To test the speakers use the arrow buttons to highlight test tone then press OK SELECT to toggle it on or off 8 When finished highlight save and press OK SELECT Audio and Video Settings For your convenience the audio video settings of your Home Theater Music Jukebox can be adjusted completely through the menu...

Страница 47: ... it is centered properly on your TV 1 Press SETUP the SETUP menu appears 2 Press the down arrow button until audio and video settings is highlighted then press OK SELECT the SETUP AUDIO AND VIDEO SETTINGS menu appears 3 Press the down arrow button until screen centering is highlighted then press OK SELECT the SPEAKER CENTERING screen appears 4 Press the right or left arrow button to center the scr...

Страница 48: ...TINGS menu appears 3 Press the down arrow button until sharpness is highlighted then press OK SELECT the SHARPNESS screen appears 4 Follow the directions on screen to adjust the sharpness to the desired level 5 When finished highlight save and press OK SELECT Color and Tint This setting helps you to adjust the color and tint settings of your TV to the optimum level 1 Press SETUP the SETUP menu app...

Страница 49: ...ust be between 4 and 8 numbers and cannot contain letters To delete a number press REV DEL To move the cursor use the arrow buttons 5 When finished highlight save and press OK SELECT Notes If you do not want to enable password protection leave the password blank If you forget your password enter 722 You will be able to clear the password or enter a new one Movie Ratings You can choose which movies...

Страница 50: ... make sure you want to reboot the system No information on the hard drive will be lost but any recordings in progress are interrupted 4 Use the arrow button to highlight reset and press OK SELECT the unit will reboot System Information The System Information screen gives you important information about the Jukebox which may be helpful when contacting your service provider 1 Press SETUP the SETUP m...

Страница 51: ...rocess 1 Press SETUP the SETUP menu appears 2 Press the down arrow button until utilities is highlighted then press OK SELECT the UTILITIES menu appears 3 Press the down arrow button until update software is highlighted then press OK SELECT A confirmation screen appears to make sure you want to update the software 4 Use the arrow buttons to highlight ok and press OK SELECT the unit will begin sear...

Страница 52: ...ard video S video or component video connection remember to also connect audio cables to the Music Jukebox If a center channel speaker is not connected you may need to change the surround mode to stereo or press the SURR button on the remote until the correct mode is selected No picture no sound but unit is on Tune your TV to the appropriate Video Input Channel see page 10 If you are using the com...

Страница 53: ...th mp3 files and audio CDs Both the player and the disc are coded by region If the regional codes don t match the disc cannot be played This player is Region No 1 Play starts but then stops immediately The disc is dirty Clean it Condensation has formed Allow player to dry out Can t advance through a movie You can t advance through the opening credits and warning information that appear at the begi...

Страница 54: ...ts at the beginning of a movie you won t be able to This part of the movie is often programmed to prohibit skipping through it Desired angle cannot be changed Most discs don t have the multi camera angle system and some discs only have multiple angles during certain parts of the movie Picture is too tall and thin Change the aspect ratio of the DVD preferences settings in the Setup menu Picture is ...

Страница 55: ... off the player after use Maintenance of Cabinet For safety reasons when cleaning the cabinet be sure to disconnect the AC power cord from the AC outlet Do not use benzene thinner or other solvents for cleaning Wipe the cabinet with a soft cloth Formation of Condensation Due to sharp changes in temperature and humidity condensation may form if warm air comes in contact with any cold parts inside t...

Страница 56: ...tic code search without programming any of your components press EXIT CLEAR until the indicator on the remote turns off Note AUX can t be programmed using the automatic code search method 1 Turn on the component you want to operate TV VCR etc 2 Press and hold the component button you want to program TV for example While holding the component button press and hold ON OFF until the indicator on the ...

Страница 57: ... button TV VCR1 AUX etc to set the remote to control the component 2 Press ON OFF to turn the component ON or OFF 3 Use the remote buttons that apply to that component Notes The remote may not be compatible with all brands and models of components It also may not operate all functions of the remote that came with your component If you keep pressing buttons and nothing happens the remote is probabl...

Страница 58: ...chwood 1004 1006 1054 Teknika 1004 1005 1006 1008 1012 1013 1014 1016 1038 1046 1076 1082 1083 1105 1170 1171 Telecaption 1117 TMK 1004 1006 Toshiba 1049 1071 1072 1105 1109 1117 1118 1160 1162 Totevision 1171 Universal 1052 1087 Victor 1066 1182 Vidtech 1004 1005 1006 Viking 1174 Wards 1000 1001 1004 1005 1006 1019 1024 1033 1046 1052 1062 1068 1069 1075 1076 1083 1087 1088 1095 1119 1120 Yamaha ...

Страница 59: ...5047 5049 5052 Realistic 5009 5049 Regal 5022 5035 Regency 5017 Rembrandt 5003 Runco 5026 Samsung 5014 5034 Scientific Atlanta 5006 5036 5037 5038 Signal 5014 5018 Signature 5003 SL Marx 5014 Sprucer 5052 Starcom 5007 5018 5053 Stargate 5014 5018 Starquest 5018 Tandy 5040 Teleview 5014 Tocom 5004 5023 5041 Toshiba 5026 Tusa 5018 TV86 5027 Unika 5008 5009 5011 United Artists 5002 United Cable 5053 ...

Страница 60: ...take you to a specialized information area for you to explore your favorite artists and actors You can also find similar artists or movies top hits artist bios and purchase new CDs and DVDs to be shipped right to your home The available services are always evolving so check back often With your RCA Home Theater Music Jukebox and all OpenGlobe has to offer you have the key to enhanced entertainment...

Страница 61: ...Internet Radio web sites that can be accessed using your Internet Browser on a PC One example is Radio Locator Simply go to http www radio locator com and type in the station call letters zip code State code Genre or Country in the fields provided and press GO The radio locator will return information about the station or the area that you requested Click on the i icon in order to find the detaile...

Страница 62: ...structions may cause harmful interference to radio communications However there is no guarantee that interference will not occur in a particular installation If this equipment does cause harmful interference to radio or television reception which can be determined by turning the equipment off and on the user is encouraged to try and correct the interference by one or more of the following measures...

Страница 63: ...details This equipment uses one or more of the following plugs and jacks USOC RJ11 USOC RJ14 If this equipment causes harm to the telephone network the telephone company will notify you in advance that temporary discontinuance of service may be required But if advance notice isn t practical the telephone company will notify the customer as soon as possible Also you will be advised of your right to...

Страница 64: ...only items not covered by warranty will be charged to your account If your unit is not received within 14 days the suggested retail value of the unit will be charged to your credit card This amount will be credited less a handling fee if the unit is subsequently received 4 Ship your defective unit back to us less accessories using the replacement unit s carton Shipping instructions will be include...

Страница 65: ...ontact you should it ever be necessary The return of the card is not required for warranty coverage Limitation of Warranty THE WARRANTY STATED ABOVE IS THE ONLY WARRANTY APPLICABLE TO THIS PRODUCT ALL OTHER WARRANTIES EXPRESS OR IMPLIED INCLUDING ALL IMPLIED WARRANTIES OF MERCHANTABILITY OR FITNESS FOR A PARTICULAR PURPOSE ARE HEREBY DISCLAIMED NO VERBAL OR WRITTEN INFORMATION GIVEN BY THOMSON ITS...

Страница 66: ...This page intentionally left blank ...

Страница 67: ...This page intentionally left blank ...

Страница 68: ...his manual or on the carton This will only add delays in service for your product Visit the RCA website at www rca com 2003 Thomson Inc Trademark s Registered Marca s Registrada s Printed in China TOCOM 1606377A Thomson Inc 10330 North Meridian Street Indianapolis IN 46290 ...

Отзывы: