background image


Packing List 

The following components are included in your package:   


IP120                                   

Handset & Handset Cord                           

AC Adaptor 

Ethernet Cable   

Quick Start Guide 


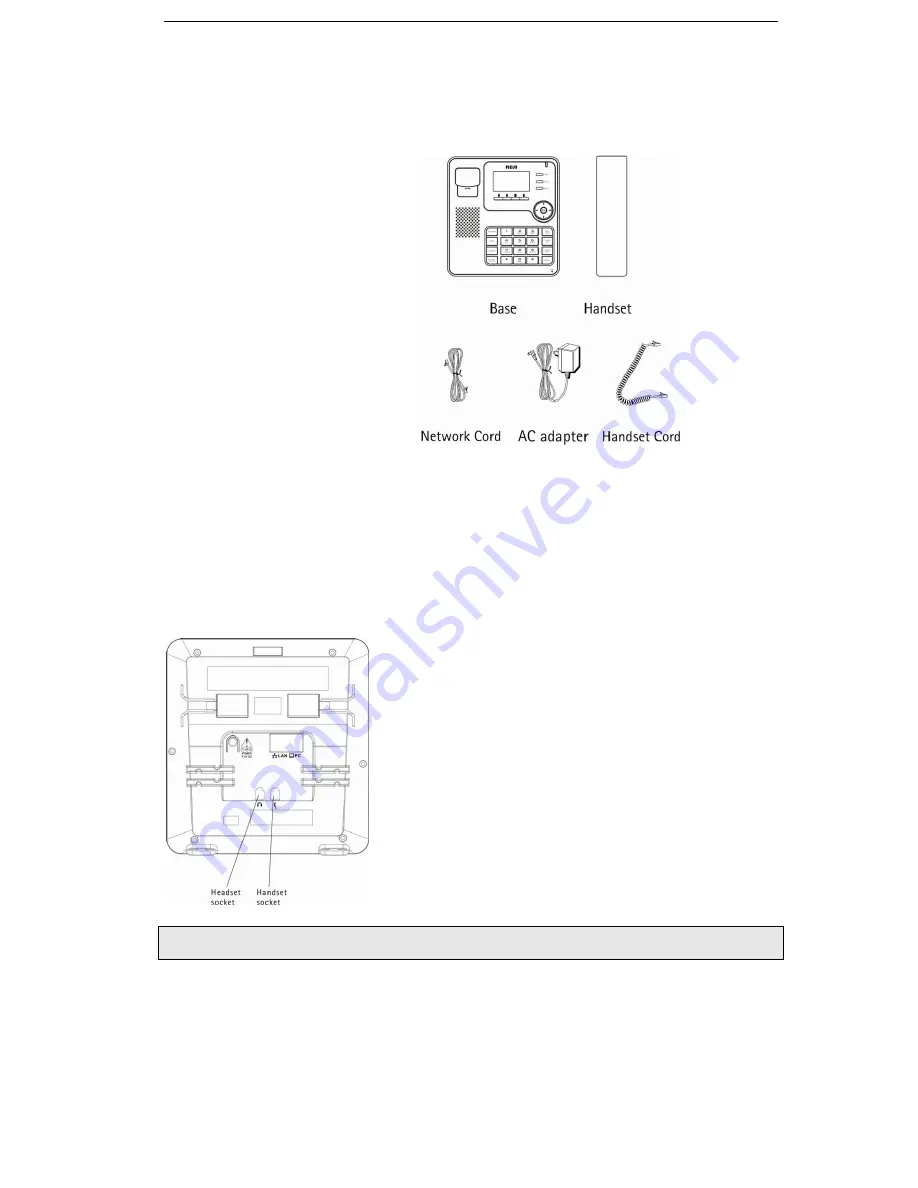
Assembling IP120 

This section introduces how to assemble the phone with the components in the packing 
list


Connect Handset;   

Connect Network and Power.   

Connect Handset and Headset, as shown below

:  


  Note: headset is not provided. 


Connect Network and Power 

You can either connect the phone to the AC Power directly using a power adapter (not 

Содержание IP120

Страница 1: ...1 ...

Страница 2: ...pment cause trouble on your line which may harm the telephone network the telephone company shall where practicable notify you that temporary discontinuance of service may be required Where prior notice is not practicable and the circumstances warrant such action the telephone company may temporarily discon tinue service immediately In case of such temporary discontinuance the telephone company mu...

Страница 3: ... ery to correct the interference by one or more of the following measures Reorient or relocate the receiving antenna that is the antenna for radio or television that is receiving the interference Reorient or relocate and increase the separation between the telecommunications equipment and Receiver Connect the telecommunications equipment into an outlet on a circuit different from that to which the...

Страница 4: ...azardous substances in electrical and electronic equipment end users of electrical and electronic equipment should understand the meaning of the crossed out wheeled bin symbol Do not dispose of WEEE as unsorted municipal waste and have to collect such WEEE separately Licensing Licensed under US Patent 6 427 009 Hearing Aid Compatibility This telephone system meets FCC standards for Hearing Aid Com...

Страница 5: ... Interface 17 Customizing Your Phone 20 General Settings 20 Phone Status 20 Language 21 Time and Date 22 Audio Settings 23 Volume 23 Ring Tones 23 Codec Selection 24 Contact Management 25 Edit Add Delete Contacts 25 Basic Call Functions 28 Outgoing calls 28 Call Devices 28 Call Methods 28 Send Key configuration 29 Hot Line 30 Anonymous call 30 Dial Plan 32 Incoming calls 33 ...

Страница 6: ...uring an Active Call 37 Mute 37 Call Hold 37 Call Waiting 37 Handling a waiting call 37 Call Waiting Configuration 38 Call Transfer Error Bookmark not defined 3 way Conference 38 Voicemail 38 Voicemail settings 39 Retrieving your Voicemail messages 39 Advanced Functions 40 Account Setting 40 Network Settings 41 Advanced Network Settings 41 VLAN 41 HTTPS 41 802 1X 42 Maintenance Tasks 42 User level...

Страница 7: ...ine keys Configuration 46 Line 47 Speed Dial 47 Conference 47 Forward 48 Transfer 48 Hold 48 DND 48 Call Return 49 Pick Up 49 Call Park 49 Voice Mail 49 Prefix 50 Redial 50 Trouble shooting 50 Appendix A Error Bookmark not defined Line Key configuration menu Error Bookmark not defined Memory Key configuration menu Error Bookmark not defined Getting Started ...

Страница 8: ...Guide Assembling IP120 This section introduces how to assemble the phone with the components in the packing list Connect Handset Connect Network and Power Connect Handset and Headset as shown below Note headset is not provided Connect Network and Power You can either connect the phone to the AC Power directly using a power adapter not ...

Страница 9: ...tall AC adapter not provided Make sure the Ethernet cable and switch hub are PoE compliant The Internet Port can also be connected to Hub Switch IP PBX or other internet devices The phone can also share the network connection with other network devices such as PCs Connect the phone s PC port and computer s network port together using an Ethernet cable ...

Страница 10: ... page and find out your IP120 IP address Enter it for example http 10 0 4 66 into the address bar of your web browser The default administrator s login name and password are admin admin Note Please locate your PC in the same network segment of your IP120 10 0 4 x to be able to access the web configuration page Please consult your system administrator for help Network Settings Choose Network Intern...

Страница 11: ...your network performance Please contact your network administrator Account Settings The phone attempts to register to the SIP server using the account data provided by automatic or manual initialization Choose Account Account Settings Select Account to Account 1 You will find the following parameters Field Description ...

Страница 12: ... provided by ISP SIP Server SIP server address provided by ISP SIP Server Port SIP server port provided by ISP Default is 5060 Fill the fields and press the Save button The phone will try to register to the SIP server If all accounts registering fail the phone will display No Service by default Note Should the IP PBX SIP Server require an authentication a correct password is needed Make sure you a...

Страница 13: ...ter the internet relating configuration page Account Settings Press MENU 3 Settings 2 Advanced OK Enter the admin password and choose Accounts OK to configure the account settings You find the following fields Field Description Activation Enable disable the account Label The name showing on LCD of the phone Display Name The local phone name showing on the other phone when calling Register Name Reg...

Страница 14: ... 14 Once you finish all admin related tasks you should change back to user mode with the same procedure ...

Страница 15: ... 15 Overview Keypad ...

Страница 16: ...on Steady orange when new messages or new missed calls Blinking orange When there is an incoming call or when a call is muted Slow blinking orange When network is not available or sip server failure Off in idle mode Icons IP120 displays different kinds of icons on its LCD you can refer to the following table for their meanings Icon Description Account registering Account registration succeeded Acc...

Страница 17: ...ne Using Web user interface in an Internet browser from your PC please refer to Configuration and Registration to get into the Web interface In many instances it is possible to use either the phone user interface or the web interface to operate the phone and change settings Some operations however are only possible via phone or web user interface Please refer to the following table for differences...

Страница 18: ...Hot Line Anonym Call DND Logs Setting Basic Phone Functions Language Time Date Ring Tone Phone Volume Advanced Phone Functions Accounts Network Reset Factory Set Password Set AES Key Auto Provision Other Features Messages History Directory User Mode ...

Страница 19: ...rather than all of them Please refer to next chapters for more details 2 Some functions are password protected In this case when you are prompted for a password make sure to introduce one in accordance with active User Type The default administrator password is admin ...

Страница 20: ...NS etc Phone Model Hardware Firmware Product ID and MAC Accounts The 3 SIP accounts status To check the Phone Status via Phone interface Press OK button to check the IP Use the navigation keys to check the other information To view the Phone Status via Web interface Open a web browser and input the IP Address of the phone Enter login and password default login and password are admin and admin Sele...

Страница 21: ...ll languages may not be available for selection The available languages depend on the language packs currently loaded on the phone Please contact your system administrator or technical support for more information about language packs loading To change the language via Phone interface Press menu soft key 3 Settings 1 Basic 1 Language OK Scroll through the list of available languages Press OK butto...

Страница 22: ...own navigation keys to highlight the specific options and change parameters to meet your needs You can set Time Zone and NTP Server respectively By default GMT 0 is configured If Manual is chosen the time can be set manually Use the up and down navigation keys to highlight the option and enter the specific date and time Press OK button to save your changes Or press MENU key to return to the previo...

Страница 23: ...me Down and Volume Up or left and right navigation keys to increase or decrease volume Press OK button to save volume change or press Back soft key to cancel To adjust ring volume you can also press Volume Down and Volume Up when the phone is in idle status To adjust the volume when you are in an active call When Handset Headset Hands free mode is activated press Volume Down or Volume Up to adjust...

Страница 24: ...e change or MENU to cancel Codec Selection IP120 supports the following voice codecs PCMU PCMA G 729 G 722 G 726 iLBC iLBD 20 You can enable disable the desired codecs via Web interface Please contact your System Administrator for more details about the codecs To enable disable the codecs via web interface Choose Account Account Settings Account 1 Account2 Account3 Select the desired codecs in Cod...

Страница 25: ...y and Blacklist To add a contact via Phone interface Press Dir soft key 1 Directory or Menu soft key 6 Directory 1 Directory Press OK button to enter into the Contacts list press Add soft key enter Name press down navigation key to enter phone number of the contact via the keypad Press down navigation key to set and choose a special ring tone for the contact If you want to assign this contact to a...

Страница 26: ... and down keys to select Account use the left or right navigation keys to if you want to assign this speed dial keys to a specific account Then use the up and down navigation keys to select Value enter the desired number and press Save soft key to confirm Note in idle mode with dial tone or during a conversation if you make a long press on the key it will automatically call the contact stored on t...

Страница 27: ...o blacklist then press Option soft key and then select Move to Black List Press OK soft key or press Cancel soft key to return to previous menu A warning message will ask for confirmation to move the contact Press OK soft key to confirm the operation or press the Cancel soft key to return to the directory Manage Blacklist via Web interface Choose Contact Black List To move a contact from Call Log ...

Страница 28: ...ton icon will be shown on the idle screen Press Headset button if the headset is connected to the Headset Port The icon will be shown on the idle screen This is a toggle key Pressing it again will unselect headset as audio device Note 1 You can dial the number first and then choose the device you will use for your call 2 You can select the device first and then enter the calling number If dial pla...

Страница 29: ...ndset mode replace the handset on hook or 3 If you are in handsfree mode press the SPEAKER key Send Key configuration Admin can set a specific button or as the send key If this feature is enabled once you ve dialed the desired number you can press this send key to call your correspondent immediately To set the send key via the phone interface 1 Make sure active User Type is admin or var 2 Press Me...

Страница 30: ...Hot Line via the Web interface Go to Phone Features General Information Anonymous call Anonymous call also known as Caller ID restriction allows you to request the network to hide your subscriber identity when you are performing outgoing calls IP120 supports Permanent Caller ID restriction meaning that while enabled all calls will request to be anonymous and you need to disable if you want your id...

Страница 31: ...ancel To set Anonymous call rejection using phone interface 1 Enter Anonymous call menu as explained above 2 Press the up or down navigation keys to enter the Rejection page 3 Press right or left navigation keys to enable disable Anonymous Call Rejection function 4 If you would like to use your service provider to get this service please press the down key and enter the Reject On Code and Reject O...

Страница 32: ...T means to dial the numbers immediately after the dial plan sequence is matched e g 1234T Square brackets are for digit matching For example 578 xxx will match any four digit sequence starting with either 5 7 or 8 5 8 xxx will match any four digit sequence starting with 5 6 7 or 8 Here is a dial plan example 111T 0 4 xxxxxxxxT Explanation 111T This will dial 111 immediately after you entered the t...

Страница 33: ...bled all the incoming calls will be rejected and the display shows icon you can find the incoming call record in the Call History If you press DND soft key in idle mode you activate or deactivate the DND function To configure the DND function via Phone interface 1 Go to Menu soft key 2 Features 7 DND to enter the configuration interface 2 Use the right or left navigation keys to choose Enable Disa...

Страница 34: ...igure Call Forward via Phone interface 1 Press Menu soft key 2 Features 1 Forward You can also press down navigation button to enable disable call forward when the phone is in idle mode 2 There are 3 options Always Busy and No Answer 3 Select one of them with OK Then enter the phone number to which calls must be forwarded For No answer you can also select the No answer timeout pressing the down ke...

Страница 35: ...ind of impairment This function is set on a per account basis This function should be enabled disabled by admins or vars To set Auto Answer via the phone interface 1 Make sure active User type is var or admin 2 Press Menu soft key 3 Settings 2 Advanced enter the password and press OK button 3 Then choose 1 Accounts and then select an account use the up and down navigation keys to choose Auto Answe...

Страница 36: ...hange list use the right key the sequence is All Forwarded Missed Received Dialed Note the icons at the top of the screen which indicate the list you are on Accessing Missed Calls list You can also access Missed Calls list by pressing Left navigation key from idle mode to reach Call log and then right navigation key twice as explained above When you are in the Missed Calls list you should see icon...

Страница 37: ... you press Mute Cancal button all of the conversations will be muted Call Hold This call function allows you to place an active call on hold In this case your IP PBX might play a melody or message to the other party while waiting Other calls can be received and made while having a call on hold To hold resume a call Press Hold soft key to put your active call on hold If there is only one call on ho...

Страница 38: ...s an incoming call during an active call 5 Press OK button to save the changes or Back soft key to return to the previous menu To configure Call Waiting via Web interface Go to Phone Features General Information 3 way Conference Your IP120 is able to establish a three party conference by locally mixing the audio signals of your two correspondents To establish a conference via phone interface 1 Onc...

Страница 39: ...administrator for the connecting code Different systems have different codes To configure Voicemail settings using the Web interface 1 Go to Account Account Settings and set Voicemail number Retrieving your Voicemail messages To check your voicemail status via the Phone interface 1 Press Menu soft key 4 Messages 1 View Voice Mail 2 You can view your messages new and old messages To listen to your ...

Страница 40: ...n Timer seconds This document defines an extension to the Session Initiation Protocol SIP This extension allows for a periodic refresh of SIP sessions through a re INVITE or UPDATE request The refresh allows both user agents and proxies to determine if the SIP session is still active Voice Encryption SRTP Voice Encryption SRTP ptime ms The time between two RTP packets of the current used codec SIP...

Страница 41: ...ll to Network option press ok button and select VLAN then press OK to enter 4 Choose WAN Port and press OK button to enter 5 Use the left or right navigation keys to choose and set the VLAN Status input the VID Number Priority 6 Press OK button to save the settings or Back soft key to return to VLAN menu To configure VLAN settings via Web interface Choose Network Advanced Perform necessary changes...

Страница 42: ...trator Mode Administrator mode grants unlimited access to the phone configuration on both Web and Phone interface User Mode is not able to access the settings on the Phone interface such as Accounts Network Reset to Factory other advance phone settings VAR mode grants access to subset of Administrator functions Login and password are var var Administrator Mode Administrator mode grants unlimited a...

Страница 43: ... Go to System Upgrade 2 Click Reboot button Note Please do not power off during reboot or it will cause the flash memory error Reset to Factory You should reset the phone only in this case the phone configuration was changed and the phone is not functioning anymore To maintain the configuration of the phone you need your system administrator or service provider s advice To reset to factory via pho...

Страница 44: ...interface To update the firmware manually via Web interface Choose System Upgrade select the firmware file in your local computer Click upgrade button to update the new firmware Please do not power off during the updating To update the firmware and configuration automatically you can use auto provisioning Note Please check with your Technical Support for the Autoprovisioning guide To launch Autopr...

Страница 45: ...Set AES key via Web interface Go to System Provisioning Settings Note You can ask your system administrator for the decrypt password Set AES Key via phone interface Press Menu soft key 3 Settings 2 Advanced 5 Set AES Key Enter the Common AES and the MAC oriented option Press the OK button to save the changes Keys configuration Send Key configuration Admins can set a specific button or as the send ...

Страница 46: ...ey access to dialed list Down key access to call forward Left key access to call log Right key access to account switch Ok key access to status DND key access to DND Line keys Configuration The phone has 3 line keys to which functions can be assigned out of a list of functions The following list shows the functions you can set on the Line keys The next paragraphs provide a description for each fun...

Страница 47: ... call management To assign the key as Line via web interface Go to Phone Function Keys Line Key Speed Dial You can configure the key as a simplified speed dial key This key function allows you to easily access the most frequently dialed numbers To assign the key as Speed Dial via web interface Go to Phone Function Keys Line Key Conference You are allowed to configure the Line key to be used as a c...

Страница 48: ...via web interface Go to Phone Function Keys Line Key Transfer You are able to configure a key as a transfer key to perform the Blind Attended Semi Attended Transfer The main difference with Transfer hard key is in this case you can pre configure the number to which transfer will be performed This is very useful when there is a limited number of numbers to which you usually transfer your calls To a...

Страница 49: ...key via web interface Go to Phone Function Keys Line Key Call Park Call Park is a feature that allows a person to put a call on hold at one telephone set and continue the conversation from any other telephone set Your server needs to support this feature Please check with your service provider or IP PBX vendor for more details The call park feature is activated by pressing a preprogrammed button o...

Страница 50: ...enter the Dialed Calls interface If you press this key in off hook mode last dialed number will be sent directly If you press this key when there is an active call it will be put on hold and a new call sent to the last dialed number To assign Redial to a key via web interface Go to Phone Function Keys Line Key Trouble shooting I cannot register to the server Check the IP address press OK key for s...

Страница 51: ...atible with the server Consult the payload value with your service provider Time and date are not correct Select the right time zone or enter the time information manually on the phone How to answer the incoming calls during a call If a call comes in when you are in a conversation press OK key to answer the incoming call How to refuse incoming calls during a call To refuse current incoming call pr...

Страница 52: ... 52 will probably crash after the update How to auto provision Consult auto provision server address with your service provider ...

Страница 53: ... 53 ...

Страница 54: ... to the telephone network the telephone company may request that you disconnect the equipment until the problem is resolved This product may be serviced only by the manufacturer or its authorized service agents authority to operate this product For instructions on how to obtain service refer to the warranty included in this guide or call customer service at 1 800 511 3180 Or refer inquires to Mana...

Страница 55: ... 55 ...

Страница 56: ...ED UNDER THIS WARRANTY IS THEEXCLUSIVE REMEDY OF THE CONSUMER TELEFIELD NA INC SHALL NOT BE LIABLE FOR INCIDENTAL OR CONSEQUENTIAL DAMAGES RESULTING FROM THE USE OF THIS PRODUCT OR ARISING OUT OF ANY BREACH OF ANY EXPRESS OR IMPLIED WARRANTY ON THIS PRODUCT THIS DISCLAIMER OF WARRANTIES AND LIMITED WARRANTY ARE GOVERENED BY THE LAWS OF THE STATE OF OREGON EXCEPT TO THE EXTENT PROHIBITED BY APPLICA...

Страница 57: ... 57 ...

Отзывы: