


D11935-1
S
eaTalk
hs
2
S
ea
Ta
lk
hs
8
7
1
S
ea
Ta
lk
hs
S
ea
Ta
lk
hs
6
5
3
4
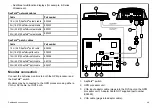
1.
GPM processor unit.
2.
SeaTalk
hs
switch.
3.
PoE (Power over Ethernet) injector (only required if using the
optional JCU).
4.
Joystick Control Unit (JCU), optional.
5.
Cable coupler.
6.
Thermal camera.
7.
Video connection.
8.
GVM video module.
Important notes
• You can control the thermal camera using your G-Series
keyboard. The Joystick Control Unit (JCU) is optional, but can
be used in conjunction with the G-Series system to control the
thermal camera if required.
• You can only connect 1 thermal camera to each GVM video
module in your G-Series system. When a thermal camera is
connected, each GVM video module is limited to that input
only and does NOT support the connection of any further video
devices.
• Each thermal camera must be connected to Video Input 1 of a
GVM video module.
• “Dual payload” thermal cameras include 2 independent lenses;
1 for thermal (infrared) and visible light, 1 for thermal (infrared)
only. These cameras include 2 separate video connections. If
you only have 1 GVM video module you should only connect the
video cable labelled “VIS / IR” (visible light / infrared), in order to
be able to switch between the 2 lenses. If you have 2 or more
GVM video modules you should connect the video cable labelled
“VIS / IR” to GVM video module 1, and the video cable labelled
“IR” to GVM video module 2.
• Thermal camera support requires the latest G-Series software. To
check your software version select
MENU > System Diagnostics
> Software Services > Unit Info > App Version
. Refer to your
Cables and connections
63
Содержание G-Series system
Страница 1: ...G Series system Installation instructions...
Страница 2: ......
Страница 4: ......
Страница 8: ...8 G Series installation instructions...
Страница 14: ...14 G Series installation instructions...
Страница 45: ...3 4 Typical power distribution 3 2 1 2 4 5 6 7 10 8 9 11 11 11 11 D11803 1 3 Cables and connections 45...
Страница 56: ...GVM video module connections D11820 1 SeaT alkhs 1 3 7 4 2 8 6 5 56 G Series installation instructions...
Страница 85: ...D11871 1 297 mm 11 69 in 98 mm 3 85 in 35 mm 1 38 in 59 8 mm 2 35 in 46 mm 1 81 in Location and mounting 85...
Страница 93: ...Dimensions D11883 1 170 mm 6 7 in 237 mm 9 33 in 56 mm 2 2 in Mounting arrangement Location and mounting 93...
Страница 98: ...98 G Series installation instructions...
Страница 124: ...124 G Series installation instructions...
Страница 142: ...142 G Series installation instructions...
Страница 146: ...146 G Series installation instructions...
Страница 158: ...158 G Series installation instructions...
Страница 180: ...www raymarine com...


