background image

T200

Installation and operation
instructions

English

Date: 06-2013
Document number: 81349-2-EN 
© 2013 Raymarine UK Limited

T200

Содержание E70110

Страница 1: ...T200 Installation and operation instructions English Date 06 2013 Document number 81349 2 EN 2013 Raymarine UK Limited ...

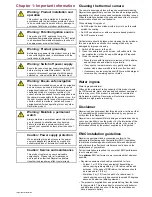
Страница 2: ...th as this could scratch the coating Do NOT use abrasive or acid or ammonia based products Do NOT pressure wash Particular care should be taken when cleaning the lens window this has a protective anti reflective coating which may be damaged by improper cleaning 1 Switch off the power to the unit 2 Clean the camera body with a clean soft cotton cloth You can moisten the cloth and use a mild deterge...

Страница 3: ...tailed in the installation manual Note Where constraints on the installation prevent any of the above recommendations always ensure the maximum possible separation between different items of electrical equipment to provide the best conditions for EMC performance throughout the installation ...

Страница 4: ...Chapter 2 Handbook and product information Chapter contents 2 1 Handbook information on page 10 2 2 Product information on page 10 Handbook and product information ...

Страница 5: ...emovable outer cover The outer cover is not intended to provide sealing The camera provides analog video output through a standard F type connection and receives power from its Power over Ethernet PoE interface D12865 1 The following variants of the T200 series fixed mount thermal camera are available Part number Description E70111 T200 Thermal camera 320 x 240 9 Hz NTSC E70110 T203 Thermal camera...

Страница 6: ...ation Chapter contents 3 1 Thermal camera controllers and displays on page 12 3 2 Installation checklist on page 12 3 3 Typical systems on page 13 3 4 Parts supplied on page 14 3 5 Tools required on page 15 Planning the installation ...

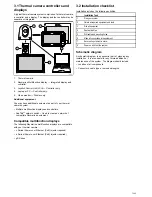
Страница 7: ...ent Compatible multifunction displays The following Raymarine multifunction displays are compatible with your thermal camera c Series Power over Ethernet PoE injector required e Series Power over Ethernet PoE injector required gS Series 3 2 Installation checklist Installation includes the following activities Installation Task 1 Plan your system 2 Obtain all required equipment and tools 3 Site all...

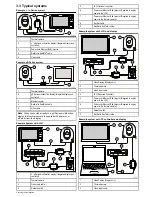
Страница 8: ...on display Integrated display and controller 2 Thermal camera 3 Video input cable 4 Network switch 5 JCU Optional controller 6 Power over Ethernet PoE injector Required to supply power to the JCU 7 Power over Ethernet PoE injector Required to supply power to the thermal camera 8 RayNet cable 9 RayNet to SeaTalkhs cable Example system with JCU and display D12842 1 6 7 8 2 1 3 4 5 8 1 Video Display ...

Страница 9: ...t stud washer 6 5 O ring 1 6 Top down fixings 4 7 Documentation pack 1 8 Grounding strap securing nut 1 2 2 9 Video connectors Female to female F type connector Female F type to Male RCA adaptor Female F type to BNC connector 2 10 Zip ties 3 11 1 m 3 28 ft RayNet to SeaTalkhs cable 1 12 7 7 m 25 ft Ethernet cable 1 13 7 7 m 25 ft Coaxial video cable 1 Unpack the camera unit carefully to prevent da...

Страница 10: ...o metal threaded connections Marine grade sealing tape e g 3M Scotch Seal 2229 or equivalent 3 5 Tools required The following tools are required for installation D12333 1 1 2 3 4 5 6 Item Description 1 Drill 2 10 mm 7 16 inch spanner 3 6 4 mm drill bit for bottom down installation 4 Jigsaw only required for JCU installation 5 Pozi drive screwdriver only required for JCU installation 6 Thread lock ...

Страница 11: ...e 18 4 2 Connections overview on page 18 4 3 Chassis ground connection on page 19 4 4 External or internal connections on page 19 4 5 Network and power connection on page 20 4 6 Video connection on page 21 4 7 PoE connection on page 21 4 8 PC connection on page 23 Cables and connections ...

Страница 12: ...of the way Where a cable passes through an exposed bulkhead or deckhead use a suitable watertight feed through Do NOT run cables near to engines or fluorescent lights Always route data cables as far away as possible from other equipment and cables high current carrying ac and dc power lines antennae Strain relief Ensure adequate strain relief is provided Protect connectors from strain and ensure t...

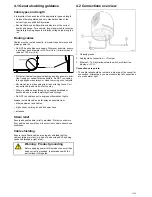
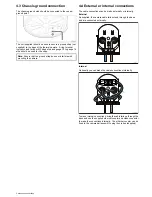
Страница 13: ...e with mounting the camera 4 4 External or internal connections The cable connections can be made externally or internally External As supplied the camera cable tails extend through the base and are connected externally D12847 1 Internal Optionally you can make the cable connections internally D12848 1 To make internal connections bring the cable tails up through the base and use the supplied ethe...

Страница 14: ...onal PoE injector is required when connecting a JCU Joystick Control Unit JCU To connect a JCU the ethernet cable supplied with the JCU PoE injector and a RayNet to SeaTalkhs network cable are required The JCU is supplied with a 7 6 m 25 ft ethernet cable for this connection If you require a different length contact your dealer for suitable cables Note The PoE injector must be mounted in a dry are...

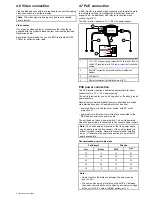
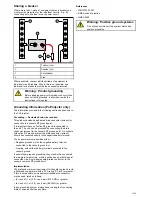
Страница 15: ...requires a dedicated power cable for direct connection to a 12 V 24 V power supply The unit is intended for use on dc negative or floating ground power systems Raymarine recommends that all power connections are made via a distribution panel All equipment must be either powered from a circuit breaker or switch with 5A circuit protection or powered from a 5A slow blow in line fuse connected to the ...

Страница 16: ...or screen to the vessel s RF ground point On vessels without an RF ground system the drain conductor screen should be connected directly to the negative battery terminal The dc power system should be either Negative grounded with the negative battery terminal connected to the vessel s ground or Floating with neither battery terminal connected to the vessel s ground If several items require groundi...

Страница 17: ...ither directly or using network switch D12850 1 2 3 1 1 Laptop 2 Thermal camera 3 Power over Ethernet PoE injector The thermal camera must be connected to the PoE injector The laptop can be either connected directly to the PoE injector or to a network switch that the camera s PoE injector is also connected to Cables and connections ...

Страница 18: ...Chapter 5 Installation Chapter contents 5 1 Camera mounting on page 26 5 2 Optional JCU mounting on page 30 Installation ...

Страница 19: ...rizontal If you cannot access both sides of the mounting surface then you will need to mount the camera top down Fixings are supplied for a mounting surface of up to 41 mm 1 6 in thick A thicker surface will require the installer to provide alternative fixings The camera mounting surface must be at least as large as the footprint of the camera itself to ensure an adequate seal with the O ring The ...

Страница 20: ...g claw and capture nut 9 Connect the external ethernet cable to the other end of the ethernet coupler 10 Using the zip ties supplied secure the ethernet coupler to the rear of the camera ball assembly 11 Pull any excess cable back through the bore hole 12 Secure the ethernet cable by reassembling the rubber gland and clamping claw into the bore hole and tightening the capture nut 13 Feed the camer...

Страница 21: ...uts are provided for a neater solution where the mounting is exposed to view You must ensure a watertight seal You may use a marine grade sealant as an alternative to the mounting O ring Mounting the camera top down The top down mounting method is used when access to the underside of the mounting surface is restricted Use the instructions below to mount the camera unit using the top down method 1 ...

Страница 22: ...era ball assembly can be tilted up and down 3 You may also need to loosen the cable glands to allow the ball assembly to rotate freely 4 Adjust the tilt to the required position 5 Retighten the securing nuts to a torque of 13 6 Nm 10 ft lbs Do not overtighten 6 Replace the cover 7 Ensure that the cover is seated correctly all the way around the base of the camera ball assembly Adjusting the therma...

Страница 23: ...rough the mounting hole and into the JCU ethernet port Ensure the cable gland sealing nut is tightened correctly 5 Remove the 4 panel mounting clamps and insert the JCU in place Affix the mounting clamps to the screws on the other side of the mounting surface ensuring that the mounting clamps are rotated outward from the JCU housing Tighten the screws to draw the mounting clamps up against the mou...

Страница 24: ...Chapter 6 System operation and setup Chapter contents 6 1 Thermal camera image on page 32 6 2 Operation and features overview on page 33 System operation and setup ...

Страница 25: ...ime viewing in environments where traditional video camera performance suffers such as in shadows or backlit scenes Thermal camera status icons The thermal camera image includes icons to show the current status of the camera Icon Description Camera paused Scene preset mode for night conditions Scene preset mode for daytime conditions Scene preset mode for night docking Scene preset mode for identi...

Страница 26: ...ode In addition to the above the camera also provides setup menus to configure the system to your requirements Image adjustments Camera zoom The default zoom level is 1x In addition to this the thermal camera can be set to either 2x 320 x 240 cameras or 2x and 4x 640 x 480 cameras zoom level 1x 2x 4x Thermal camera scene presets Scene presets enable you to quickly select the best image setting for...

Страница 27: ... required using the camera s on screen Video Setup menu Note If you have the Disable Color Thermal Video option selected in the camera s on screen Video Setup menu only 2 color modes are available greyscale and red Thermal camera reverse video You can reverse the polarity of the video image to change the appearance of objects on screen The reverse video option video polarity switches the thermal i...

Страница 28: ...Chapter 7 Web browser interface Chapter contents 7 1 Web interface overview on page 36 7 2 Web interface access on page 38 7 3 Advanced IP Communications on page 41 Web browser interface ...

Страница 29: ...ext in the Windows Components Wizard 10 You may be asked for the Windows XP installation CD 11 When the installation has completed click Start 12 Select Connect To 13 Click Show all connections 14 Right click on the network connection that the camera is connected to 15 Click Properties 16 Select Internet Protocol TCP IP 17 Click the Properties button 18 Click on Use the following IP address 19 Ent...

Страница 30: ... you may need to assign the PC a static IP address To assign a static IP address follow the steps below 1 From the Control panel Click Network and Internet 2 Click Network and Sharing Center 3 Click Change adaptor settings 4 Select the Network Connection that your thermal camera is connected to 5 Right click and choose Properties The Network Connection Properties dialog is displayed 6 Select Inter...

Страница 31: ...ls The Web interface can be used to control the thermal camera D12866 1 8 10 13 9 11 1 2 3 4 5 6 7 12 14 1 Toolbar accesses the control Toolbar page 2 Setup accesses the Setup menu page 3 Maintenance accesses the Maintenance page 4 Help accesses the support and product information page 5 Change Password changes the password for the current account This icon is only available when account type has ...

Страница 32: ...that you allow change of password on that account Changing the password To change the current users password follow the steps below Passwords can only be changed if an administrator has allowed the account type to change their own password From the Web interface 1 Select the Change password icon The change password icon is the yellow key icon located along the top of the page The change password d...

Страница 33: ...the toolbar From the web interface toolbar 1 Select the Change Scene icon to change the scene Selecting the Change Scene icon will cycle through the available scenes Selecting a color palette using the web utility toolbar To select a color palette follow the steps below From the web interface toolbar 1 Select the Change Color icon to change the color palette Selecting the Change Color icon will cy...

Страница 34: ...not required for day to day operation of the camera The information that is displayed in the text area is intended for system integrators and programmers It displays the actual command strings sent to and received from the thermal camera Programmers and integrators can manually input command strings and send them to the camera using the TX button Web browser interface ...

Страница 35: ...Chapter 8 On Screen Display Menu Chapter contents 8 1 On Screen Display OSD menu options on page 44 On Screen Display Menu ...

Страница 36: ...available icons Display Minimal Icons Selecting this menu item reduces the icon activity Position Zoom Rearview Pause Stabilization disabled and Point Mode enabled icons are unaffected Home and Scene icons are displayed only momentarily Other icons are not shown Menu item Description Settings Operation Hide All Icons Selecting this option hides all icons except for Position indicator Rearview mode...

Страница 37: ...trol Unit Chapter contents 9 1 JCU controls overview on page 46 9 2 Image adjustments on page 47 9 3 JCU Power menu on page 47 9 4 Restoring factory defaults on page 48 9 5 Resetting the JCU on page 48 Optional JCU Joystick Control Unit ...

Страница 38: ...on not provided on the other keys The default operation is the Reverse Video function white hot black hot Short press Perform the programmed action Press and hold Program the USER button with another function The USER button can be programmed for the following functions Man Over Board changes scene to the Man Overboard scene Hide Show All Icons Invert Video Polarity changes between white hot and b...

Страница 39: ...To switch the camera to rear view mode follow the steps below Using the JCU 1 Press MENU 2 Select System Setup 3 Select Enable Rearview Mode When enabled the option is changed to Disable Rearview Mode selecting this will revert back to normal view 4 Press MENU to cancel the on screen menu 9 3 JCU Power menu Menu item Description Settings Operation JCU Stndby This option places the JCU in standby O...

Страница 40: ...etup menu displayed 1 Select the About Help menu 2 Select Restore Factory Defaults from the available options 9 5 Resetting the JCU Occasionally it may be necessary to reset the JCU to do this you can either power cycle the JCU or follow the steps below 1 Press and hold the SCENE COLOR and HOME buttons for 1 second T200 ...

Страница 41: ...Chapter 10 Troubleshooting and support Chapter contents 10 1 Thermal camera troubleshooting on page 50 10 2 Raymarine customer support on page 51 Troubleshooting and support ...

Страница 42: ... If other controllers are operating this will eliminate the possibility of a more fundamental camera fault Camera is not a dual payload model Only dual payload dual lens thermal cameras support VIS IR switching Cannot switch between thermal and visible VIS IR video image VIS IR cable not connected Ensure that the VIS IR cable is connected from the camera to the Raymarine system The IR only cable d...

Страница 43: ...Chapter 11 Technical specification Chapter contents 11 1 Camera technical specification on page 54 11 2 PoE Injector technical specification on page 54 Technical specification ...

Страница 44: ...djustments Pan 30º Tilt 34º to 27º Note Pan and Tilt angles are fixed during installation Video resolution 320 x 240 640 x 480 Depending on camera model Field of View 24º x 18º 25º x 20º Depending on camera model 11 2 PoE Injector technical specification Nominal input voltage 12 or 24 V dc Operating input voltage range 9 V dc to 36 V dc Power consumption 22 W Max Output voltage 48 V dc 0 35 A Outp...

Страница 45: ...Chapter 12 Spares and accessories Chapter contents 12 1 T200 Spares and accessories on page 56 12 2 RayNet to RJ45 SeaTalkhs adaptor cables on page 56 Spares and accessories ...

Страница 46: ...xial video cable 7 6 m 25 ft A80266 Ethernet cable 7 6 m 25 ft A80267 Mounting kit R32144 JCU Joystick Control Unit E32130 12 2 RayNet to RJ45 SeaTalkhs adaptor cables Cable Part number 1 m 3 28 ft RayNet to RJ45 SeaTalkhs cable A62360 3 m 9 84 ft RayNet to RJ45 SeaTalkhs cable A80151 10 m 32 8 ft RayNet to RJ45 SeaTalkhs cable A80159 400 mm 1 3 ft RayNet to RJ45 SeaTalkhs female cable A80160 T200...

Страница 47: ...www raymarine com View other Marine Electronics Navigation made by Raymarine Electronics on our website ...

Отзывы: