


nVent.com
|
9
3.3 LED INDICATORS
The console includes twelve LED indicators:
Six LEDs indicate the console status — the operating mode (a shifted function, alarm, monitor,
or configure modes) and the active control Point (A or B).
Four LEDs indicate the alarm and control output status for both Points A and B.
The two additional LEDs are used to indicate external communications activity — the “Rx” LED
flashes to show that the controller is receiving information via its communications port, and
the “Tx” LED flashes when the controller is transmitting data.
3.4 OPERATIONAL BASICS
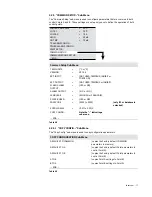
3.4.1 Operating Modes
The console operates in one of four modes and is related to the basic function the operator
selects. These modes are:
Mode
Function
Scan
• This is the default mode. In this mode the console sequentially displays the
active control point, the setpoint, temperature, and load current readings
for Points A and B.
Alarm
• Invoked when you press the SHIFT key followed by ALARM key. This
mode allows you to examine or reset any alarms that may exist. The LED
above the ALARM key is illuminated while in this mode.
Monitor
• Invoked when you press the SHIFT key followed by MONITOR key.
In this mode, you may examine any of the controller readings such as
temperature, load current, ground fault current, etc. The LED above the
MONITOR key is illuminated while in this mode.
Configure
• Invoked when you press the SHIFT key followed by CONFIG key. In this
mode, you may examine or alter the controller configuration. The LED
above the CONFIG key is illuminated while in this mode.
3.4.2 Menus
Each of the operating modes has a list of data items associated with it. For example, in the
Monitor mode you may view temperatures, load current, resistance, ground fault current,
voltage, or power information. This collection of data items is referred to as a menu.
Only one menu item may be viewed at a time. The ( ) keys move to the next (previous) item
in the menu. When you reach the end of the menu (indicated by --- END ---), wraps you to the
first item in the menu; conversely, wraps you to the last item in the menu.
Some of the items within a menu are actually entry points to sub-menus — these entries are
indicated with “...” at the end of the message. To enter a sub-menu, press the key. To move
around in the menu, use the and keys move to the next and previous items respectively.
The key exits the current menu and returns to the previous menu.
After approximately five minutes of keypad inactivity, the current menu and mode will be exited
and the console will revert back to the Scan mode.
IMPORTANT: Some menus are dynamic, that is, some items appear or disappear depending
on the configuration. For example, if you disable the low voltage alarm, then the corresponding
low voltage setpoint is not available and will not be displayed.
Содержание 920 Series
Страница 2: ...2 nVent com ...


