background image

2 8

CAN Diagnostics

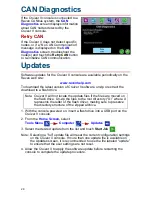
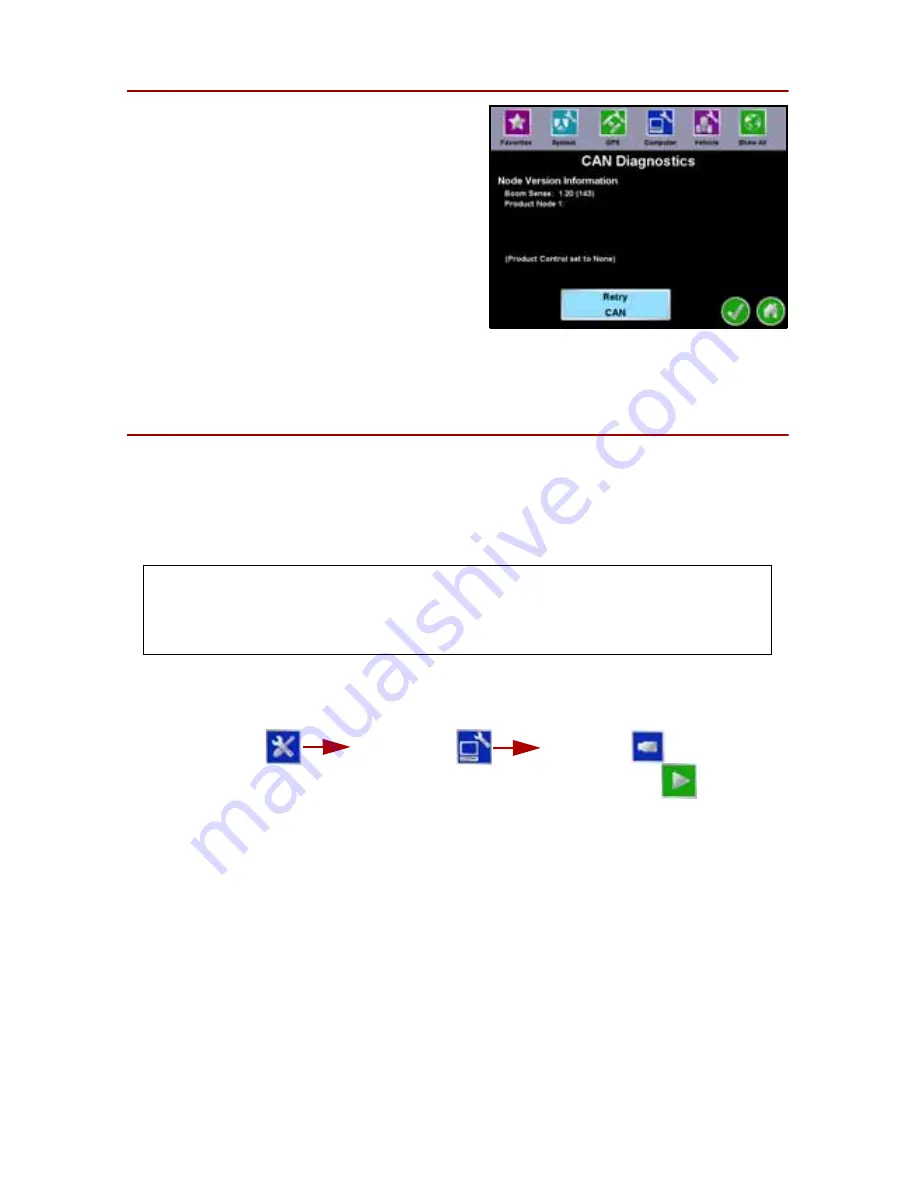
If the Cruizer II console is connected to a 
Raven CANbus system, the 

CAN 

Diagnostics

 screen displays information 

about CAN nodes detected by the 
Cruizer II console.

Retry CAN

If the Cruizer II does not detect specific 
nodes, or if a “No CAN Communication” 
message is displayed on the 

CAN 

Diagnostics

 screen, troubleshoot the 

node(s) and touch the 

Retry CAN

 button 

to re-initialize CAN communication.

Updates

Software updates for the Cruizer II console are available periodically on the 
Raven web site:

www.ravenhelp.com

To download the latest version of Cruizer II software, unzip or extract the 
download to a flash drive.

1. With the console powered on, insert a flash drive into a USB port on the 

Cruizer II console.

2. From the 

Home Screen

,

 select:

Tools Menu 


Computer


 Updates


.

3. Select the desired update from the list and touch 

Start Job


.

Note:  Selecting a “full” update file will reset the current configuration settings 

on the Cruizer II console. If more than one update file is available on 
the Updates screen, it is recommended to use the file labeled “update” 
to ensure that the user settings are not reset.

4. Allow the Cruizer II to apply the software update before restarting the 

console to complete the update procedure.

Note:  Cruizer II will not locate the update files if the files are moved on 

the flash drive. Un-zip the files to the root directory (“X:\” where X 
represents the letter of the flash drive), making sure to preserve 
the directory structure of the zipped archive.

Содержание Cruizer II

Страница 1: ... Software Version 3 0 Cruizer II Operation Guide ...

Страница 2: ...ifications or repairs made outside our facilities nor damages resulting from inadequate maintenance of this system As with all wireless and satellite signals several factors may affect the availability and accuracy of wireless and satellite navigation and correction services e g GPS GNSS SBAS etc Therefore Raven Industries cannot guarantee the accuracy integrity continuity or availability of these...

Страница 3: ...ring Down the Cruizer II 16 Standby Mode 16 Tools Menu 17 Favorites 17 System 17 Vehicle 18 Computer 18 GPS 19 Favorites Menu 20 AccuBoom 20 Display 23 Coverage Maps 24 Enabling Coverage Map Output 24 Coverage Map Output 25 Using RTK Corrections 26 Baud Rate Settings 27 CAN Diagnostics 28 Updates 28 Troubleshooting 29 System Connection Diagrams 31 Kit Contents Cruizer II Console P N 063 0173 090 o...

Страница 4: ...ruizer II Console This manual is designed for use with Cruizer II software version 3 0 Updates for Raven manuals are available at the Applied Technology Division web site www ravenhelp com Sign up for e mail alerts to receive notification when updates for Raven products are available on the Raven web site Warning Cruizer II consoles with P N 063 0173 090 or 063 0173 327 are NOT weather resistant N...

Страница 5: ... the vehicle battery If the machine will not be in operation for an extended period of time e g more than a couple weeks disconnect the power cable from the back of the console Installation 1 Mount the antenna on the centerline of the tallest point of the vehicle usually on the top of the cab using the magnetic mount Make sure that the antenna has a clear 360 view of the sky If the mounting locati...

Страница 6: ... the Antenna Position screen to set the position of the GPS antenna with respect to the center of the boom or implement width The left side of the Antenna Position screen displays a visual reference of the location of the boom or implement and DGPS antenna After the antenna offsets are programmed the antenna position display should show a general representation of the actual machine configuration ...

Страница 7: ...e Screen Home Screen Icons Touch the following icons displayed on the Home Screen to Note The fore aft offset must be measured perpendicular to the boom or implement width Note The left right offset must be measured parallel to the boom or implement width Start Job Start a new job resume a previously saved job or return to the guidance screen for a job currently in progress Tools Menu Accesses the...

Страница 8: ...shield will display if the status of DGPS is O K Flashing yellow red if DGPS is initializing or converging if an error or cautionary condition has been encountered if GPS is non functional Make sure the DGPS antenna cable connections are secure and the antenna has a clear 360 view of the sky when the receiver has a full RTK position fix and is providing sub inch corrections Note The GPS Health scr...

Страница 9: ...ame for the field operation to be started Note Use the icon at the right end of the text entry field to clear the text box before entering the new job name Renaming new job files is highly recommended if a specific job will be restarted at a later date Enter field location operation type or any other information which may help identify specific job files Names of job files entered on the console s...

Страница 10: ...turned on Note An applied area must be present from a previous swath before Cruizer II will display the next guidance path in Last Pass mode Straight A B Line Mode Allows the operator to select a starting A point and an ending B point or compass heading through which Cruizer II draws a straight line as the guidance path Subsequent guidance paths will be parallel to the initial A B line Check the L...

Страница 11: ...t of jobs saved on the Cruizer II console or a USB flash drive connected to a USB port To help identify saved jobs the Resume Job screen displays the age and coverage area of each job as well as the distance from the current vehicle location to the saved job 6 Touch the desired job feature to use with the new job file and touch Next to display the Cruizer Guidance Screen Note Touch Cancel to retur...

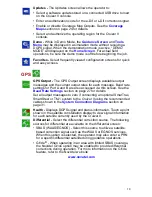
Страница 12: ...the Guidance Screen Zoom Zooms in each time it is pressed until maximum zoom is reached then zooms out Menu Touch to access other guidance views available path tools or return to the Cruizer II Home Screen Refer to the Guidance Menu section on page 12 for more information Active Guidance Pattern The icon to the left of the menu icon displays the currently selected guidance pattern Touch the icon t...

Страница 13: ...tion is not displayed correctly while this icon is displayed touch the Forward Override to override the Cruizer II reverse detection and resume forward guidance AccuBoom Override and Section Status Note Refer to the AccuBoom section on page 20 for assistance with configuring sections or setting up the AccuBoom override feature If AccuBoom is enabled for the current guidance operation the status of...

Страница 14: ... and press Set B Note When using the straight line mode the Set by Heading may be selected to set the B point by heading Enter a value between 0 due north and 359 180 is due south Home Screen Touch to return to the Cruizer II Home Screen 3 D View Displays a down field view of the vehicle position 2 D View Displays a bird s eye view of the vehicle position Field Review Mode Displays an overview of ...

Страница 15: ...nes may be created 1 Begin with the vehicle stopped at the beginning of the field boundary 2 From the Home Screen touch Start Job 3 Review the Starting Guidance section on page 7 to start a new job or resume a previous job The Cruizer II Guidance Screen will be displayed 4 Next touch Boundary Mapping Menu and Boundary Tools or Zone Boundary Tools A B Line Tools Select this icon to access the avail...

Страница 16: ...mpleting a field boundary the Cruizer II displays the calculated total field area in either the lower panel of the Field Review Screen or by opening the Boundary Mapping Menu Field Zone Description Pause While recording a feature touch the Pause icon to pause recording of the boundary or zone This feature is useful when refilling tanks or when the vehicle path is not part of the boundary When paus...

Страница 17: ...n the Field Review Mode The Pan Lock feature automatically scrolls the Field Review display to follow the vehicle indicator as it moves off of the screen To enable the Pan Lock feature touch the Pan icon until the Pan Lock icon is displayed Field Markers While a job is in progress Field Markers may be added to locate things such as well heads rock piles or other points of interest During the appli...

Страница 18: ...Accept 3 Select the Accept icon again to power down the Cruizer II Standby Mode Use the standby mode to conserve power for short periods such as breaks or refilling tanks This mode allows the operator to quickly resume a job in progress without shutting down the Cruizer II console Note The Cruizer II will automatically enter the standby mode after two hours of inactivity without a job in progress ...

Страница 19: ... source for toggling history on or off Install and connect the optional external switch wire to a source of 12V power to utilize the Hardware setting If Touch Screen is selected touching or on the Guidance Screen will toggle coverage history recording on or off Tilt The Tilt icon is only displayed if an optional TM 1 Tilt Module is connected to the console Select the Tilt icon to setup and calibra...

Страница 20: ...cable platform Contact a local Raven dealer for ordering information Width Set the guidance width width of boom or implement Cruizer II uses this setting along with the selected guidance pattern to determine the displayed guidance path Offsets Select the Offsets icon to set the position of the GPS antenna with respect to the center of the boom or implement Sections The sections icon will be displa...

Страница 21: ...d B are also accessed via this screen See the Baud Rate Settings section on page 27 for details Set all output messages to zero if connecting an optional SmarTrax SmartSteer or TM 1 system to the Cruizer II using the recommended cables shown in the System Connection Diagrams section on page 31 Health Displays DGPS signal and status information Touch a point shown in the satellite constellation dis...

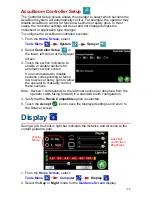
Страница 22: ...ray and no spray zones to field boundaries completed with the AccuBoom feature enabled The area within the completed boundary is automatically assigned as a spray zone and a minimum of three boom or implement widths outside of the boundary is assigned to a no spray zone Note When used with the SCS 4400 or SCS 4600 the Cruizer II must have software version 2 3 or later If the Cruizer II console is ...

Страница 23: ...ns is displayed below the No of Sections slider This list is automatically updated if the number of sections is adjusted Use the up or down arrows to display additional section settings if necessary Note Section 1 corresponds to the left most section as observed from the operator cabin facing forward in a standard boom configuration 4 Touch any of the displayed section values width left right or f...

Страница 24: ...or is driving the machine Coverage Percent AccuBoom automatic section control allows the operator to define the amount of coverage tolerated during an application For applications which require complete coverage the coverage percent setting should be set to a higher value 80 to 100 When applying products that do not tolerate overlaps the percent coverage should be set to a lower value The default ...

Страница 25: ...rs to enable or disable sections for automatic section control It is recommended to disable sections corresponding to fence row nozzles or spray guns to allow the operator to manually control these sections Note Section 1 corresponds to the left most section as observed from the operator cabin facing forward in a standard boom configuration 4 Verify that the Raven Compatible option is selected 5 T...

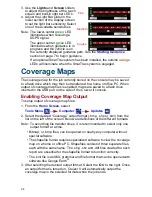
Страница 26: ...the USB port on the side of the Cruizer II console Enabling Coverage Map Output To setup output of coverage map files 1 From the Home Screen select Tools Menu Computer Updates 2 Select the desired Coverage output format bmp shp or kml from the list on the left of the screen Below are definitions of the different formats Note To avoid long file transfer times it is recommended to select only one ou...

Страница 27: ...b is closed or if a different file type is desired 1 End any jobs currently in progress on the Cruizer II 2 Review the Enabling Coverage Map Output section on page 24 to configure the file output types 3 Restart the job for which a coverage map file is desired Refer to the Resume a Saved Job and Delete Jobs section on page 9 for assistance with selecting a job file to resume 4 Insert a flash drive...

Страница 28: ...n the following steps are recommended if a Slingshot Field Hub will be used as the source for differential corrections If RTK is not available in the source list the internal receiver is not capable of receiving a dual frequency correction signal 3 Touch the Baud Rate option and select the baud rate at which corrections are transmitted from the RTK correction source The default baud rate setting i...

Страница 29: ...settings for each port Product Port SmartBoom SmartRow A or B TM 1 Tilt Sensor B SmarTrax software version 4 1 or older B Steering Node B SCS Serial Rate Console A Product Port A Port B TM 1 Tilt Sensor 19200 Datalogging with a Raven SCS 4400 4600 Console 9600 Serial Rate Display with a Raven SCS Serial Rate Controller 9600 SmarTrax software version 3 2 or older 38400 Recommended SmarTrax software...

Страница 30: ...h the console powered on insert a flash drive into a USB port on the Cruizer II console 2 From the Home Screen select Tools Menu Computer Updates 3 Select the desired update from the list and touch Start Job Note Selecting a full update file will reset the current configuration settings on the Cruizer II console If more than one update file is available on the Updates screen it is recommended to u...

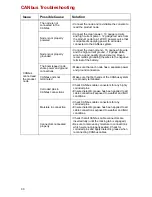
Страница 31: ...I console and antenna Tighten any loose connections Check the antenna port on the back of the Cruizer II console for a 5V signal use the metal surround of the antenna port as ground If a helix style antenna is used connect the antenna cable and test voltage at the antenna end using the same procedure Ensure that the antenna has a clear 360 view of the sky The machine should not be inside or near b...

Страница 32: ...oom speed node share power and ground connections Make sure that each node has a separate power and ground connection CANbus ends not terminated Make sure that both ends of the CANbus system are properly terminated Corroded pins in CANbus connections Check CANbus cable connectors for any highly corroded pins Ensure dielectric grease has been applied to all cable connections exposed to weather and ...

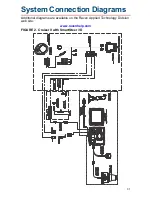
Страница 33: ...3 1 System Connection Diagrams Additional diagrams are available on the Raven Applied Technology Division web site www ravenhelp com FIGURE 2 Cruizer II with SmartSteer 3D ...

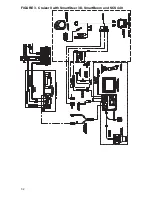
Страница 34: ...3 2 FIGURE 3 Cruizer II with SmartSteer 3D SmartBoom and SCS 440 ...

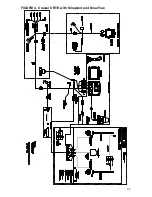
Страница 35: ...3 3 FIGURE 4 Cruizer II RTK with Slingshot and SmarTrax ...

Страница 36: ...3 4 ...

Страница 37: ......

Страница 38: ......

Страница 39: ...e Period How Can I Get Service What Will Raven Industries Do What is not Covered by this Warranty Bring the defective part and proof of purchase to your Raven dealer If your dealer agrees with the warranty claim the dealer will send the part and proof of purchase to their distributor or to Raven Industries for final approval Upon confirmation of the warranty claim Raven Industries will at our disc...

Страница 40: ...reserved under copyright laws Raven Industries Applied Technology Division Toll Free U S and Canada 800 243 5435 P O Box 5107 or Outside the U S 1 605 575 0722 Sioux Falls SD 57117 5107 Fax 605 331 0426 www ravenprecision com www ravenhelp com Raven Industries Inc 2010 2011 2012 Cruizer II Software Version 3 0 Operation Guide P N 016 0171 415 Rev D 2 12 E19207 ...

Отзывы: