manualshive.com logo in svg
background image

Installing software and drivers

Get the RаngeVisiоn software (equipped with the scanner) and run the installer
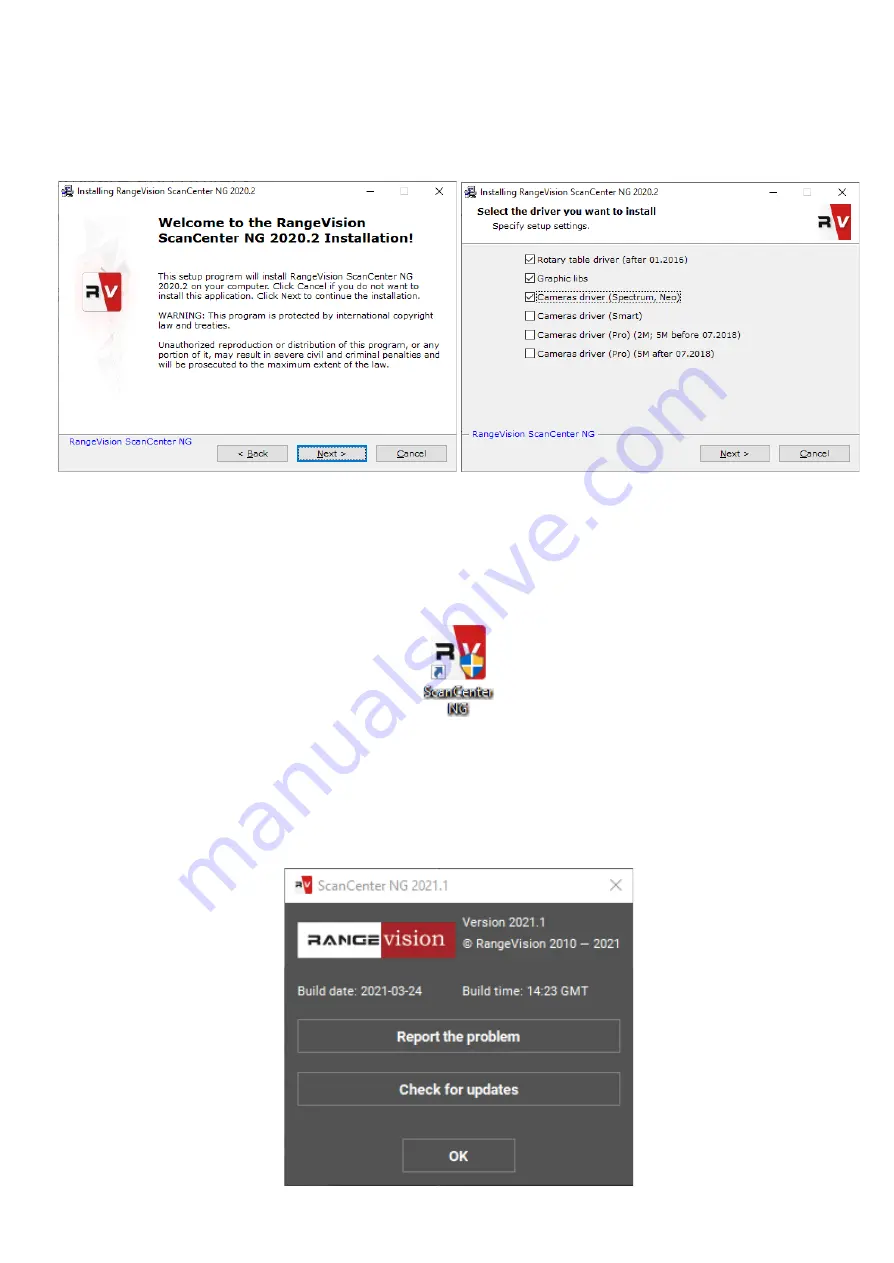
RаngeVisiоn SсаnCenter setup.

Following


the


prompts,


select


the


desired


language,


type


and


path


for


installation.

After


the


files


have


been


copied


install


drivers


and


graphics


libraries,


necessary


for

the


correct


operation


of


RangeVision


3D


scanner.

If


you


have


access


to


the


Internet


RangeVision


ScanCenter


NG


will


automatically

notify


you


when


updates


are


available.


You


can


check


for


updates


manually


by

clicking


About


Check


for


Updates

6

Содержание NEO

Страница 1: ...RANGEVISION Setup and calibration NEO...

Страница 2: ...ckage contents 5 Installing software and drivers 6 Setting up your computer for work with the scanner 7 Connecting projector 7 Configuring computer parameters 8 Scanner assembly 9 Calibrating the scan...

Страница 3: ...the procedures for preparing the scanner installing the required drivers calibration procedure scanning procedure and tips for acquiring high quality three dimensional object model Information may be...

Страница 4: ...3 Texture scanning yes FOV 300 240 240 mm 3D point accuracy 0 06 mm 3D resolution 0 18 mm Working distance 45 cm System requirements operating system Windows 7 8 10 64bit processor Intel Core i3 i5 1...

Страница 5: ...n plate and a stand for the calibration plate which are used to calibrate the scanner Name qty 1 Scanning module Mounting structure with projector 1 Cable kit for PC connection USB HDMI 1 2 Tripod 1 3...

Страница 6: ...esired language type and path for installation After the files have been copied install drivers and graphics libraries necessary for the correct operation of RangeVision 3D scanner If you have access...

Страница 7: ...ctor First connect the USB to power up the projector and then connect it to the HDMI port of your video card After connecting the projector it should be displayed in the system If the computer has sev...

Страница 8: ...recurrence of the problems during the scanner operation you must turn off the screensaver and sleep mode Go to Screen Saver Settings menu and turn off the screen saver disable turning off the display...

Страница 9: ...nning module onto the tripod 2 Connect USB cable to your PC 3 Connect HDMI cable to your PC 4 When using the turntable connect it to the power source then connect the USB cable to your PC and turn the...

Страница 10: ...turntable finding the table axis Full and automatic calibrations are used before work with the scanner after transporting the scanner Fast calibration is used if you suspect that the camera moved due...

Страница 11: ...down list choose the correct calibration plate size specified on the back side of the plate or add a new one It is possible that camera images in the software will be swapped or flipped from the start...

Страница 12: ...cameras matches the markers on the plate the cross is projected on the central marker 3 If the plate placement is incorrect an error message will appear Correct the placement and repeat the step In c...

Страница 13: ...advice on calibration do not change the distance from the center of the plate to the scanner when turning the plate The exception are only snapshots in positions 10 and 11 do not rotate the plate at a...

Страница 14: ...uring orienting starts to be very different from the original one you need to re calibrate the equipment Example The initial accuracy is 0 084 accuracy after orientation is 0 25 The value exceeded 0 2...

Страница 15: ...wn to the right is in compliance with Waste Electrical and Electronic Equipment Directive 2002 96 EC WEEE The mark indicates the requirement NOT to dispose the equipment as unsorted municipal waste bu...

Отзывы: