background image

29

Grill check

Open the grill compartment door.
The grill burner has an FSD that stops the flow of gas to 

the grill if the flame goes out. Turn the knob to the large 

flame symbol ( ). Press in the grill knob. This lets gas 

through to the burner. Keep holding the knob pressed in 

and press the igniter button or light with a match. Keep 

holding the button for about 10 seconds
If when you let go of the control knob the burner goes 

out, the safety device has not held in. Turn off the grill 

and wait one minute then try again this time holding in 

the button for slightly longer.

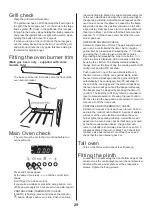
Fitting the oven burner trim

(Main  gas  oven  only  -  supplied  with  some 

models  only) 

The loose oven burner trim hooks onto the front of the 

oven burner bracket.

Main Oven check

 The clock must be set to the time of day before the 

ovens will work.

Press and hold as above. 

At the same time, press - or + until the correct time 

shows. 

Don’t forget it’s a 24 hour clock. 

If you make a mistake or press the wrong button, turn 

off the power supply for a minute or two and start again.
CONTROL KNOB (THERMOSTAT) CHECK  

If (AUTO) is flashing, press and release the manual (

) button. Check each oven in turn. Push in and turn 

the control knob to Mark 9. A series of sparks will occur 

at the oven electrode and when the oven burner lights 

the sparking will stop. A small flame will appear on the 

oven burner, but as this flame is ‘sensed’ by the flame 

supervision device, the gas flow will come on full after 

a short delay. Heat each oven for 10 minutes at Mark 9 

then turn to Mark 1 and check that the flame size has 

reduced. Turn off each oven and check that the oven 

burner goes out.
TIMER AND SOLENOID CHECK 

 Automatic Operation of Timer: The gas supply to each 

oven can be controlled by the timer. Set a ‘cooking 

period’ time by pressing and releasing the  (

) button 

and using the + button to give a time of 2 minutes. 

By pressing and releasing the ‘stop time’ button  (

) the stop time is displayed. Add 3 minutes to this time 

by using the + button. The display will automatically 

change to show the time of day, the cooking symbol (

) will go out and (AUTO) will show.
Push in and turn one of the oven knobs to Mark 9, 

the timer will run until the ‘cook period’ starts, when 

the oven solenoid will open and the burner will light 

automatically. The cooking symbol ( ) will show. At 

the end of the ‘cooking period’ the solenoid will close, 

the oven burner will go out and the beeper will sound 
(the beeper may be stopped by pressing the timer (

) button). The flashing (AUTO) symbol is a reminder to 

reset to manual operation. Pressing the reset’ button (

) once to stop the beep and a second time to return to 

manual, turn off the oven knob.
CONTROL KNOB (THERMOSTAT) CHECK  

Set timer to manual. Check each oven in turn. Push in 

and turn the control knob to Mark 9. A series of sparks 

will occur at the oven electrode and when the oven 

burner lights the sparking will stop. A small flame will 

appear on the oven burner, but as this flame is ‘sensed’ 

by the flame supervision device, the gas flow will 

come on full after a short delay. Heat each oven for 10 

minutes at Mark 9 then turn to Mark 1 and check that 

the flame size has reduced. Turn off each oven and 

check that the oven burner goes out.

Tall oven

Turn on the Tall oven and check that it heats up.

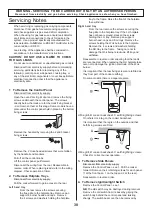
Fitting the plinth

Loosen the 3 screws along the front bottom edge of the 

cooker. Hook the central keyhole over the central screw. 

Twist and fit each end keyhole over their respective 

screws. Tighten the fixing screws.

Содержание Professional 90 Gas FSD

Страница 1: ...90 Gas FSD Users Guide Installation Service Instructions U106130 05...

Страница 2: ...with respiratory or allergy problems should vacate the area for this brief period If you smell gas pp DO NOT turn electric switches on or off DO NOT smoke DO NOT use naked ames DO turn off the gas at...

Страница 3: ...of the pan Carefully watch for spills or overheating of foods when frying at high or medium high temperatures Never try to move a pan of hot fat especially a deep fat fryer Wait until the fat is cool...

Страница 4: ...9 The Tall Oven electric Page 10 The Clock Page 11 Cooking using the timer Page 12 Oven cooking Page 13 Main Gas Oven cooking guide Page 14 Tall Fan electric Oven cooking guide Page 15 Cleaning your c...

Страница 5: ...sing a lid will help the contents boil more quickly Pans and kettles with concave bases or down turned base rims should not be used 4 Simmering aids such as asbestos or mesh mats are NOT recommended T...

Страница 6: ...oil before use Light the hotplate burners Adjust the ame heights to suit 4 Preheat the griddle for a maximum of 5 minutes before adding food Leaving it longer may cause damage You can reduce the heat...

Страница 7: ...b pressed for about 10 seconds If when you let go of the control knob the burner goes out the safety device has not held in Turn off the grill and wait one minute then try again this time holding in t...

Страница 8: ...e ame will become larger indicating that the oven is full on 4 Dishes cooking on the central shelf will cook at the gas mark indicated on the knob 5 Dishes placed above the central position will be co...

Страница 9: ...and then pull the shelf forward To re t the shelf line up the shelf with a groove in the oven side and push the shelf back until the ends hit the shelf stop Lift up the front so the shelf ends clear t...

Страница 10: ...hotplate immediately before S cooking Poultry and rolled joints should not be stuffed before cooking The stuf ng should be cooked separately Poultry and pork should be cooked in the top half of the ov...

Страница 11: ...nly setting The fan circulates air inside the oven but the heating element is not turned on This setting is useful for defrosting small quantities frozen foods Whole chickens and large joints of meat...

Страница 12: ...manual cooking To start and stop the oven automatically Before you set the clock you must have two numbers clearly in mind The cook period which is the period of time you want the oven to cook The sto...

Страница 13: ...the oven to turn on any time over the following 24 hour period If you want to cook more than one dish choose dishes that require approximately the same time However dishes can be slowed down slightly...

Страница 14: ...vegetables to hot fat around a roast dry them thoroughly or brush lightly with cooking oil Suf cient heat rises out of the oven while cooking to warm plates in the grill compartment If you want to bro...

Страница 15: ...s Fish 5 2 Fillets 15 20 mins Whole 15 20mins per 500g 5 2 Steaks according to thickness Cakes Very rich fruit Christmas wedding etc 1 4 45 50mins per 500g of mixture When two tier cooking leave at le...

Страница 16: ...per 500g 20 25mins 190 C 15 20mins per 500g 15 20mins Turkey 150 C 20 25mins per 500g 20 25mins 190 C 15 20mins per 500g 15 20mins Stuffed Poultry Cook at 200 C or at 200 C for 20mins then 160 C for r...

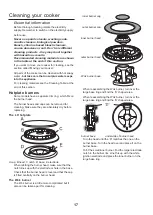
Страница 17: ...er heads and caps can be removed for cleaning Make sure they are absolutely dry before replacing The LH hotplate A cap B head C notch D base E electrode When re tting the burner head make sure that th...

Страница 18: ...fully lift off the outer door panel The inside face of the glass panels can now be cleaned take care not to disturb or wet the door insulation Please note that the door is triple glazed but the inner...

Страница 19: ...rome Warm soapy water soft cloth Oven Door Glass Glass Lid Toughened glass Hot soapy water cream cleaner scourer if necessary Oven and Grill Part Finish Recommended Cleaning Method Sides oor roof of o...

Страница 20: ...The lining panels can be removed for cleaning and for cleaning behind Remove the shelves rst Each side of the oven is xed with four xing screws You don t have to remove the screws to remove the oven l...

Страница 21: ...heck the power is on is the clock illuminated Grill Ignition faulty Is the power on Is the clock illuminated If not there maybe something wrong with the power supply See power supply section further o...

Страница 22: ...ent of a failure in the electrical supply the hotplate may be lit using a match you want Try cooking at a higher shelf position and or higher Mark Oven cooking times and temperatures may need to be in...

Страница 23: ...llation must be carried out by a Competent Person and installed in accordance with the current edition of I S 813 Domestic Gas Installations the current Building Regulations and reference should be ma...

Страница 24: ...available at most builders merchants GAS PRESSURE TESTER It is important the gas pressure is set correctly FLEXIBLE GAS HOSE Must be in accordance with the relevant standards For LP Gas it should be...

Страница 25: ...nsibility for damage caused by normal use of the cooker to any material that de laminates or discolours at temperatures less than 65 C above room temperature For safety reasons curtains must not be tt...

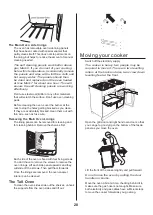
Страница 26: ...lower Fit the Handles Remove the 4mm Allen screws from the doors with the hexagon key tool Use the screws to t the door handles Moving the Cooker The cooker is very heavy Take great care We recommend...

Страница 27: ...ensure the bracket does not foul the oven burner assembly Gas Connection A hose is not supplied by with the cooker The Gas supply needs to terminate with a down facing bayonet The rear cover boxes lim...

Страница 28: ...Always state this colour when ordering a replacement fuse carrier IMPORTANT The wires in the mains lead are coloured in accordance with the following code GREEN AND YELLOW EARTH BLUE NEUTRAL BROWN LI...

Страница 29: ...ND SOLENOID CHECK Automatic Operation of Timer The gas supply to each oven can be controlled by the timer Set a cooking period time by pressing and releasing the button and using the button to give a...

Страница 30: ...o the wiring diagram Check operation of timer 2 To Remove Hotplate Trays Disconnect from electricity supply Pull the cooker forward to gain access to the rear Left hand tray From the rear remove the s...

Страница 31: ...heck tap is adjusted for correct gas Check appliance is gas sound 8 To Change Hotplate Control Taps Remove the Control Panel see 1 Lift up the appropriate hotplate tray front see 2 Unplug the FSD lead...

Страница 32: ...nd withdraw complete assembly Remove oven burner Fit oven burner to new assembly Replace complete assembly in the oven Reconnect tube nut Check appliance is gas sound Check correct ame supervision dev...

Страница 33: ...is held in place by small hooks on the rear face At the corner pull seal diagonally away from the door centre until that hook is released Proceed to the next hook and release it in a similar way and...

Страница 34: ...emove oven inner back see 15 Hold the fan blade and remove the centre nut left hand thread 2 brass washers fan blade and circlip Unscrew fan retaining nuts and washers 3 off each and lift the fan away...

Страница 35: ...35 Circuit Diagram...

Страница 36: ...pace for fixing See Positioning of Cooker Minimum space above hotplate 650mm Connections Gas Electric Rp 1 2 at rear right hand side 220 240V 50Hz Ratings Natural Gas L P Gas Hotplate Injector Injecto...

Страница 37: ...37...

Страница 38: ...ArtNo 000 0001 Aga address block...

Отзывы: