13
ArtNo.306-0001 - 3-button clock
ArtNo.306-0001 - 3-button clock
ArtNo.306-0001 - 3-button clock
ArtNo.306-0001 - 3-button clock
ArtNo.306-0001 - 3-button clock
To Start and Then Stop the Right-hand Oven
Set the right-hand oven to automatically start and stop using
a combination of the
‘cook period’
and
‘stop time’
.
You cannot set a start time directly – this is set
automatically by a combination of the
‘cook period’
and
‘stop time’
.
1.
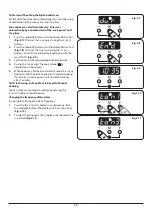
Press the mode [M] button until the display flashes ‘dur’
(Fig. 3.7). Then set the
‘cook period’
using the [+] or [-]
buttons.
2.
Press the mode [M] button until the display flashes ‘End’
(Fig. 3.8). Then set the
‘stop time’
using the [+] or [-]
buttons. Current time will be displayed along with the
word ‘AUTO’ (Fig. 3.9).
3.
Set the oven to the required cooking temperature.
4.
During the
‘cook period’
the cook symbol [ ] is
illuminated in the display.
5.
When cooking is finished an alarm will sound. Press any
button to stop the alarm and return to manual cooking.
If the alarm is not stopped, it will stop automatically
after 7 minutes.
AUTO is Showing, But You Want to Revert to Manual
Cooking
You can cancel any automatic settings by pressing the
[+] and [-] buttons simultaneously.
Changing the frequency of the alarm
It is possible to change the alarm frequency.
1.
Press the the [+] and [-] buttons simultaneously, then
the mode [M] button. The display will show ‘ton1,2 or 3’
2.
To select the tone press the [-] button until desired tone
is reached (Fig. 3.11).
Fig. 3.7
Fig. 3.8
Fig. 3.9
Fig. 3.10
Fig. 3.11
Содержание Classic 100 Gas
Страница 1: ...Classic 100 Gas 3 Button Clock Built from experience U110733 01 USER GUIDE INSTALLATION INSTRUCTIONS...
Страница 4: ...iv...
Страница 40: ...36 Note...
Страница 41: ...37 Note...
Страница 42: ...38 Note...

