INSTALLATION
Check the appliance is electrically safe and gas sound when you have finished.
28
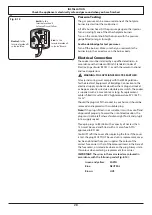
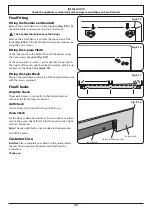
Pressure Testing
The gas pressure can be measured at one of the hotplate
burner injectors (not the wok burner).
Lift off a burner head. Fit the pressure gauge to the injector.
Turn on and light one of the other hotplate burners.
Turn on the control knob for the burner with the pressure
gauge fitted to let gas through.
See the data badge for test pressures.
Turn off the burners. Make sure that you reassemble the
burner top in the correct way on the burner body.
Electrical Connection
The cooker must be installed by a qualified electrician, in
accordance with all relevant British Standards/Codes of
Practice (in particular BS 7671), or with the relevant national
and local regulations.
n
n
WARNING: THIS APPLIANCE MUST BE EARTHED.
All external wiring must comply with the IEE Regulations
for the Electrical Equipment of Buildings. Connection to the
electrical supply can be made with either a plug and socket
or be permanently wired via a double-pole switch. The cooker
is supplied with a 3-core cable 2 m long. If a replacement
cable is fitted it must be 250 V high temperature PVC (85 °C),
1 mm².
Should the plug not fit the socket in your home, it should be
removed and replaced with a suitable plug.
Note: If the plug is fitted is not suitable, it must be cut off and
disposed of properly. To avoid the risk of electrocution, the
plug must not be left where children might find it and plug it
into a supply socket.
Three pin plugs to BS 1363 with a capacity of not less than
13 A must be used and fitted with a 13 amp fuse ‘ASTA’
approved to BS 1362.
You MUST refit the cover after replacing the fuse. If the cover
is lost, the plug MUST NOT be used until a replacement cover
has been obtained from your supplier. The colour of the
correct fuse carrier is that of the coloured insert in the base of
the fuse recess, or stated elsewhere on the plug. Always state
this colour when ordering a replacement fuse carrier.
IMPORTANT:
The wires in the mains lead are coloured in
accordance with the following code
:
Green and yellow:
EARTH
Blue: NEUTRAL
Brown: LIVE
Earth:
to the
terminal marked E,
coloured Green/Yellow
Live:
to the
terminal marked L,
coloured Brown
Neutral:
to the
terminal marked N,
coloured Blue
Fig. 8.14
Содержание Classic 100 Gas
Страница 1: ...Classic 100 Gas 3 Button Clock Built from experience U110733 01 USER GUIDE INSTALLATION INSTRUCTIONS...
Страница 4: ...iv...
Страница 40: ...36 Note...
Страница 41: ...37 Note...
Страница 42: ...38 Note...


