8
The Glide-out Grill
n
n
CAUTION: Accessible parts may be hot when the grill
is in use. Young children should be kept away.
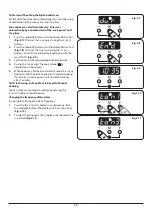
Open the door and pull the grill pan carriage forward using
the handle (Fig. 2.15).
The burner does not glow red when in use; food cooks from
the heat of the flame. The first time you light the grill there
may be a little smoke given off – this is perfectly normal.
Operation
The grill has a special safety device which stops the flow of
gas if the flame goes out.
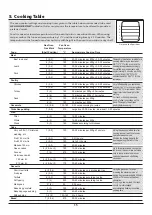
To turn on the grill, press the igniter button and then press
and hold the grill control knob to the large flame symbol (
)
for about 10 seconds (Fig. 2.16).
To heat the right-hand half, turn the knob counter-clockwise.
The neon indicator light by the grill control will come on.
If, when you release the control knob the burner goes out,
then the safety device has not held in. Turn the grill control
knob to ‘0’ and wait for one minute. Repeat the operation but
hold the button and control knob in for slightly longer.
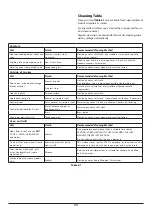
The low position, marked with the small flame symbol, is
beyond high, not between high and off (Fig. 2.17).
For best results, slide the grill pan back into the grill chamber
and preheat the appropriate part(s) of the grill for two
minutes. The grill trivet can be removed and the food placed
on it while you are waiting for the grill to preheat.
n
n
DO NOT leave the grill on for more than a few
moments without the grill pan underneath it,
otherwise the knobs may become hot.
Once the grill has preheated, slide the grill pan out again.
With the trivet back in place with the food on it, slide the pan
back into the grill chamber. Make sure that it is pushed right
in.
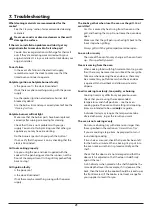
The grill pan trivet can be turned over to give two grilling
positions (Fig. 2.18).
n
n
Never close the grill door when the grill is on.
ArtNo.331-0002 Grill pan high/low position
ArtNo.331-0001Grill pan pulled forwards
Fig. 2.15
Fig. 2.16
Fig. 2.17
Fig. 2.18
Содержание Classic 100 Gas
Страница 1: ...Classic 100 Gas 3 Button Clock Built from experience U110733 01 USER GUIDE INSTALLATION INSTRUCTIONS...
Страница 4: ...iv...
Страница 40: ...36 Note...
Страница 41: ...37 Note...
Страница 42: ...38 Note...


