background image


20.


Warnings, End-User License Agreement, and Warranty 

 
Pay attention to road conditions and street signs, and obey all traffic and safety laws. Traffic 
laws and current traffic conditions must always be observed and take precedence over the 
instructions issued by the Rand McNally navigation system. The User should be aware of 
situations where current traffic conditions and the instructions from the navigation system 
may be in conflict. Always use your best judgment and exercise common sense when 
making off-road navigational decisions. For safety, be attentive to trail and weather 
conditions and defer to posted signs. It is the User’s responsibility to ensure compliance with 
all laws and regulations. The use of the navigation system does not relieve the User of 
his/her responsibilities. The User should be aware of the surroundings at all times. 
 
If after reading these statements the User decides not to accept these terms, the User should 
not use the navigation system. 
 
Rand McNally hereby grants you ("User") a single-user non-exclusive, non-transferable 
license to use the Rand McNally Foris™ navigation product (hereinafter referred to as the 
"Product" (including software and associated data)) for User’s own internal business or 
personal use and not for resale, sublicense or commercial use. 
 
This Product and the software incorporated in it and related documentation are furnished 
under license and may be used only in accordance with this license. Except as permitted by 
such license, the contents of this Product and software may not be disclosed to third parties, 
copied or duplicated in any form, in whole or in part, without the prior written permission of 
Rand McNally. This Product and software contain proprietary and confidential information of 
Rand McNally and its licensors. Rand McNally grants User a limited license for use of this 
Product and the software incorporated in the Product for its normal operation. By using the 
Product, User acknowledges that the content of this document and the Product are the 
property of Rand McNally and its licensors and are protected by U.S. copyright, trademark 
and patent laws and international treaties. 
 
THE USER MAY NOT: 
 
• Use the Product on a network or file server, time-sharing or to process data for other 
persons. 
• Use the Product to create any routing tables, files, databases or other compendiums. 
• Copy, loan or otherwise transfer or sublicense the Product, its software or content. 
• Modify, or adapt the Product in any way, or decompile, disassemble, reverse engineer or 
reduce to human readable form the Product and software incorporated therein. 
• Alter, remove or obscure any copyright notice, trademark notice, or proprietary legend from 
the Product, its software or content. 
 
This license will terminate automatically if User fails to comply with any of the terms of this 
license and User agrees to stop using the Product. Rand McNally may revise or update the 
Product and is not obligated to furnish any revisions or updates to User. 
 
Warranty: Please retain your original sales receipt for warranty service. Rand McNally 
warrants that the Product, and the component parts thereof, will be free of defects in 
workmanship and materials for a period of one (1) year from the date of first consumer 
purchase. 
 
This warranty may be enforced by the first consumer purchaser, provided that the product is 
utilized within the U.S.A.  
 
Rand McNally will, without charge, repair or replace (with a new or newly reconditioned unit), 
at its option, defective Products or component parts. For repair or replacement of defective 

Содержание Foris 850

Страница 1: ...User Manual ...

Страница 2: ... right to provide changes and enhancements that may not be reflected in the pictures and specifications in this document All trademarks mentioned in this manual belong exclusively to the respective owners and may therefore not be used for commercial or other purposes 2013 RM Acquisition LLC d b a Rand McNally All rights reserved ...

Страница 3: ...3 Points of interest 12 3 4 Previous destinations 13 3 5 Position on map 13 3 6 Waypoints 13 3 7 Coordinates 13 3 8 Geocaches 14 3 9 Tracks 14 3 10 Trips 14 3 11 Arrange menu 14 3 12 Calculated route 14 4 Trip computer 15 5 Trip Manager 15 5 1 Create trip 15 5 2 Loop Me 16 5 3 Select saved trip 16 6 Settings 17 6 1 Navigation settings 17 6 1 1 Route options 17 6 1 2 Set routing 17 6 1 3 Speed prof...

Страница 4: ...tion format 20 6 3 8 Screen auto off 20 6 3 9 Set home 20 6 3 10 Quick access menu 20 6 3 11 Quick access button assignment 20 6 3 12 Miles kilometers 20 6 3 13 Delete history 20 6 3 14 Default settings 20 6 3 15 Time 20 6 3 16 Voice 20 6 3 17 Screen 20 6 3 18 Info 21 6 3 19 Arrange menu 21 7 Active route 21 8 Remember position 21 9 Geocaching 21 9 1 Transfer files to your device 21 9 2 Search for...

Страница 5: ...1 4 1 TrackNav 26 11 4 2 Start track directly 26 12 Extras 27 12 3 GPX manager 27 12 4 Map errors 27 12 4 1 Create map error 27 12 4 2 Create POI error 27 12 4 3 Edit map and POI errors 27 12 5 Help 28 13 Arrange menu 28 14 Trailhead 28 14 1 Introduction to Trailhead 28 14 2 Import of GPX files 28 14 3 Transfer of content 30 14 4 Import of POIs 30 14 5 Software 32 15 Tips and tricks 32 16 Troubles...

Страница 6: ...y over the routes of the navigation device Never operate the navigation device while riding and do not allow yourself to be distracted by the device while riding The map data which is used may include inaccurate or incomplete data You should therefore check the calculated route to see if it makes sense and choose your own alternative route if necessary CAUTION The navigation device is intended for...

Страница 7: ...evice off completely Cancel takes you back to the application Volume Brightness Adjust volume and brightness Quick Access In the default setting this button starts or pauses the track recording To change the function of this button see Settings System General Quick Access Button Note If the device is not responding press the power button for approximately 3 seconds to restart Or simply remove and ...

Страница 8: ... recharged while in the device Note To maximize battery life select the correct battery type under Settings System General Battery type Additional tips for maximizing battery life Reduce the brightness of the display Display dims automatically when batteries are low Reduce the volume Volume decreases automatically when batteries are low Set navigation to beep output in Settings Navigation Settings...

Страница 9: ...ing plate for the micro SD card upwards and flip it up from underneath Insert the micro SD card Make sure the contacts on the card are pointing downwards Flip the retaining plate back down towards the device and lock it in place by sliding it downwards Bike Mount 1 Push up on the lever at the top of the mount to release the lock 2 Wrap the strap around the handlebar and reinsert the locking lever ...

Страница 10: ...curely to the handlebar Note To mount to the stem remove the screws rotate the bracket 90 degrees and replace the screws 5 Slide the device onto the bracket until it clicks into place 6 To remove the device press down on the tab at the bottom of the bracket and slide off ...

Страница 11: ...direction of the next turn Tap to repeat Also displays other intersecting roads and the distance to your next maneuver The top field displays the second maneuver Upcoming intersections may also display and count down here Goes to the main menu Hold to hide the navigation information and show a cleaner view of the map Tap again to return to the main menu Displays and hides the elevation profile on ...

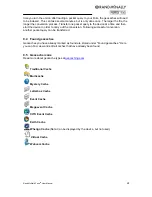
Страница 12: ... fewer than 3 satellites Adequate GPS signal is sufficiently strong to allow positioning Signals are being received from 3 satellites Strong A high quality GPS signal is being received that allows your elevation to be determined Signals are being received from at least 4 satellites Means of Transport The symbols and correspond to biking and hiking mode Compass Indicates the current compass directi...

Страница 13: ...sappear as you type to prevent errant keystrokes To narrow the search search within a state by tapping the flag at the top of the screen Select the state and tap OK To view the location on the map tap Show Map Tap List to select the city from a list 3 Once you have entered the city tap Next 4 Enter the street Tap List to select the city from a list Tap Center to route to the center of the city 5 O...

Страница 14: ...nce from this point The results are displayed in a list Sort Sort results by distance alphabetically or by those that include extra information Map Display the selected POI on the map OK Start the route calculation to the selected POI Double tap Open the detailed view for a POI ABC Search for a POI by entering text Detail view Tap on a POI to see more information in the detail view Switch between ...

Страница 15: ...layed in a list Sort Sort results by distance or alphabetically Map Display the selected waypoint on the map OK Start the route calculation to the selected waypoint Double tap Open the detailed view for a waypoint ABC Search for a waypoint by entering text 3 7 Coordinates You can also enter your destination via coordinates particularly helpful for reaching a precise location in open terrain where ...

Страница 16: ...r import tracks via Trailhead See Chapters 11 14 To route on a track select the track from the list Tap OK to view the track tap OK again to start the route 3 10 Trips See Chapter 5 To find a saved trip search around your location or an address Trips are displayed according to their relative distance Or tap Show all trips Select the trip from the list Tap OK to view the trip tap OK again to start ...

Страница 17: ...uter displays data about the current trip The default view displays six different statistics Tap any field to select different information to display The red box at the bottom shows the destination Tap Stats for further information about the current trip Tap to reset all values 5 Trip manager Enter destinations in the trip manager to Enter a starting point that is different from your current GPS l...

Страница 18: ... stop trip around your location an address or choose to display all trips Select the trip and tap OK or tap ABC to search for a trip by name Tap any of the three tabs to view route Info see destinations on the Map or list Stopovers The Stopovers list shows each destination on the trip Use the arrows to scroll through Tap any stop to deselect The icon changes to a red X Indicates this stop will be ...

Страница 19: ...a longer route Route preferences A red x indicates this type of route will be avoided in most cases Individual routes may disregard some preferences as necessary for route calculation A heart symbol indicates this type of route is preferred Bike paths uses or avoids cycling paths only in bicycle mode Hiking trails uses or avoids hiking trails Hiking trails can be preferred in pedestrian mode Steep...

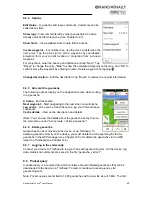
Страница 20: ... screen and rotates according to direction 6 2 3 Position on street On Off Specify whether your current position should be shown on the nearest road or trail Note It is important to turn this setting off for geocaching or navigation in open terrain 6 2 4 City names on map On Off Controls labels on the map 6 2 5 Auto zoom On Off Auto zoom adjusts the map view automatically based on position and spe...

Страница 21: ...ff Tap to adjust volume separately for the speaker and keytones Note Volume is automatically reduced when battery is low 6 3 5 Calibrate compass To guarantee precise orientation of the compass you should recalibrate the compass at regular intervals Tap Calibrate compass and follow the instructions on the device Visit the support section of Rand McNally website to see a short video Note Conduct com...

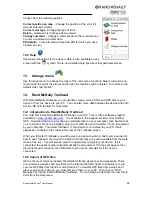
Страница 22: ...creen See Chapter 1 6 3 11 Quick access button Located on the left side of the device To specify what this button does select one of the functions from the list and tap OK 6 3 12 Miles Kilometers Set units of measurement 6 3 13 Delete history Delete all user data You will see which data will be deleted in the confirmation prompt 6 3 14 Default settings Reset to default factory settings The device ...

Страница 23: ...te to the next destination Current trip profile For multi stop trips View the entire tour profile see Chapter 5 3 8 Remember position Saves the current position as a waypoint Use the date and time or tap to delete and enter another name To save a point other than your current location see waypoint manager Chapter 10 9 Geocaching Geocaching is a kind of outdoor treasure hunt in which you as the tre...

Страница 24: ...atus Search for geocaches that are either unattempted not found or where repair is needed Cache type Look specifically for one cache type or for several cache types Cache size Choose a particular size of cache Difficulty Choose a particular level of difficulty Terrain Choose a particular difficulty of terrain Note The Rand McNally Foris does not support Wherigo caches 9 2 3 Detailed view Display m...

Страница 25: ...o a geocache X Cache End the search Next waypoint Start navigating to the next stop in a multicache Log cache Once you ve found the cache log your find and leave comments Cache details View cache description and details Note You can view the details about the geocache at any time on the main menu under Active route Active geocache 9 2 6 Delete geocache Geocaches can be removed via the device or vi...

Страница 26: ... carry out the conversion Following successful conversion another pocket query can be transferred 9 4 Found geocaches Geocaches you have already marked as found are stored under Found geocaches Here you can find view and edit all caches that have already been found 9 5 Geocache icons Read more about geocache types at geocaching com Traditional Cache Multicache Mystery Cache Letterbox Cache Event C...

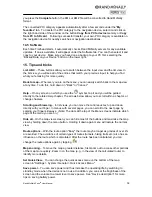
Страница 27: ...existing track or delete or edit tracks 11 1 Record track Record the route that you are riding or walking along This track recording will allow you to retrace the route you have ridden or walked precisely at a later date After the recording you can choose to display the track on the map and view the altitude profile You can also display additional information such as the starting and end position ...

Страница 28: ...ion calculates a route as similar as possible to the original track The route includes turn by turn directions and displays the arrival time and the real distance Both the original track and the calculated route display on the map Choose Route to obtain turn by turn directions Choose Track to start guidance without turn by turn directions Choose whether to be guided to the starting point of the tr...

Страница 29: ...n then transfer the map errors to Rand McNally via Trailhead You can create map errors on the menu or record them directly while you are travelling and then edit them at a later date Create new map errors as well as view map errors or POI errors that have been saved previously 12 4 1 Create map error Tap Create map error to record a new map error You can also enter an address or mark a position on...

Страница 30: ...ram available on www randmcnally com It is available in the Support section under Outdoor GPS Download the file to a location you will remember on your computer then double click on it to install it Once it is installed plug in your GPS device and wait for it to be recognized by your computer Then start Trailhead If your device is connected to your PC it will appear as connected in the lower left ...

Страница 31: ...hting the selected item next to the rather than the detail underneath Select the detail under the to see speed and altitude but select the summary to see the possible options shown by the orange circle icons on the right GPX files on the map view In the GPX manager you can display waypoints tracks and geocaches that you have created yourself The map can be moved using the arrows and the hand icon ...

Страница 32: ...n various categories Along the top the categories Country maps POIs My favorite lists Voices and Software are presented in tabs When you click on the tab a list appears Row headings and icons show where the data is located per the icons below in the internal memory of the navigation device on the SD card on the PC on CD DVD or on an Internet server Important An active internet connection must exis...

Страница 33: ...r KMZ compressed KML file on your PC which you would like to transfer to your navigation device Once you have selected a file a list of the POIs in it appears beneath it Press the Next button In the next window you can assign an individual category name for your POI category You also have the option here of providing more details about the particular POI category Once you have provided the POI cat...

Страница 34: ...ou will be guided directly to the related Help chapter The arrows below allow you to scroll within a chapter or change chapters Scrolling and browsing In list views you can move the continuous text up and down directly with your finger In menus with several pages you can scroll to the next page by swiping your finger sideways Note The dots at the top of the Menu screens indicate which page of the ...

Страница 35: ...onally responding reset may be required Carry out a hard reset by holding down the power button for around 3 seconds The device then switches off entirely Compass does not align itself correctly The compass should be regularly calibrated Recalibrate the compass There may be magnetic interference nearby Make sure that there are no sources of interference such as magnets large metal objects such as ...

Страница 36: ...is compatible with direct download of Geocaches from Geocacaching com Geocoin Geocoins perform the same role as Travel Bugs They are tracked online and can travel around the world Geocoins are often individually designed by geocachers and are also used as collectors items GPS The Global Positioning System is a satellite based system for global positioning Your location can be pinpointed using the ...

Страница 37: ...ddress or position of special interest such as restaurants interesting sights museums and many more The points of interest on your device are divided up into various categories to make it easier to search for specific destinations Additional points of interest can be transferred to the device via Trailhead see Chapter 14 Coordinates Positions can be determined precisely with the aid of coordinates...

Страница 38: ...ly This Product and software contain proprietary and confidential information of Rand McNally and its licensors Rand McNally grants User a limited license for use of this Product and the software incorporated in the Product for its normal operation By using the Product User acknowledges that the content of this document and the Product are the property of Rand McNally and its licensors and are pro...

Страница 39: ... WARRANTY OR REPRESENTATION EITHER EXPRESS OR IMPLIED WITH RESPECT TO THE PRODUCT INCLUDING ANY WARRANTY AS TO QUALITY PERFORMANCE TITLE OR NON INFRINGEMENT IN NO EVENT WILL RAND MCNALLY OR ITS LICENSORS BE LIABLE FOR ANY INDIRECT SPECIAL INCIDENTAL OR CONSEQUENTIAL DAMAGES ARISING OUT OF THE USE OR INABILITY TO USE THE PRODUCT EVEN IF ADVISED OF THE POSSIBILITY OF SUCH DAMAGES Some states do not ...

Страница 40: ...s and actions arising from or in connection with the Data provided to the User hereunder User shall not export the Product in violation of any U S or foreign laws Rand McNally s licensors shall be third party beneficiaries of Rand McNally s rights under this license but are not parties hereto and have no obligations hereunder By using this product you agree to be bound both by the foregoing and to...

Отзывы: