background image

Documentation Center

Installation

This section provides the instructions on mounting and securing the mounting kit to the enclosure and the
mounting pole.

Mounting

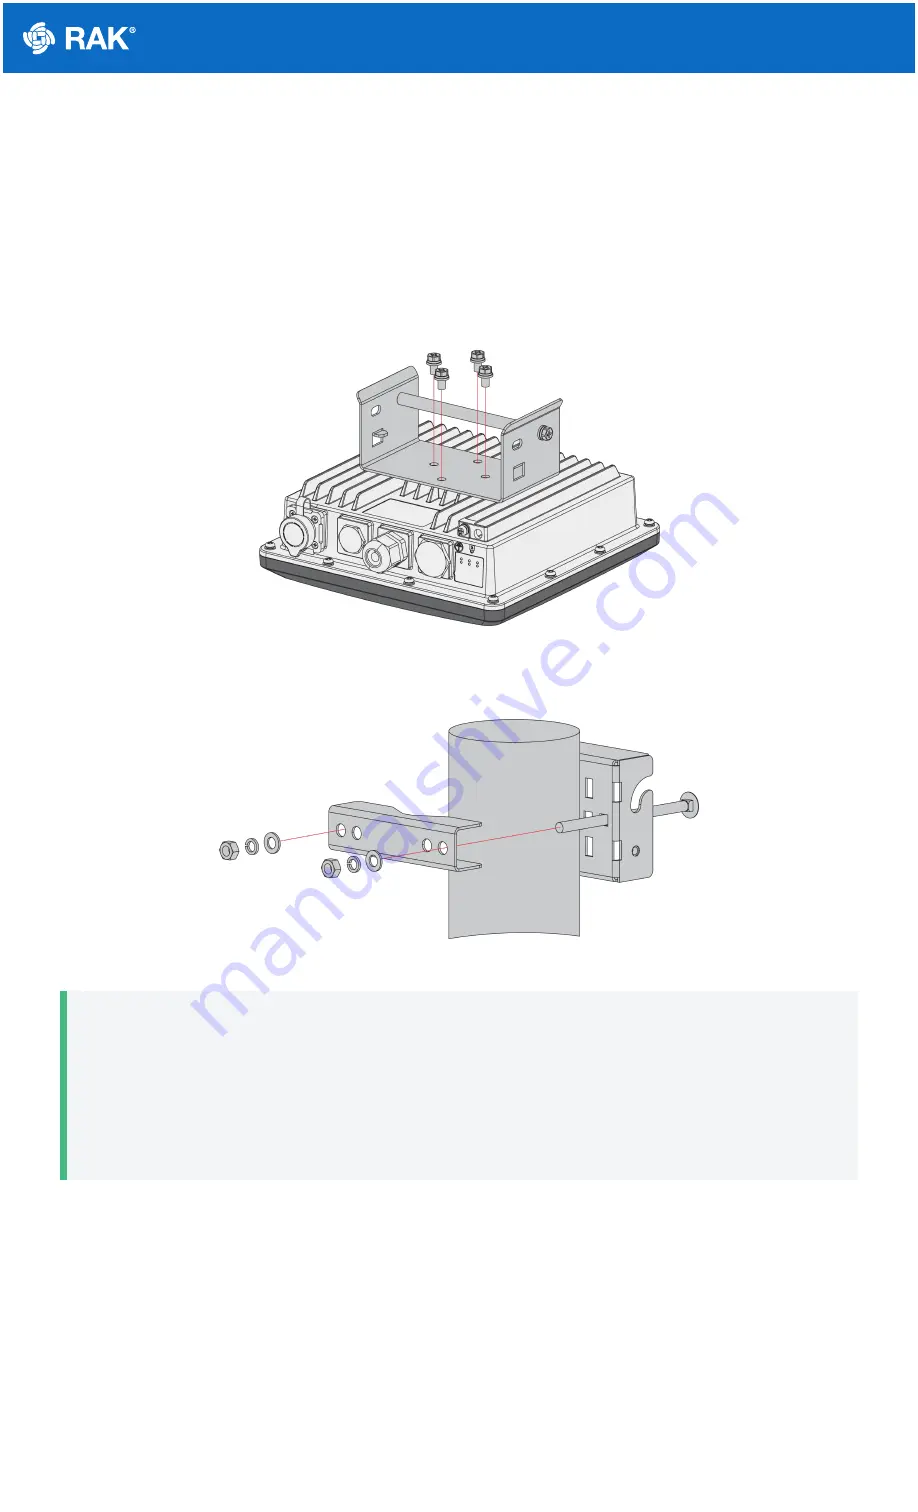
1. Fix the bracket included in the mounting kit on the bottom of the enclosure with four M6*12 screws.

Figure 2: Mounting the bracket to the enclosure

2. Position and tighten the pole clamps together around the pole with bolts, washers, and nuts.

Figure 3: Mounting the clamps to a pole

📝

 NOTE

The diameter of the pole that is supported by the brackets is 50-100 mm. If the pole diameter is more than
this value, hose clamps can be used. The standard mounting kit does not include hose clamps. If needed,
they should be purchased separately.

The clamp's back also has openings for hose clamps that are not included in the mounting kit.

Содержание WisGate Edge Pro RAK7289

Страница 1: ...WARNING The SIM card slot of the cellular versions is not hot swappable Make sure the gateway is switched off before inserting or ejecting the SIM card What Is Included in the Package Figure 1 RAK7289...

Страница 2: ...et to the enclosure 2 Position and tighten the pole clamps together around the pole with bolts washers and nuts Figure 3 Mounting the clamps to a pole NOTE The diameter of the pole that is supported b...

Страница 3: ...et Connecting the PoE Adapter 1 Connect the Ethernet cable from the enclosure to the Ethernet port labeled PoE adapter 2 Connect an Ethernet cable from your LAN network to the Ethernet port labeled LA...

Страница 4: ...ion of the connector Continue wrapping the PVC tape to about 10 mm below the end of the connector Figure 7 Wrapping with PVC tape 2 Cut off about 50 cm waterproof tape Stretch it to double the length...

Страница 5: ...ay without interruption or damage from the lighting Figure 10 Full lightning protection set up Outdoor Surge Protection System Antenna Grounding RAKwireless recommends a lightning arrestor to be insta...

Страница 6: ...ar cable is used for RAK7289 Lightning Protection This cable is an N Type Male N Type Female cable with 1 5 m 3 m 5 m 10 m or longer custom length It is an LMR 400 coaxial cable with N type connectors...

Страница 7: ...hernet Port on the bottom of the casing Figure 12 Powering the gateway using PoE Access the Gateway In this section several ways of accessing the gateway are provided to have different alternatives fo...

Страница 8: ...f the gateway s MAC address 1 To access the Web Management Platform input the following IP Address in your Web browser 192 168 230 1 Figure 13 Accessing the gateway via Wi Fi AP mode NOTE No password...

Страница 9: ...gateway via WAN Port Ethernet 2 The default IP is 169 254 X X where the last two segments are mapped from the last four bits of the MAC address of your gateway For example the last four bits of the M...

Страница 10: ...dress and set the IP address for this example to 169 254 15 100 Figure 17 Setting IP address of the PC In this example you can access the gateway on the 169 254 15 1 address 5 Use the same steps and c...

Страница 11: ...less network is enabled Figure 19 Wi Fi settings 2 From the drop down Mode menu choose Client or Access Point Client if you want to see the gateway s AP 3 You can either click the Scan button to choos...

Страница 12: ...b browser the same way as in AP mode Connect Through Ethernet PoE Figure 21 Accessing the Internet through Ethernet 1 Connect the Ethernet cable to the port marked ETH on the gateway and the other end...

Страница 13: ......

Отзывы: