background image

8

Installation Instructions

1.  Safety Precautions

• To prevent an accident and/or injury, do not hoist the unit over     

your shoulder. Use a hand truck to transport the unit.
• Do not lay the unit on its side.
• Wear safety glasses and work gloves during installation

2.  Test the Raw Water

• If water contains iron, manganese or hydrogen sulfide, a seperate 

iron removal system is suggested to be installed prior to the 

conditioner, consulting with your local dealer.

3.  Check the Water Pressure

• Use a pressure gauge to confirm that the water pressure does not     

exceed 120 psi. If the water pressure does exceed this limit, install a 

pressure regulator on the inlet pipe of the unit. The minimum    water 

pressure for a conditioner is 20 psi. 60 psi is the optimum    operating 

pressure. 

4.  Locate a Site for the System


• There are three primary requirements needed for a site: the main    

water source, an air-gap drain and a grounded electrical connection. 

Locate the system as close to these items as practical. Drain lines over 

50 feet long, may need to be increased in size to allow proper flow.
• Place the system in the desired location. The location should have a 

level, smooth, and clean surface.
• If the system is located outdoors, protect the unit from direct 

sunlight. Direct sunlight can damage the fiberglass and other system 

components. If necessary, build a box or shed. In some installation 

environments you may choose to partially bury the system.  This is 

done primarily for aesthetics, however this will add stability to the 

system as well.  
• We do recommend all systems installed outdoors include the valve 

weather cover. 

5.  Install the Valve Head

• Remove the cap plug from the tank.
• Lubricate the riser pipe O-ring and tank O-ring with the Dow 111 

silicone-based lubricant or equivalent.
• Attach the supplied upper basket to the bottom of the control        

valve; twist to lock in place. Do not use if water contains any amount 

of iron. 
• Align the upper basket with the riser pipe and slowly lower the        

control valve onto the riser pipe, using a twisting motion.
• Align the control valve with the tank. Push down on the control      

valve and continue to turn it clockwise until the valve O-ring seals 

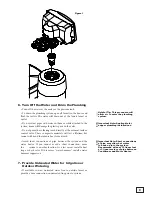
against the tank (see figure 1).

Helpful Tip: The drain may be a 

floor drain, a sewer trap, utility 

sink, vent stack, dry well, etc., 

depending on local plumbing 

codes.

!

Important Note: The system 

can only be installed outdoors 

in climates that do not reach 

freezing levels.  

!

Important Note: Do not over-

tighten the valve to the tank.

!

Important Note (For 

Massachusetts Residents 

Only) The Commonwealth of 

Massachusetts Plumbing Code 

248 CMR shall be adhered to. A 

licensed plumber shall be used 

for this installation.

!

Important Note: Water pressure 

often spikes higher at night.  We 

recommend adding a pressure 

regulator if your daytime 

pressure reading is higher than 

80 PSI.

!

Important Note: Not Applicable 

for EC4-CAB and SS Models.

Содержание EC4 SERIES

Страница 1: ...ries is tested and certified by WQA to CSA B483 1 Standard Part No 50038 Rev B 10 20 Rainsoft Division of Aquion Inc 101 S Gary Ave Roselle Illinois 60172 1 847 437 9400 or 1 800 860 7638 www rainsoft...

Страница 2: ...m Start Up 13 Salt Requirements 15 Maintenance Requirements 15 An Overview of the Regeneration Process 16 17 EC4 Display Home Screen 17 Customer Setting Flow Chart 18 Customer Settings 19 20 How to In...

Страница 3: ...ht amount of salt for maximum efficiency based on your individual water consumption needs Application Limitations On hardness levels of 60 grains and higher the system may not achieve a hardness of le...

Страница 4: ...where water is microbiologically unsafe or of unknown quality without adequate disinfection before or after the system This system must be installed in accordance with all applicable state and local...

Страница 5: ...10 0 2 0 10 0 34 500 15 0 lbs 30 500 10 0 lbs 14 200 3 0 lbs 4 750 3 0 lbs EC4 100 CV 10 x 44 1 0 10 0 2 0 11 0 34 500 15 0 lbs 30 500 10 0 lbs 14 200 3 0 lbs 4 750 3 0 lbs EC4 100S V 10 x 35 1 0 10...

Страница 6: ...2 0 11 0 30 500 15 0 lbs 26 100 10 0 lbs 13 500 3 0 lbs 4 516 3 0 lbs EC4 150 T 10 x 54 1 5 9 6 2 0 12 0 45 700 22 5 lbs 39 200 15 0 lbs 20 300 4 5 lbs 4 516 4 5 lbs EC4 150 CT 10 x 54 1 5 9 6 2 0 13...

Страница 7: ...liance The EC4 Series is tested and certified by WQA to CSA B483 1 Standard Water treatment devices sold to retail consumers in California accompanied by certain health claims must be registered to Ca...

Страница 8: ...or shed In some installation environments you may choose to partially bury the system This is done primarily for aesthetics however this will add stability to the system as well We do recommend all s...

Страница 9: ...ns of pipe between the system and the water heater If you cannot avoid a short connection move the system to another location As a last resort install a heat trap or check valve If this causes water h...

Страница 10: ...let pipe connection of the yoke When looking at the front of the system the inlet is the pipe connection on the right side of the valve see figure 3 The arrow molded into valve indicates the direction...

Страница 11: ...in line to the air gap The air gap should be installed between the end of the drain line and the drain to prevent possible back siphoning see figure 6 11 Figure 5 Mr Drain AIR GAP STAND PIPE FOR WASHE...

Страница 12: ...bout 5 inches from the overflow elbow see figure 7 3 11 Install the Brine Line Slide the brass compression nut over the end of the brine line followed by the ferrule and tube support Attach the brine...

Страница 13: ...e Remaining Debris from the System Open the cold water faucet on your bathtub Allow the system to flush the remaining dirt and debris into the bathtub until the water runs clear Open all remaining fau...

Страница 14: ...locks Standard Block Dims 8 5 x 8 5 x 11 5 Total Blocks Possible 3 150 lbs of Salt Level 4 0 level equal to 200 lbs Not Correct STACKING BLOCK SALT 50 lbs BLOCKS 11 5 8 5 8 5 STACKING BLOCK SALT 25 lb...

Страница 15: ...s Your water quality and the amount of regenerations necessary will affect this maintenance schedule Your local RainSoft Dealer is knowledgeable in the different water qualities and will have the nece...

Страница 16: ...ed the control will calculate the exact amount of salt that you will need to restore the system capacity Then 2 hours before the time of regen the control will start to fill just enough water to the b...

Страница 17: ...manual regeneration mode available Regen Now See the How to Initiate a Manual Regeneration in this manual on how start a manual regeneration An example of when to use a manual regeneration would be if...

Страница 18: ...hrough the menu s list of functions While in regeneration press and hold to advance valve to next cycle While in regeneration press and hold to cancel the regeneration and send valve to service positi...

Страница 19: ...ay 2 Days Use the Up and Down button to change the number of days away Salt Alarm OFF ON 5 00 PM Off On setting that will enable an audio alarms to sound when the system has low salt The Audio alarm w...

Страница 20: ...cess if initiated in error by pressing and holding the Right Arrow Button To initiate a Regen Later Follow the same steps from above however press the Right Arrow button to select No press the Enter R...

Страница 21: ...ed number of days until the next regeneration based on water use and history Vacation Mode listing days remaining if active Conditioner Install listing the date of EC4 installation House Filter Servic...

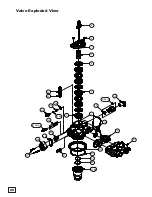
Страница 22: ...22 Valve Exploded View 9 8 7 5 4 3 2 1 6 27 ABCD 22 23 24 10 25 30 31 AB 28 11 12 32 13 17 14 15 16 26 ABCDE 29 18 19 20 AB 21...

Страница 23: ...ILL FLOW CONTROL 0 5 GPM COMPOSITE 21 1 17957 ADAPTER BLFC 0 25 GPM 22 1 17939 1 2 NPT X 1 2 BARB POLY ELBOW 23 1 17557 COMPOSITE BYPASS VALVE 24 1 17558 TURBINE METER ASSEMBLY WITH CABLE 25 1 17812 R...

Страница 24: ...Control Exploded View 24 6 6 EC4 TECHNOLOGY 12 19 4 10 14 8 1 7 9 13 8 15 17 16 18 6 8 1 2 3 9 1 5 EC4 LOGO PAD PRINTED 11...

Страница 25: ...918 SCREW 1 4 20 X 1in PHIL PAN SS 8 6 51919 SCREW 4 20 x 1 4in PHIL PAN PLASTITE 9 1 51921 RPS SOFTENER VALVE MOTOR ASSY 9 1 1 17501 BRINE GEAR CAM 10 1 52461 FRONT HOUSING GEN6 11 1 52463 DOOR BUTTO...

Страница 26: ...ypass valve 3 Poor water quality 1 Low pressure to the unit 1 Bypass the system If the problem still exists after bypass it is not related to a RainSoft product Check your water distribution system If...

Страница 27: ...GATE FOR BARIUM AND RADIUM REDUCTION CLAIMS PER NSF ANSI STANDARD 44 ADDITIONAL NOTES THE LIST OF SUBSTANCES WHICH THIS TREATMENT DEVICE REDUCES DOES NOT NECESSARILY MEAN THAT THESE SUBSTANCES ARE PRE...

Страница 28: ...TESTED EFFICIENCY DUE TO INDIVIDUAL APPLICATION FACTORS INCLUDING WATER HARDNESS WATER USAGE AND OTHER CONTAMINANTS THAT REDUCE THE SOFT ENERS CAPACITY A WATER SOFTENER IS NOT INTENDED TO BE USED FOR...

Страница 29: ...TESTED EFFICIENCY DUE TO INDIVIDUAL APPLICATION FACTORS INCLUDING WATER HARDNESS WATER USAGE AND OTHER CONTAMINANTS THAT REDUCE THE SOFT ENERS CAPACITY A WATER SOFTENER IS NOT INTENDED TO BE USED FOR...

Страница 30: ...ges so parts of the above limitation or exclusion may not apply to you This warranty gives you specific legal rights and you may also have other rights which vary from state to state You also have imp...

Страница 31: ...31...

Страница 32: ...RainSoft Division of Aquion Inc 101 S Gary Avenue Roselle Illinois 60172 Main Switchboard 1 847 437 9400 Customer Service 1 800 860 7638 www rainsoft com 2013 RAINSOFT A DIVISION OF AQUION INC...

Отзывы: