


5
3.2 Recommended Tools
● Precision screwdriver (for small Phillips screws)
● Compass or GPS (for wind direction calibration)
● Adjustable wrench
3.3 Get Ready for Installation
Note
: The solar panel could offer power for the outdoor sensor in sunlight, but
also need battery-powered in dark. So the sensor array must be powered and
updating before powering up the console, or the console will stop scanning and
connecting with the sensors.
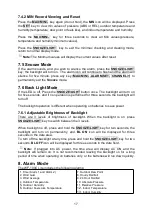
The following image shows the full segment of Integrated Outdoor Sensor: It consists
of Thermo-Hygrometer
,
Anemometer, Rain gauge, and Solar panel.
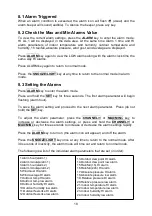
3.3.1 Install Batteries into the Integrated Outdoor Sensor.
Locate the battery lid at the bottom of the sensor, and open the battery compartment.
Remove the battery lid on the back of the sensor by removing the set screw.
Содержание WF-100C Lite
Страница 32: ...31 3 When the registration is completed successfully will pop up the page below ...
Страница 89: ...88 In Ihrem Posteingang sollten Sie nun eine entsprechende E Mail vorfinden ...
Страница 95: ...94 Klicken Sie nun abschließend auf die mit Create bezeichnete Schaltfläche ...
Страница 110: ...109 ...