


47
Install a fresh set of batteries in the remote thermo-
hygrometer. For cold weather environments, install lithium
batteries.
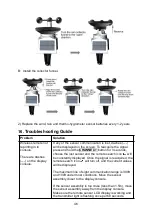
Make sure the remote sensors are not transmitting
through solid metal (acts as an RF shield), or earth barrier
(down a hill).
Move the display console around electrical noise
generating devices, such as computers, TVs and other
wireless transmitters or receivers.
Move the remote sensor to a higher location. Move the
remote sensor to a closer location.
Temperature sensor
reads too high in the
day time.
Make sure the thermo-hygrometer is mounted in a shaded
area. The pre preferred location is a north facing wall
because it is in the shade most of the day.
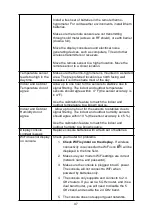
Indoor and Outdoor
Temperature do not
agree
Allow up to one hour for the sensors to stabilize due to
signal filtering. The indoor and outdoor temperature
sensors should agree within 4 °F (the sensor accuracy is
± 4 °F).
Use the calibration feature to match the indoor and
outdoor temperature to a known source.
Indoor and Outdoor
Humidity do not
agree
Allow up to one hour for the sensors to stabilize due to
signal filtering. The indoor and outdoor humidity sensors
should agree within 10 % (the sensor accuracy is ± 5 %).
Use the calibration feature to match the indoor and
outdoor humidity to a known source.
Display console
contrast is weak
Replace console batteries with a fresh set of batteries.
WiFi does not display
on console.
Check your router for problems.
1.
Check WiFi symbol on the display.
If wireless
connectivity is successful the WiFi icon
will be
displayed in the time field.
2. Make sure your modem WiFi settings are correct
(network name, and password).
3. Make sure the console is plugged into AC power.
The console will not connect to WiFi when
powered by batteries only.
4. The console only supports and connects to 2.4
GHz routers. If you own a 5 GHz router, and it is a
dual band router, you will need to disable the 5
GHz band, and enable the 2.4 GHz band.
5. The console does not support guest networks.
Содержание WF-100C Lite
Страница 32: ...31 3 When the registration is completed successfully will pop up the page below ...
Страница 89: ...88 In Ihrem Posteingang sollten Sie nun eine entsprechende E Mail vorfinden ...
Страница 95: ...94 Klicken Sie nun abschließend auf die mit Create bezeichnete Schaltfläche ...
Страница 110: ...109 ...