


Designer’s
Handbook
27
7.
BIOS Support for Program Cloning
A
program can be loaded into a controller by compiling it using Dynamic C. However,
this
is awkward and slow in some situations. If cloning is enabled in the BIOS, a Rabbit-
based
system can copy itself into another controller by connecting the programming ports
of
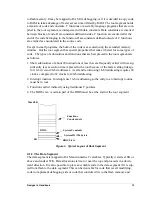
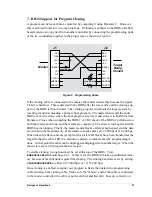
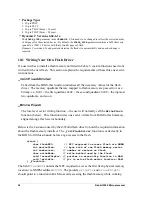
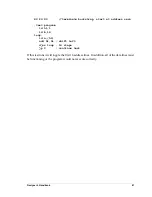
the two controllers together in the proper way as shown in Figure 6.
Figure
6.
Programming
Cable
If
the cloning cable is connected to the master, the master detects this because the signal
CLKA
is held low. This is detected in the BIOS after the reset ends, and the cloning sup-
port
of the BIOS is then invoked. The cloning program cold-boots the target system by
resetting
it and downloading a primary boot program. The master then sends the entire
BIOS
over to the clone, where the boot program receives it and stores it in RAM (just like
Dynamic
C does when compiling the BIOS). A CRC check of the BIOS is performed on
both
the master and clone, and the results are compared. The clone is reset again, and the
BIOS
begins running. Finally, the master sends blocks of data at high speed, and the data
are
written to the flash memory. Data transfer can take place at 57,600 bps or 115,200 bps.
When
the entire flash contents (except for the system ID block) have been transferred, the
target
flashes the cable LED in a distinctive pattern to indicate that the programming is
done.
At that point the cable can be unplugged and plugged into another target. When the
master
is reset, it will program the next target.
To
enable cloning, two options must be set at the top of the BIOS. First,
ENABLECLONING
should be set to 1. If this is set, the BIOS will take up additional mem-
ory
because of the functions required for cloning. The cloning baud rate is set by setting
CLONINGBAUDRATE
to either 0 (57,600 bps) or 1 (115,200 bps).
Once
cloning is enabled, compile your program to flash, then detach the programming
cable
and attach the cloning cable. Make sure the “master” end of the cable is connected
to
the master controller (the cable is not reversible) and that pin 1 lines up correctly on
J1
J2
RXA
GND
CLKA
+5 V
/RESET
TXA
N/C
STATUS
SMODE0
SMODE1
RXA
GND
CLKA
+5 V
/RESET
TXA
N/C
STATUS
SMODE0
SMODE1
RESET MASTER
CLONE STATUS
470
Ω
Master
Target
Being
Cloned
Содержание 2000
Страница 1: ...Rabbit 2000 Microprocessor Designers Handbook Revision C...
Страница 4: ...Rabbit 2000 Microprocessor...
Страница 6: ...2 Rabbit 2000 Microprocesssor...
Страница 12: ...8 Rabbit 2000 Microprocessor...
Страница 34: ...344 Dynamic C User s Manual...
Страница 36: ...34 Rabbit 2000 Microprocessor...
Страница 44: ...42 Rabbit 2000 Microprocessor...


