background image


Copyright © 2021  

4  

Power device on 

Press the power button located on the top of the device for 2-3 seconds. The charge indicator 

will blink in orange until the startup is complete. If the charge indicator flashes three times in 

red, the battery requires charging. Connect the Papyr device to a computer or AC Adapter, using 

the supplied USB cable, to charge it.  


Power device off 

Press and hold the power button for 2-3 seconds. A "Turn power off" confirmation screen 

appears. Select “Yes” to turn off. 


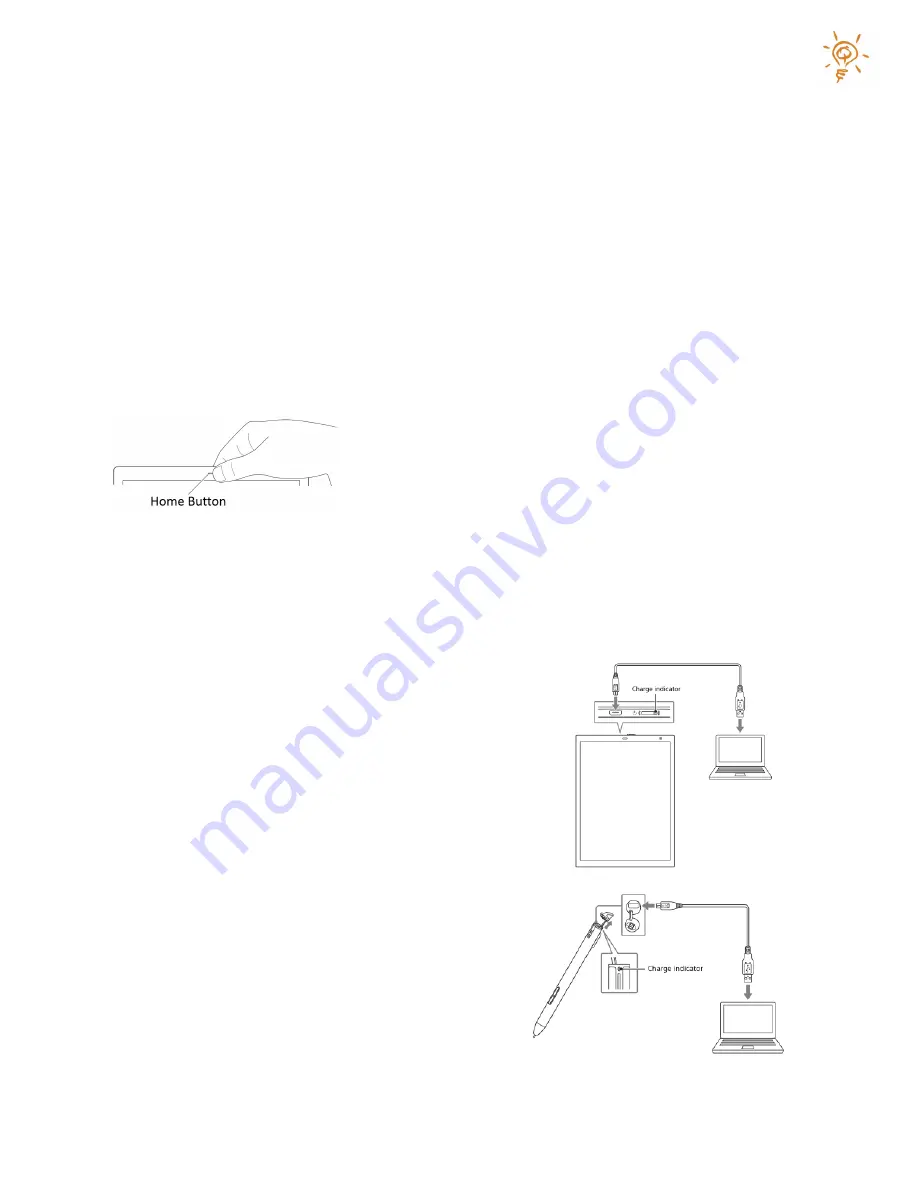
The Home Button 


Press the Home Button to bring up a full screen menu that will 

allow you to return to your current document, access certain 

system settings, check for update, create a new workbook, or 

access your workbook library. These operations are described 

in detail below. 


Sleep Mode 

When the device is on, quickly press the power button. Sleep mode reduces battery 

consumption when the device is not in use. To wake up the device, quickly press the power 

button again. 


Charging your Papyr device and pen 

1.


Connect the USB cable that was supplied with 

your device to a computer or AC Adapter 

2.


Connect the other end of the USB cable to either 

the micro USB connector on the Papyr device or 

pen 

3.


The Charge indicator lights up in red while 

charging 


*Note*

 When charging from a computer, the Papyr device or pen may not charge if your 

computer is turned off, enters sleep mode, standby mode, or hibernation mode.  

Содержание Papyr

Страница 1: ...User Guide V 1 3...

Страница 2: ...racting with your Papyr 9 Managing Content 13 Workbook Tools 13 The Library View 14 Exporting Pages 17 Inserting Pages 18 Sharing Workbooks 19 Workbook Permissions 20 Access Shared Content 20 Share No...

Страница 3: ...Power button 3 Charge indicator LED 4 Reset button 5 Home button 6 Insertion slit and magnet for holding the pen 7 Touchscreen and writing surface 8 Strap hole 1 Micro USB connector 2 Strap hole 3 Cha...

Страница 4: ...current document access certain system settings check for update create a new workbook or access your workbook library These operations are described in detail below Sleep Mode When the device is on q...

Страница 5: ...uration below To sign in 1 Select main menu on the top right corner of the screen 2 Select Sign In Using the QR code displayed on your Papyr you can sign in by using QuirkLogic s companion app and its...

Страница 6: ...tionality available to you The User Interface Viewing Pages Use one finger to swipe the page flip icon diagonally to turn the page Swiping down from the top left will move to the previous page and swi...

Страница 7: ...eset the page by double tapping the screen with two fingers Page Navigator Tap the current page number to open a page navigator view In the viewer tap on a page to navigate to it or re order your page...

Страница 8: ...or the notebook as a local workbook will be immediately created for you called Workbook where will be the next largest unique number for the workbook Using this method will immediately open the new wo...

Страница 9: ...ling or striking through pen strokes while pressing the erase button Hold the highlighter button located directly above the erase button while using the pen to create a thick semi transparent yellow i...

Страница 10: ...insert a shape change pen line thickness change the color of the pen insert a template add a page delete the current page undo an action redo an action or erase all ink on a page The menu will close...

Страница 11: ...er is set at approximately 25 opacity If you select this color the line width will automatically change to the largest size 30 pt After your selection the pen will write with the selected color until...

Страница 12: ...plit Screen to view two of the same documents or two different documents side by side Change which workbook shows on which side by tapping Swap Sides from the side menu when in Split Screen mode Retur...

Страница 13: ...New Creates a new workbook Save a Copy Save a copy of the current workbook to a desired location local or InkWorks Share Share your workbook with another InkWorks user Insert Insert selected pages fr...

Страница 14: ...Managing Workbooks and Folders While in the library view tap on the icon associated with each workbook or folder to access options to Open Rename Share Copy To Move To Tag Delete Browse When accessing...

Страница 15: ...e Sharing Workbooks section below for more details Tags The Tag feature provides a simple way to help organize your personal cloud Mine content Tap the menu icon associated with a workbook and then ta...

Страница 16: ...Works cloud account Shared with me When logged in this library icon will be available to show workbooks and folders that you have been granted access to from another InkWorks user When viewing the Min...

Страница 17: ...Me exports as a PDF 4 Select which pages you would like to export or tap Select all To clear your selection tap Deselect all 5 If you chose Email to Me tap Send to send a PDF document of the selected...

Страница 18: ...x If you select either Google Drive or Dropbox as the library source and you have not recently exported or imported pages from the selected service you will be required to log into your selected servi...

Страница 19: ...c user tap on Add Collaborator Tap in the provided email box and use the supplied keyboard to enter the desired collaborator s InkWorks account name which is an email address Tap the on the right of t...

Страница 20: ...ibrary 3 From left hand panel select Shared with Me Files and Folders that have been shared with you will display on the right Tap the desired file to open it Tips Tap the active icon in the Library v...

Страница 21: ...deo conference To use this mode a common workbook must be shared with each user and opened on their Papyr Quilla or WebApp Browser Note that page operations are not shared with users viewing the workb...

Страница 22: ...pressure to the pen tip and or button during use When not in use put the device in sleep mode or turn it off The device is not waterproof do not submerge into water or get the device wet Charging Only...

Страница 23: ...nnection when in sleep mode The available options include Always enabled Enabled only when plugged in and Disabled Always enabled will allow the device applications and systems to stay connected via W...

Страница 24: ...re items than can fit on the screen you can scroll down on the list System Software This section of the Settings application provides information pertaining to the device s current software build vers...

Страница 25: ...Color Sets the default pen colour that you are presented with upon opening a new workbook This property does not immediately affect the pen colour of the currently open workbook only the initial pen...

Страница 26: ...the ink strokes saved in the separate layer To choose to export ink strokes as a separate PDF annotation layer 1 Tap main menu on the top right corner of the screen 2 Tap Settings 3 Select Applicatio...

Страница 27: ...r string as the device name You can give your device a name that is more meaningful This name is displayed in the top status bar and is used to identify your device to others when using the Workbook C...

Страница 28: ...space it will also slow down the initial opening process of cloud workbooks As such you may want to consider not clearing the cache to maintain quicker workbook load times Help General User Guide Info...

Страница 29: ...Works cloud are Host cs quirklogic com Port 443 Screen Refresh The nature of electronic ink can result in residual ghost images lingering on the screen This is analogous to the way chalk dust builds o...

Страница 30: ...Do not use an abrasive pad scouring powder or solvent such as alcohol or benzene Replacing the Pen Tip The pen tip will wear out through use We recommend replacing the tip when it becomes shorter than...

Страница 31: ...interference will not occur in a particular installation If this equipment does cause harmful interference to radio or television reception which can be determined by turning the equipment off and on...

Страница 32: ...the following standards are applied EN 55032 2015 AC 2016 EN IEC 61000 3 2 2019 Class D EN 61000 3 3 2013 A1 2019 EN 55035 2010 A1 2015 ETSI EN 301 489 1 V2 2 3 ETSI EN 301 489 3 V2 1 1 ETSI EN 301 4...

Отзывы: