


QVM 9
Series
18
■ Due to the extremely low flue temperatures, the QVM 9 series water heater may be vented using 3"
schedule-40 venting materials.
■ Cut all lengths of pipe cleanly maintaining a 90-degree square edge. Use long radius elbows whenever
possible.
■ Use only the type of adhesive recommended by the PVC pipe manufacturer.
■ Keep an uphill slant from water heater to the outside to ensure that all condensed water inside the pipe will
return back to the water heater.
■ Do not place the outdoor termination kit in an area where discharge gases will be directed towards
evergreen shrubbery.
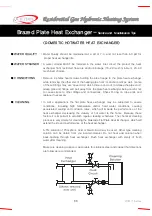
■ Assemble the flue using the following illustration as a guide. Your installation may vary slightly from the
illustration shown below.
Installation of the Flue
Use the supplied SCF-2 Termination Kit for venting the QVM 9 water heater to the outside.
- Optional : The Stainless Steel SCF-9 Coaxial Vent Kit may be used in place of the SCF-2 PVC
Termination Kit.
PVC Venting Method
NOTE
ⅰ) Ø 3″ Schedule 40 PVC pipe only.
ⅱ) Maximum three 90° elbows.
ⅲ) Slant flue 2 - 3° towards water heater for condensate return.
Содержание QVM9 Series
Страница 4: ...QVM 9 Series 2 Model QVM 9 090W1 NG 125W1 NG 150W1 NG Identifying the Components...
Страница 22: ...QVM 9 Series 20 Schematic of SCF 9 Installation Installation of the Flue...
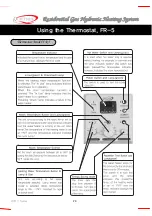
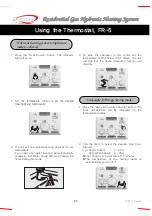
Страница 26: ...QVM 9 Series 24 Thermostat Model FR 5 Using the Thermostat FR 5...
Страница 38: ...QVM 9 Series 36 Wiring Diagram Error Codes FR 5 Thermostat DIP S W Setting on Main Controller Wiring Connecters...
Страница 39: ...37 QVM 9 Series Wiring Diagram...
Страница 41: ...39 QVM 9 Series Models QVM9 090W1 NG 125W1 NG 150W1 NG Exploded Views...


