QUALITYFRY iQ 1000 CARROUSEL Скачать руководство пользователя страница 1

e s

E N

MODELO iQ 1000

CARROUSEL

U S E R   M A N U A L

E N

Содержание iQ 1000 CARROUSEL

Страница 1: ...e s E N MODELO iQ 1000 CARROUSEL U S E R M A N U A L E N...

Страница 2: ...T Y F R Y 2 U S E R M A N U A L T H I S M A N U A L R E F E R S T O i Q 1 0 0 0 C a r r o u s e l m o d e l P L E A S E C A R E F U L L Y R E A D T H E S E I N S T R U C T I O N S F O R T H E B E S T...

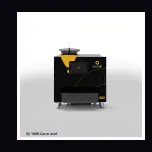
Страница 3: ...3 3 iQ 1000 Carrousel 3 E N 3...

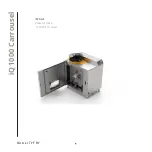
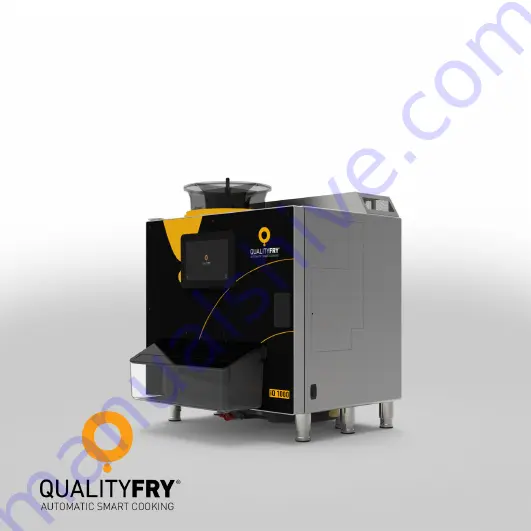
Страница 4: ...4 Q U A L I T Y F R Y 4 Q U A L I T Y F R Y iQ 1000 Carrousel IMAGE VIEW OF OPEN iQ 1000 Carrousel...

Страница 5: ...lowed to photocopy reproduce or translate to another language any part whatsoever of this document without the prior written consent of QUALITYFRY S L QUALITYFRY S L reserves itself the right to enter...

Страница 6: ...G e n e r a l I N D E X...

Страница 7: ...fat build up can ignite Fire hazard 3 GENERAL DESCRIPTION OF THE EQUIPMENT 3 1 Characteristics 3 2 Dimensions 3 3 Installation and Electrical Connection 3 4 Elements included in the iQ 1000 CARROUSEL...

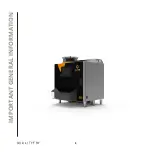
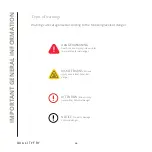
Страница 8: ...8 Q U A L I T Y F R Y 8 Q U A L I T Y F R Y IMPORTANT GENERAL INFORMATION...

Страница 9: ...ave been described The contents of this instruction manual must be familiar to all people who operate the equipment This manual must be stored in a safe and dry place and available to all authorised p...

Страница 10: ...st not be performed by children not even while under adult supervision Users are warned that technical maintenance and repairs must be performed by a technical servicing agent authorised by QUALITYFRY...

Страница 11: ...r damage to the equipment it is essential that operating staff attend a tutorial and receive instructions on safety periodically or as appropriate these should be given by qualified staff who are endo...

Страница 12: ...s DANGER WARNING Death serious injury irreversible Imminent potential danger RISK OF BURNS Serious injury reversible Potential danger ATTENTION Minor injury reversible Potential danger NOTICE Property...

Страница 13: ...without the prior authorisation of the manufacturer will invalidate the warranty and exempt the manufacturer of all product liabilities W h a t i s c o v e r e d This warranty covers all defects in wo...

Страница 14: ...ps www qualityfry com click on contact and fill in the form In the Comment field request the desired service It is important that you provide the model series number of the machine and a description o...

Страница 15: ...rescribed in your QUALITYFRY service and owner s manual Damage due to shipping Removal changes or damage to the rating plate Changes to the settings and calibrations after thirty 30 days from the date...

Страница 16: ...y or indirectly by the client due to the installation of any parts that are not approved by the manufacturer Installation must comply with all national and regional laws and regulations and meet the l...

Страница 17: ...polystyrene and the parts located on top of the fryer Filter kit Bucket funnel filter and hose see Figure 1 Once the above mentioned parts have been removed remove the outer box to access the machine...

Страница 18: ...h the unit on the bottom left and once it has been pulled remove the fryer from inside the unit Once the fryer case is out of the unit remove the polystyrene positioners which are located behind the f...

Страница 19: ...the work surface where it will be installed This should be done by two 2 people so that the base of the machine is exposed allowing it to be worked on easily Once the fryer unit is on the work surfac...

Страница 20: ...ve the appliance slowly and carefully and ensure it does not tip over Finally ensure that your centre of gravity is balanced When placing the appliance on the supporting surface you should ensure the...

Страница 21: ...ot open or touch until the interior has decreased in temperature Outside the unit the door of the appliance and the upper part of the unit can get hot while the fryer is in operation Therefore care sh...

Страница 22: ...therefore it should not be removed until it reaches an appropriate temperature for it to be handled less than 40 C or 104 F Care should be taken when removing the product output tray since this can h...

Страница 23: ...ns to the skin Risk of chemical burns or irritation to skin eyes and the respiratory system due to contact with chemical cleaning products and their fumes Do not heat the appliance if there are chemic...

Страница 24: ...not treat the equipment with acids or expose it to acid vapours otherwise you can damage the passive layer of steel and end up discolouring the equipment To prevent corrosion or excess fat inside the...

Страница 25: ...ack of cleaning For this reason be sure the oil level is correct 5 5 L by using other systems such as a manual measuring implement DANGER WARNING To clean the exterior cladding only use cleaning produ...

Страница 26: ...2 6 Q U A L I T Y F R Y 2 6 Q U A L I T Y F R Y GENERAL DESCRIPTION OF THE QUIPMENT i Q 1 0 0 0 C a r r o u s e l i Q 1 0 0 0 C a r r o u s e l...

Страница 27: ...ted fryer which fries any type of fresh or frozen food in less time thanks to its design which maintains its internal temperature and foods do not absorb the oil when they are fried The machine has be...

Страница 28: ...ounding connection and a protection system against power surges and derivations For optimal performance two important factors are recommended 1 Place the machine as far away as possible from heat sour...

Страница 29: ...2 9 2 9 E N GENERAL DESCRIPTION OF THE EQUIPMENT...

Страница 30: ...3 0 Q U A L I T Y F R Y 3 0 Q U A L I T Y F R Y GENERAL DESCRIPTION OF THE EQUIPMENT 1 2 3 4 5 6 7 8 9 10 11 12 13 14 15 16 17 18 28 29 30 25 26 35 31 32 33 34 36 37 27 20 22 19 21 23 24 38 39...

Страница 31: ...aining Drum 14 Fans 15 Fan Covers 16 Coil Heating element 17 Carbon Filter 18 Metal Mesh Filter 19 Coupling Extraction 20 Product Input Support 21 Hatch 22 Carrousel Hopper 23 Legs 24 Deep Fryer 25 Fr...

Страница 32: ...R Y Start screen 3 2 Q U A L I T Y F R Y GENERAL DESCRIPTION OF THE EQUIPMENT 4 2 3 c a n c e L K E Y M E N U K E Y o n o f f K E Y 6 P R O D U C T I O N O P E N K E Y 1 5 D I S P L A Y 7 P R O G R A...

Страница 33: ...can be used on the display to discard any changes made to the machine parameters or to cancel an ongoing fry 4 O N O f f K e y This key switches the machine off electronically 5 O P E N k e y This ke...

Страница 34: ...I T Y F R Y GENERAL DESCRIPTION OF THE EQUIPMENT Change Language To change the machine language keep the flag icon pressed until a central listing appears Slide with your finger until you find the des...

Страница 35: ...on the screen 1 o i l If this icon shows there is a low oil level Add 1 litre and wait 2 to 3 minutes 2 W I F I This icon appears when the equipment is connected to Wi Fi 3 d r a i n If this icon sho...

Страница 36: ...n Fill the fryer with 10 litres of oil it is advisable to use the oils recommended by QUALITYFRY After pouring the oil into the fryer press the power button on the display One of the main innovations...

Страница 37: ...time and temperature for any type and or size of food to fry To set the fryer for your specific needs use the Menu Enter button on the main screen It has the following options Data Input Enable senso...

Страница 38: ...d portions and the oil temperature values oil quality etc To use this function we must click on the Menu display and then press Data Input It shows the temperature of the two 2 probes one temperature...

Страница 39: ...enu then press Enable sensors on the screen Here there will be the following options In this section you can enable or disable the main sensors of the machine which are Beep Product output acoustic wa...

Страница 40: ...nge the product type icon and frying time hold the desired icon until a menu appears as shown below Here you can select the different photos loaded onto the machine and slide the scale to vary the fry...

Страница 41: ...emperature To change the frying temperature hold down the point where the temperature is indicated 190 by default until a sub menu appears Once opening this option choose the desired temperature by sl...

Страница 42: ...the same time while four 4 products are on stand by in the input hopper or carrousel When selecting small portions the display shows the icon with two 2 500g portions 2 L A R G E This production is u...

Страница 43: ...4 3 4 3 E N MANAGEMENT AND CONFIGURATION...

Страница 44: ...ses productivity by being able to have various commands at once Its large capacity for high demand items facilitates the work of the operator as they only need to put the items to be fried in the comp...

Страница 45: ...can collect them as you prefer with a food shovel tongs or simply with your hands Finally there is the multi product output which unlike the large drawer unit has three 3 pots to separate each fried...

Страница 46: ...day or with the oil at a temperature of less than 40 C The following steps must be followed for filtering the oil E XPL ANATORY VIDEO This QR code takes you to the explanatory video about daily mainte...

Страница 47: ...the level of the filtered oil and if necessary fill up to 10 litres with new oil To see the oil in the fryer turn on the machine the hatch will open automatically if you have enabled the sensor or flo...

Страница 48: ...an the outside and inside of the fryer follow the following steps Clean the exterior and interior of the appliance Clean the product input hopper This part can be removed to facilitate cleaning by pus...

Страница 49: ...ty the condensation tank follow these steps It is recommended to empty the condensation chamber daily or when it is full Turn the tap to open and empty the drum The full canister message may also appe...

Страница 50: ...ling and tighten the wheel again so that it stays up Pull the handle located in the lower left part of the appliance to release the fryer case and to remove it from the machine Remove the fryer cover...

Страница 51: ...it towards the inside of the fryer vat Take the basket at both ends and pull upward to remove it from the fryer vat Carefully pull the heating unit upwards to take it out of the tank Wash only the re...

Страница 52: ...atory video about weekly maintenance To wash the input assembly follow these steps Push right and then pull upwards to remove the hopper or carousel Pull up on the opening hatch It is important when r...

Страница 53: ...Maintenance 5 3 5 3 E N...

Страница 54: ...unit This part can be washed in the sink or in the dishwasher With the clips open pull the door to the filters outwards The metal filter should only be removed for washing as the active charcoal filte...

Страница 55: ...as explained in the above steps To clean the gas extraction pipe remove the fryer from the appliance as explained in the above steps Once the gas extraction pipe has been cleaned it must be inserted i...

Страница 56: ...en it coincides with the change of the carbon filter every 5 000 servings It is recommended to carry out this maintenance when it coincides with the bimonthly maintenance for this you must follow the...

Страница 57: ...t to form creases in the tubes 8 Pour hot water with degreaser through the tube that connects to the top of the coil with a funnel 9 Let the product act for 15 to 20 minutes 10 Carefully remove the tu...

Страница 58: ...ntenance or when cleaning the frying vat Washing Frying Vat Section 4 R e p l a c i n g t h e a c t i v e c a r b o n f i l t e r It is recommended to contact your supplier to perform and order the se...

Страница 59: ...Maintenance E XPL ANATORY VIDEO This QR code takes you to the explanatory video about weekly annual maintenance 5 9 5 9 E N...

Страница 60: ...ack gasket is inside the heating unit The float is not working Contact Technical Support THE OIL OVERFLOWS FROM THE VAT Too much oil has been added to the machine Remove the excess oil until you reach...

Страница 61: ...rature of the frying programme are not correct Select the suitable frying time and or temperature for the food that you are going to fry There is a greater amount of food than recommended for the smal...

Страница 62: ...e personal protective equipment anti gloves for work with steel and sheet metal protective gloves or utensils against chemical agents or heat resistant gloves for work with fryers and industrial ovens...

Страница 63: ...and turn on the machine The carousel still does not turn Contact Technical Support The input hatch does not open Contact Technical Support FAN 1 ICON ON THE SCREEN The fan located on the top left of t...

Страница 64: ...ugh oil Fill the vat with exactly 10 litres of oil The thermostat is disconnected Reset the thermostat by pressing the button located on the right side of the resistor Bad connection between the angle...

Страница 65: ...eating unit I have already added 1 litre of oil waited the suggested time and the low oil level message is still displayed Contact Technical Support CHANGE FILTER The carbon filter needs to be changed...

Страница 66: ...levels indicated in the standards EN 55014 1 2006 A1 2009 A2 2011 EN 55014 1 2015 EN 55014 2 2017 This document contains private property information which is protected by legislation on intellectual...

Страница 67: ...Supplier or Installer Signature Installation Date Client Signature Installation Date Equipment serial number Equipment serial number...

Страница 68: ...W W W q u a l i t y f r y c o m W W W q u a l i t y f r y c o m MA SAT 12 Rev 02...

Страница 69: ......

Страница 70: ...w w w q u a l i t y f r y c o m C Albasanz 12 Planta 1 28037 Madrid Spain 34 913 759 567...

Отзывы: