background image

41     APPENDIX


APPENDIX A: Specifications* 

ELECTRICAL CHARACTERISTICS 


6 – 12 Lead 

Rear Electrodes 

Sampling Rate 

500 Hz 

300 Hz 

Frequency Response 

0· 05 – 175 

Hz 

0· 5 – 100 Hz 

Resolution 

12 Bit 

8 Bit 

CMRR:   

> 60dB 

> 80 dB (0 – 100 Hz) 

Isolation 

4kV 

Requires 6-12 Lead 

DISPLAY 

Sweep Speed ECG: 


20 mm/sec ± 1 mm/sec 

Display Sensitivity ECG:   

5 or 10 mm/mV ± 0· 5 mm/mV 

Viewing Area: 


40 × 48 mm 

No. of Pixels: 


240 h × 160 w 

Display Type: 


LCD 

Back Light: 


Electro-luminescent 


MEASURED PARAMETERS 

Heart Rate (HR):  


20 – 250 bpm ± 2% 


POWER REQUIREMENTS 

Battery Type:                                 2 × AA 1·5V Alkaline cells (recommend Sanyo LR6)

Battery Life:                (typical) 12 Hours continuous use 


PHYSICAL CHARACTERISTICS 

Length:   


134 mm 

Width:   


88 mm 

Thickness: 


32 mm 

Weight:   


270 g 


ENVIRONMENTAL CHARACTERISTICS TEMPERATURE 

Operating: 


0°C – 40°C 

Storage:  


-20°C – 70°C 


HUMIDITY 

Operating: 


5% – 95% 

Storage:  


5% – 95% 


ATMOSPHERIC PRESSURE 

General:  


500 hPa – 1060 hPa


*Specifications are subject to change without prior notice.


Содержание BIOLOG 3000i

Страница 1: ... 3000i User Manual 6 A N D 1 2 L E A D S I M U L T A N E O U S E C G R E C O R D E R QRS DIAGNOSTIC LLC 14755 27th Ave North http www QRSdiagnostic com Plymouth MN 55447 Tel 763 559 8492 USA Fax 763 559 2961 ...

Страница 2: ... been altered or repaired by anyone other than an authorized QRS Diagnostic agent This warranty also does not cover any unit that has had a serial number removed defaced or rendered illegible This warranty is in lieu of all other warranties expressed or implied Including warranties of merchantability and fitness and is hereby limited to repair or replacement of instruments found defective during t...

Страница 3: ...be issued a Returned Merchandize Authorized number RMA Please have the serial number of your unit available Please re package your unit in the original packing materials if possible and ship it to QRS Diagnostic 14755 27th Ave N Plymouth MN 55447 This document contains proprietary information which is protected by copyright All rights are reserved No part of this document may be photocopied reprod...

Страница 4: ...data quickly and with great confidence Cardiac records are stored by the BIOLOG 3000i which then can be transferred to QRS Diagnostic s patient management software CardioView Alternatively they can be printed to an inkjet printer via the Biolog Printer Interface The BIOLOG 3000i s capability to perform electrocardiograms by direct chest placement makes it especially suited for Emergency Care allow...

Страница 5: ...ION A 6L Biolog Patient cable or 12L Biolog patient cable is required to be used in conjunction with the BIOLOG 3000i in order to provide protection against the effect of the discharge of a cardiac defibrillator and against high frequency burns Conductive parts of electrodes and associated connectors including the neutral electrode should not contact other conductive parts including earth The BIOL...

Страница 6: ...ments Patient cable connection socket Type BF equipment O Power off Type BF defibrillator proof applied part I Power on Class II equipment Internally powered device Regulatory compliance IEC60601 1 amendments 1 2 C22 2 No 601 1 M90 UL 2601 1 when used as part of the BLY 501 adapter system ...

Страница 7: ...on to prevent operator contact with the sensors during ECG acquisition QRS Diagnostic recommends all personnel involved with Biolog operations review and understand the ESD Symbol Warning and Caution information o Guidance and manufacturer s declaration electromagnetic emissions and immunity QRS Diagnostic medical devices are intended for use in the electromagnetic environment s specified below Us...

Страница 8: ... and 800 MHz the higher frequency range applies NOTE 2 These guidelines may not apply in all situations Electromagnetic propagation is affected by absorption and reflection from structures objects and people a Field strengths from fixed transmitters such as base stations for radio cellular cordless telephones and land mobile radios amateur radio AM and FM radio broadcast and TV broadcast cannot be...

Страница 9: ...REEN 1 16 2 4 1 LCD Backlight Illumination 16 2 4 2 Mute the QRS Beeping 16 2 4 3 Transtelephonic Mode 16 2 4 4 Automatic Device Identification ADI 17 2 4 5 Setting the Time 17 2 5 SET UP SCREEN 2 18 2 5 1 Date Format 18 2 5 2 Setting the Date 18 2 5 3 Enabling Simultaneous Acquisition 18 2 5 4 Total Single Lead Recording Time 19 2 5 5 Selecting the Mains 50 60 Hz Filter 20 2 5 6 Print Speed 20 2 ...

Страница 10: ...BLE OPTION 27 3 4 1 Recording an ECG with a 6 or 12 Lead Patient Cable 27 3 4 2 Acquiring and Saving a 6 or 12 Lead ECG 30 PRINTING TRANSMITTING THE ECG 31 4 1 TELEPHONE TRANSMISSION 31 4 2 DIGITAL TRANSTELEPHONIC MODE 32 4 3 USE WITH CARDIOVIEW 35 4 4 PRINTING WITH THE Biolog Printer Interface 35 MAINTENANCE 36 1 Batteries 36 2 Electrodes 36 3 Cleaning and Disinfection 37 TROUBLESHOOTING 38 APPEN...

Страница 11: ...3000i incorporates the following features Single lead ECG acquisition Diagnostic quality 6 and 12 Lead Simultaneous ECG acquisition High definition LCD screen readable in bright light and with switchable backlighting for low light conditions Heart rate monitoring 20 to 250 beats per Min and display Automatic Device Identification facility for management of recordings Battery status bar on screen I...

Страница 12: ...INTRODUCTION 8 1 2 System 3000i Components ...

Страница 13: ...OLOG 3000i Top View Figure 1 2 BIOLOG 3000i Bottom View DISPLAY INFRA RED WINDOW CONTRAST CONTROL REVIEW SWITCH HOLD SWITCH MODE SWITCH ON OFF SWITCH PATIENT CABLE SOCKET AUDIBLE TELEPHONE OUTPUT IDENTIFICATION LABEL ELECTRODE BATTERY COMPARTMENT COVER ...

Страница 14: ...ove the battery compartment cover by pressing down on the cover while simultaneously sliding it backwards Figure 2 1 Figure 2 1 Opening the Battery Hatch Load the Batteries with Correct Polarity Match the battery polarity signs with the polarity marked on the interior of the battery compartment casing Figure 2 2 Inserting the batteries Close the battery compartment NOTE Check the batteries were in...

Страница 15: ...e screen will display The title screen for 2 seconds The Set Up Menu for 2 seconds if configured to and The ECG display screen If the electrodes are not applied the center of the screen will show the Leads Off symbol Figure 2 4 Turning the BIOLOG 3000i on At any time you can adjust the contrast of the LCD display with the CONTRAST control button situated on the side of the unit this may be necessa...

Страница 16: ... any time how much power remains in the batteries When the voltage approaches the minimum for reliable operation the symbol BAT appears at the bottom of the screen At this stage you should complete your procedure and replace the batteries as some operations such as printing and transferring data to a PC cause a dip in the power levels which can cause the Biolog to shut down without warning Battery...

Страница 17: ...mission settings Modem settings Power down time Screen 4 Menu Display 2 3 1 To Access the Set Up Menu There are two ways to access the setup menu If the setup menu appears briefly after power up press any key while it is displayed The setup menu only appears at power up if the Biolog has been configured this way or Press and hold the MODE key then press the HOLD key at the same time The HOLD key m...

Страница 18: ... Review key changes the value of the highlighted selected item If there is more than one option you can cycle through all of them until reaching the required selection The Mode Key saves Press the Mode key to save the new values Cancelling changes The Set Up Menu will revert to previous settings when Mode key is not pressed after changing the Set Up Menu To confirm cancellation of changed items tu...

Страница 19: ...e cursor to the desired position To increase the number press the REV key up arrow until the desired number is shown Hold the key down for fast scrolling Release the key when the desired value is displayed Figure 2 7 Figure 2 7 Selecting a desired value ...

Страница 20: ...ction 2 2 2 4 2 Mute the QRS Beeping Some patients may be disturbed by the beeping sound made on the detection of every QRS To mute this sound press the HOLD key to select the open symbol To change the setting press the REV key The symbol will change to indicating that QRS Beeping is muted 2 4 3 Transtelephonic Mode BIOLOG 3000i is able to transmit a stored ECG recording using acoustic coupling vi...

Страница 21: ...dentification ADI You can send the serial number of your BIOLOG 3000i monitor when sending a transtelephonic ECG with your BIOLOG 3000i to a reception center equipped with QRS Diagnostic s CardioView software This facility is called Automatic Device Identification or ADI in brief Turn the ADI ON if sending an ANALOG Transtelephonic recording to CardioView Turn ADI OFF if sending an ANALOG Transtel...

Страница 22: ...The date format is preset DD MM YY European format 2 5 2 Setting the Date To change the date move the cursor to the appropriate position MM or DD or YY by pressing the HOLD key right arrow repeatedly To set the date briefly press the REV key up arrow 2 5 3 Enabling Simultaneous Acquisition The Sim selection must be enabled before the BIOLOG 3000i can be used with the 6 or 12 Lead simultaneous cabl...

Страница 23: ...is also possible to record a single rhythm strip off a 6 or 12 Lead simultaneous cable When the 6 or 12 Lead is enabled you can record between 5 and 80 seconds of single lead ECG To change the Recording Time move the cursor to the Recording Time area Rec by pressing the HOLD key and then increment the Recording Time by pressing the REV key Figure 2 10 Changing the single lead recording time ...

Страница 24: ...0 Hz mains filter value move the cursor to the symbol 50 position by pressing the HOLD key repeatedly To change the mains filter to 60 Hz simply press the REV key Figure 2 11 Figure 2 11 Selecting Mains Filter 2 5 6 Print Speed The Biolog Printer Interface can be set to either 25mm sec or 50mm sec To select print speed press the Hold key right arrow To set print speed press the REV key to the desi...

Страница 25: ...election Selecting this allows the BIOLOG 3000i to communicate with a modem or GSM digital mobile phone refer to section 4 2 This also allows the user to enter the modem telephone number Num to be dialed as well as selecting the Baud Rate BR at which the BIOLOG 3000i will communicate with the modem or GSM digital mobile phone 2 6 3 Power down This is an adjustable time in minutes after which the B...

Страница 26: ...ected the menu will not be displayed on start up however it can still be accessed by pressing the MODE and HOLD keys simultaneously 2 7 2 Saving the Set Up Parameters To save the Set Up Menu parameters press the MODE key OK on the display at any time during the set up Figure 2 12 When OK is selected the new set up parameters will be adopted and any old parameters will be cleared Figure 2 14 Saving...

Страница 27: ...on the skin surface moisten the electrodes with electrode gel or water When using patient cable accessories Use with Ag AgCl ECG skin electrodes Attach all electrodes before turning the unit ON Keep the patient and cables as motionless as possible during monitoring Lay the BIOLOG 3000i on a flat surface during monitoring to ensure least disturbance Two options are available to obtain the ECG Thora...

Страница 28: ...lace the BIOLOG 3000i on the patient s left anterior chest with the electrode feet firmly against the skin For ideal placement in Lead II when viewing the BIOLOG 3000i from the front The lower right electrode foot is the positive electrode It should be placed over the apex of the heart The upper left electrode foot is the negative electrode It should be placed on the sternum as close as possible t...

Страница 29: ...e Place the BIOLOG 3000i on the patient s chest as indicated above The leads off indication should vanish and after a few seconds the baseline of the patient s ECG will settle down and appear on the screen Maintain the BIOLOG 3000i in this position for at least as long as the Recording Time selected in the Set up Menu To change or review any of the set up parameters refer to the Set Up Menu Instru...

Страница 30: ...en the batteries are removed for replacement Figure 3 3 Saving an ECG to memory 3 2 3 Reviewing an ECG Stored in Memory To review an ECG stored in memory Press the REV button for about 1 second until a long beep is heard The ECG saved in memory will begin scrolling across the screen A R will be displayed in the right lower corner of the screen to indicate that the unit is in REVIEW mode Figure 3 4...

Страница 31: ...rd a single rhythm strip off any one of the six or twelve leads This recording can be between 5 and 80 seconds Refer to Section 2 5 4 NOTE To use the 6 or 12 lead Biolog Patient cable with the BIOLOG 3000i the Sim option must be enabled in set up menu 2 see section 2 5 3 3 4 1 Recording an ECG with a 6 or 12 Lead Patient Cable Plug the 6 or 12 lead patient cable into the cable socket Figure 3 5 Fi...

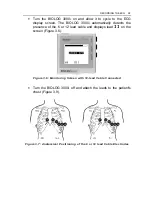
Страница 32: ...omatically detects the presence of the 6 or 12 lead cable and displays lead II II on the screen Figure 3 6 Figure 3 6 Monitoring Screen with 12 lead Cable Connected Turn the BIOLOG 3000i off and attach the leads to the patient s chest Figure 3 9 Figure 3 7 Anatomical Positioning of the 6 or 12 lead Cable Electrodes ...

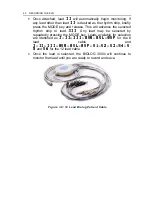
Страница 33: ... III Any lead may be selected by repeatedly pressing the MODE key Leads available for selection are identified as I II III AVR AVL AVF I II III AVR AVL AVF for the 6 lead cable and I II III AVR AVL AVF V1 V2 V3 V4 V I II III AVR AVL AVF V1 V2 V3 V4 V 5 5 and V6 V6 for the 12 lead cable Once the lead is selected the BIOLOG 3000i will continue to monitor that lead until you are ready to record and s...

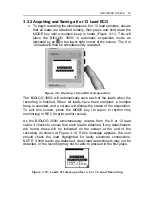
Страница 34: ...ed When all leads have been sampled a multiple beep is sounded and a screen will display the status of the acquisition To exit this screen press the MODE key to return to rhythm strip monitoring or REV to print and or review As the BIOLOG 3000i simultaneously records from the 6 or 12 lead cable it checks to ensure that each lead is attached If any detachments are found these will be indicated on t...

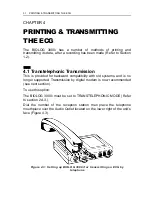
Страница 35: ...or backward compatibility with old systems and is no longer supported Transmission by digital modem is now recommended see next section To use this option The BIOLOG 3000i must be set to TRANSTELEPHONIC MODE Refer to section 2 4 3 Dial the number of the reception station then place the telephone mouthpiece over the Audio Outlet located on the lower right of the unit s face Figure 4 3 Figure 4 3 Se...

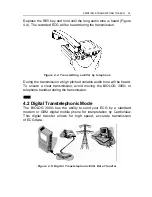
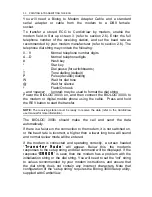
Страница 36: ...itched variable audio tone will be heard To ensure a clear transmission avoid moving the BIOLOG 3000i or telephone handset during the transmission 4 2 Digital Transtelephonic Mode The BIOLOG 3000i has the ability to send your ECG by a standard modem or GSM digital mobile phone for interpretation by CardioView This digital transfer allows for high speed accurate transmission of ECG data Figure 4 5 ...

Страница 37: ...ne using the cable Press and hold the REV button to start the transfer NOTE The receiving station must be ready to receive the data refer to the CardioView user manual for more information The BIOLOG 3000i should make the call and send the data automatically If there is a failure in the connection to the modem it is not switched on or the baud rate is incorrect a higher then a lower long tone will...

Страница 38: ...sion is complete the BIOLOG 3000i will display a message Data t Data transfer successful ransfer successful or unsuccessful Below this will be displayed Received by Received by name of the receiving station defaults to Cardioview followed by the date and time To return to the normal mode of operation press any key The Biolog will reset and go through the normal power up sequence NOTE The BIOLOG 30...

Страница 39: ...re information please refer to the user manual or consult your nearest QRS Diagnostic distributor 4 4 Printing with the Biolog Printer Interface Stored ECGs can be printed using the Biolog Printer Interface For more information please refer to the Biolog Printer Interface user manual or consult your nearest QRS Diagnostic distributor ...

Страница 40: ...after the period of time specified section 2 6 3 power down to preserve battery longevity In continuous use the batteries will last approximately for more than 10 hours with backlighting and more than 24 hours without backlighting To preserve battery life turn backlighting off when not needed and turn unit off when not in use Remove batteries from the unit if not being used over a long period of t...

Страница 41: ...damp cloth moistened with water or a commercial glass cleaner NOTE Do not wipe the case or the display lens with alcohol Alcohol will damage plastic surfaces over time and may cause them to crack In addition the display lens may become foggy in appearance To disinfect the BIOLOG 3000i wipe the back of the device including the electrodes with a hospital grade disinfectant NOTE Do not saturate the B...

Страница 42: ...e not of the recommended type Replace the batteries if this is occurring Turning off the backlight may give some extra operational time if no fresh batteries are immediately available NOTE Data stored in memory will not be lost No power the unit will not turn on The batteries are flat or they are not properly installed Remove the Battery Compartment cover and check the position of the batteries re...

Страница 43: ...patible with the 3000i Message When Transferring ECG to PC This can occur if you are touching the back electrodes or are near a source of electrical noise while the download cable is connected It does not interfere with the download operation however to clear the message ensure that the Biolog is resting on an insulated surface and away from power cables transformers or other electrically noisy eq...

Страница 44: ...Diagnostic LLC service center for routine servicing and testing Scrolling lines on the Screen This can occur if holding buttons while switching the Biolog on To cor rect this turn the Biolog off remove the batteries for ten seconds re place the batteries and turn the Biolog back on making sure you do not touch any of the buttons If the problem continues contact your QRS Diagnostic LLC service cent...

Страница 45: ...0 48 mm No of Pixels 240 h 160 w Display Type LCD Back Light Electro luminescent MEASURED PARAMETERS Heart Rate HR 20 250 bpm 2 POWER REQUIREMENTS Battery Type 2 AA 1 5V Alkaline cells recommend Sanyo LR6 Battery Life typical 12 Hours continuous use PHYSICAL CHARACTERISTICS Length 134 mm Width 88 mm Thickness 32 mm Weight 270 g ENVIRONMENTAL CHARACTERISTICS TEMPERATURE Operating 0 C 40 C Storage 2...

Страница 46: ...ocument may be photocopied reproduced or translated to another language without the written consent of QRS Diagnostic LLC The information contained in this document is subject to change without notice and does not represent a commitment on the part of QRS Diagnostic LLC BIOLOG 3000i CardioView Biolog Printer Interface are registered trademarks of QRS Diagnostic LLC USA Patents pending The BIOLOG 3...

Страница 47: ...rsely affect this device There is no guarantee that interference will not occur in a particular installation If this equipment does cause harmful interference to radio or television reception or is itself affected by equipment off and on the user is encouraged to try to correct the interference by one or more of the following antenna Reorient or relocate the receiving antenna Increase the separati...

Отзывы: