background image


91 

 
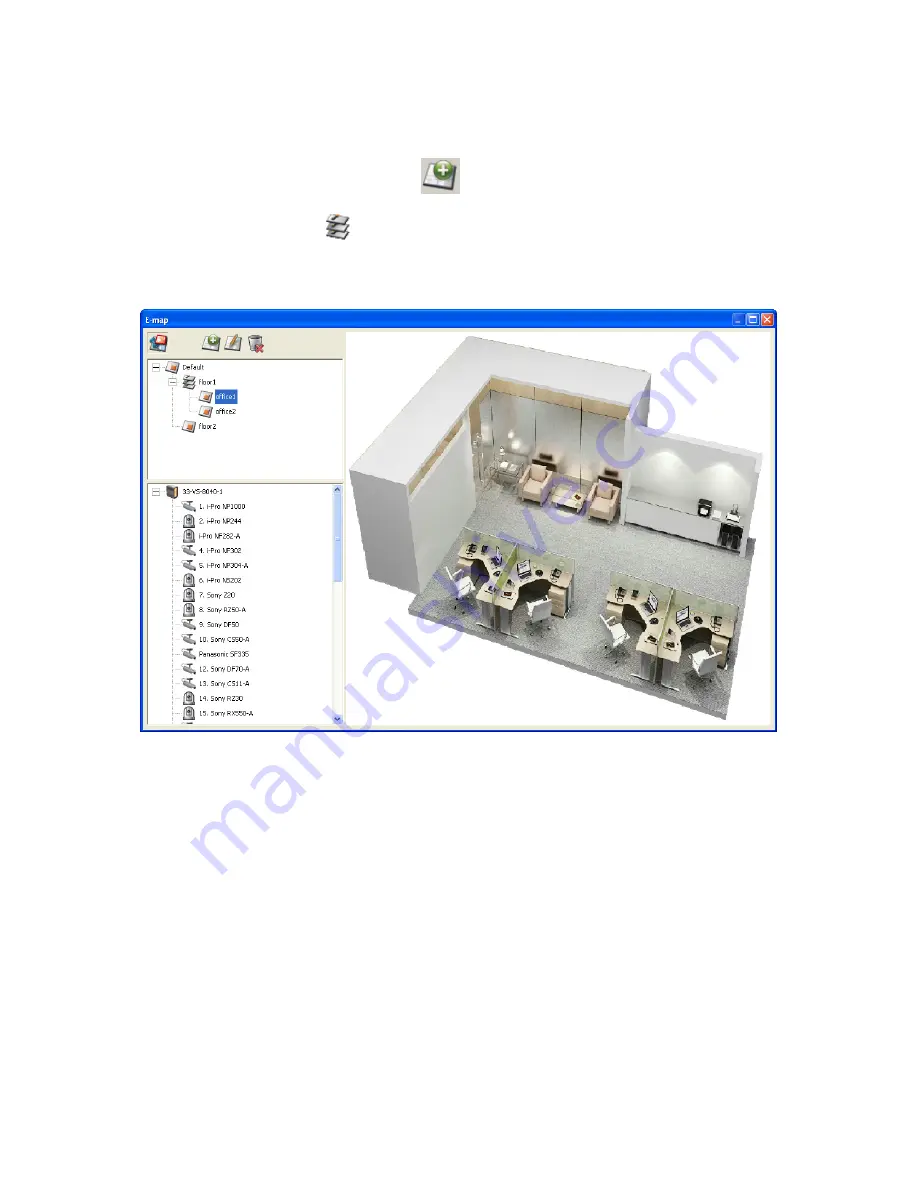
To add one or multiple E-maps, e.g. office1 and office2, under an E-map, e.g. floor1, click 

the E-map icon of floor1 and then click 

  to add the E-maps one by one.    The icon of 

floor1 will be changed to 

when more than one E-map is added.    To add another 

E-map of the same level of floor1, select ‘Default’ and add the E-map, e.g. floor2. 


Содержание VIOSTOR NVR

Страница 1: ...VioStor NVR Network Video Recorder User Manual Version 3 5 1 2011 QNAP Systems Inc All Rights Reserved ...

Страница 2: ...her brands and product names referred to are trademarks of their respective holders Further the or symbols are not used in the text LIMITED WARRANTY In no event shall the liability of QNAP Systems Inc QNAP exceed the price paid for the product from direct indirect special incidental or consequential software or its documentation QNAP makes no warranty or representation expressed implied or statuto...

Страница 3: ... the power supply provided by the manufacturer Service Please contact qualified technicians for any technical enquires Do not repair this product by yourself to avoid any voltage danger and other risks caused by opening this product cover Warning To avoid fire or electric shock do not use this product in rain or humid environment Do not place any objects on this product ...

Страница 4: ...ipment does cause harmful interference to radio or television reception which can be determined by turning the equipment off and on the user is encouraged to try to correct the interference by one or more of the following measures Reorient or relocate the receiving antenna Increase the separation between the equipment and receiver Connect the equipment into an outlet on a circuit different from th...

Страница 5: ...VS 4016U RP Pro VS 4012U RP Pro VS 4008U RP Pro 17 1 2 8 VS 4016 Pro VS 4012 Pro VS 4008 Pro 18 1 2 9 VS 4016U RP 19 1 2 10 VS 2012 Pro VS 2008 Pro 20 1 2 11 VS 2012 VS 2008 21 1 2 12 VS 2004L VS 2008L 22 1 2 13 VS 1004L 23 CHAPTER 2 INSTALL THE NVR 24 2 1 PERSONAL COMPUTER REQUIREMENTS 25 2 2 BROWSE CD ROM 27 2 3 HARD DISK DRIVES COMPATIBILITY LIST 29 2 4 IP CAMERAS COMPATIBILITY LIST 29 2 5 CHEC...

Страница 6: ... CHAPTER 5 PLAY VIDEO FILES 98 5 1 USE WEB BASED VIOSTOR PLAYER 99 5 1 1 Play Video Files from NVR 102 5 1 2 Play Video Files from Local PC 114 5 1 3 Multi view Playback 119 5 1 4 Intelligent Video Analytics IVA 127 5 1 5 Convert NVR Videos to an AVI File 134 5 2 DIGITAL WATERMARKING 138 5 2 1 Export Video Files with Digital Watermark 138 5 2 2 Watermark Proof 140 5 3 ACCESS THE RECORDING DATA 142...

Страница 7: ...parison 181 6 6 CAMERA SETTINGS 184 6 6 1 Camera Configuration 184 6 6 2 Recording Settings 187 6 6 3 Schedule Settings 189 6 6 4 Alarm Settings 190 6 6 5 Advanced Settings 208 6 7 SYSTEM TOOLS 210 6 7 1 Alert Notification 210 6 7 2 SMSC Settings 211 6 7 3 Restart Shut Down 213 6 7 4 Hardware Settings 214 6 7 5 System Update 216 6 7 6 Back up Restore Reset Settings 217 6 7 7 Remote Replication 218...

Страница 8: ... PASSWORD AND NETWORK SETTINGS 229 7 2 POWER OUTAGE OR ABNORMAL SHUTDOWN 230 7 3 HOT SWAPPING HARD DISK DRIVES RAID CONFIGURATION 230 CHAPTER 8 LCD PANEL 231 CHAPTER 9 TROUBLESHOOTING 237 APPENDIX A DYNAMIC DOMAIN NAME REGISTRATION 240 APPENDIX B CONFIGURATION EXAMPLES 245 TECHNICAL SUPPORT 250 GNU GENERAL PUBLIC LICENSE 251 ...

Страница 9: ...y liquid 8 Do not place this product on any uneven surface to avoid falling off and damage 9 Make sure the voltage is correct in your location when using this product If you are not sure about the voltage please contact the distributor or the local power supply company 10 Do not place any object on the power cord 11 Do not attempt to repair this product in any occasions Improper disassembly of the...

Страница 10: ... diversified display modes and recording features e g scheduled recording alarm recording alarm recording schedule The NVR also supports data search by date and time timeline event and intelligent video analytics IVA including motion detection missing object foreign object out of focus and camera occlusion All the functions can be configured by an IE web browser The VioStor Pro Series NVR is the w...

Страница 11: ...P Pro VS 8124 U RP Pro 1 Enter button 2 Power button 3 Select button 4 LED indicators 10 GbE Status LAN eSATA 5 VGA 6 Expansion slot x 2 reserved 7 Gigabit LAN x 2 8 USB 3 0 x 2 9 USB 2 0 x 4 10 Password network settings reset button 11 eSATA x 2 reserved 12 Power connector x 2 ...

Страница 12: ...tton 4 Hard drive LEDs 5 Select button 6 Enter button 7 LED indicators Status LAN USB eSATA 10 GbE 8 Tray lock 9 Release button 10 Power connector 11 Expansion slot 12 Kensington security slot 13 VGA 14 HDMI 15 eSATA x 2 reserved 16 Gigabit LAN x 2 17 USB 2 0 x 4 18 USB 3 0 19 Password network settings reset button ...

Страница 13: ... VS 8032U RP VS 8024U RP 1 LED indicators Status LAN USB HDD1 8 2 Power button 3 Select button 4 Enter button 5 Power connector 6 Password network settings reset button 7 RS 232 port 8 VGA 9 USB 2 0 x 4 10 Gigabit LAN x 2 ...

Страница 14: ...deo backup button 2 USB 2 0 3 LED indicators Status LAN USB HDD1 8 4 Power button 5 Select button 6 Enter button 7 Power connector 8 Gigabit LAN x 2 9 USB 2 0 x 4 10 RS 232 port 11 VGA 12 Password network settings reset button 13 Kensington security slot ...

Страница 15: ...eo backup button 2 USB 2 0 3 LED indicators Status LAN USB eSATA HDD1 6 4 Power button 5 Select button 6 Enter button 7 Power connector 8 Gigabit LAN x 2 9 USB 2 0 x 4 10 eSATA x 2 reserved 11 VGA 12 Password network settings reset button 13 Kensington security slot ...

Страница 16: ...tton 2 USB 2 0 3 LED indicators USB Status HDD1 5 LAN 4 Power button 5 Select button 6 Enter button 7 Power connector 8 Gigabit LAN x 2 9 USB 2 0 x 4 10 eSATA reserved 11 VGA 12 RS 232 port 13 Password network settings reset button 14 Kensington security slot ...

Страница 17: ... VS 4008U RP Pro 1 One touch auto video backup button 2 USB 2 0 3 LED indicators Status LAN USB eSATA HDD1 4 4 Power button 5 Power connector 6 Gigabit LAN x 2 7 USB 2 0 x 4 8 eSATA x 2 reserved 9 VGA 10 Password network settings reset button ...

Страница 18: ...eo backup button 2 USB 2 0 3 LED indicators Status LAN USB eSATA HDD1 4 4 Power button 5 Select button 6 Enter button 7 Power connector 8 Gigabit LAN x 2 9 USB 2 0 x 4 10 eSATA x 2 reserved 11 VGA 12 Password network settings reset button 13 Kensington security slot ...

Страница 19: ... VS 4016U RP 1 One touch auto video backup button 2 USB 2 0 3 LED indicators USB Status HDD1 4 LAN 4 Power button 5 Power connector 6 Gigabit LAN x 2 7 USB 2 0 x 2 8 Password network settings reset button 9 VGA ...

Страница 20: ... touch auto video backup button 2 USB 2 0 3 LED indicators HDD1 HDD2 LAN eSATA 4 Power button 5 Power connector 6 Gigabit LAN x 2 7 USB 2 0 x 2 8 eSATA x 2 reserved 9 VGA 10 Password network settings reset button 11 Kensington security slot ...

Страница 21: ...uto video backup button 2 USB 2 0 3 LED indicators HDD1 HDD2 LAN eSATA 4 Power button 5 Power connector 6 Gigabit LAN x 2 7 USB 2 0 x 2 8 Password network settings reset button 9 Kensington security slot 10 eSATA x 2 reserved 11 VGA reserved ...

Страница 22: ...e touch auto video backup button 2 USB 2 0 3 LED Indicators USB status HDD1 HDD2 LAN power 4 Power button 5 Power connector 6 Gigabit LAN 7 USB 2 0 x 2 8 Password network settings reset button 9 K Lock security slot 10 Power cord hook ...

Страница 23: ...USB 2 0 3 LED Indicators USB status HDD eSATA LAN power 4 Power button 5 Power connector 6 Gigabit LAN 7 USB 2 0 x 2 8 Password network settings reset button 9 K Lock security slot 10 eSATA 11 Power cord hook Note This model is designed for some projects only ...

Страница 24: ...2 Install the NVR For the information of hardware installation see the Quick Installation Guide QIG in the product package The QIG can also be found in the product CD ROM or QNAP website http www qnapsecurity com ...

Страница 25: ... 264 Dual core CPU 2 8GHz or above M JPEG Dual core CPU 2 4GHz or above 16 MPEG 4 MxPEG H 264 Quad core CPU 2 33GHz or above M JPEG Dual core CPU 2 6GHz or above 20 MPEG 4 MxPEG H 264 Quad core CPU 2 6GHz or above M JPEG Quad core CPU 2 33GHz or above 40 MPEG 4 MxPEG H 264 Core i7 CPU 2 8GHz or above M JPEG Quad core CPU 3 0GHz or above 48 MPEG 4 MxPEG H 264 Core i7 CPU 3 4GHz or above Operation s...

Страница 26: ...26 Security Settings of the Web Browser Please make sure the security level of the IE browser in Internet Options is set to Medium or lower ...

Страница 27: ...27 2 2 Browse CD ROM Run the product CD ROM on a Windows PC to access the Quick Start Guide and user manual and install codec and software utilities Finder and VioStor Player ...

Страница 28: ...c The codec for playing AVI videos recorded by the NVR via Windows Media Player Tool This folder contains IPP library and monitor plugin If you failed to install the ActiveX plugin when connecting to the monitoring page of the NVR by an IE browser install the plugin from the CD ROM VioStorPlayer The setup program of VioStor Player a tool to play the videos recorded by the NVR If you failed to inst...

Страница 29: ...ase visit http www qnapsecurity com pro_compatibility asp QNAP disclaims any responsibility for product damage malfunction or data loss recovery due to misuse or improper installation of hard disks in any occasions for any reasons 2 4 IP Cameras Compatibility List For the information of supported IP camera models please visit http www qnapsecurity com pro_compatibility_camera asp ...

Страница 30: ... 6 A bad sector is detected on the hard drive 7 The NVR is in degraded read only mode 2 member drives fail in a RAID 5 or RAID 6 configuration the disk data can still be read 8 Hardware self test error Flashes red every 0 5 sec The NVR is in degraded mode one member drive fails in RAID 1 RAID 5 or RAID 6 configuration Flashes green every 0 5 sec 1 The NVR is starting up 2 The NVR is not configured...

Страница 31: ...eing accessed 4 The NVR data is being copied to the external USB device Blue The USB device connected to the front USB port of the NVR is ready USB Blue Off 1 No USB is detected 2 The NVR has finished copying the data to the USB device connected to the front USB port of the NVR eSATA Orange Flashes The eSATA device is being accessed The 10 GbE network expansion function is reserved The eSATA port ...

Страница 32: ...e NVR data cannot be copied to the external device by pressing the one touch auto video backup button Short beep 0 5 sec long beep 1 5 sec 3 every 5 min The system fan is out of function 2 1 The disk volume is going to be full 2 The disk volume has reached its full capacity 3 The hard drives on the NVR are in degraded mode 4 Hard disk rebuilding process starts Long beep 1 5 sec 1 1 The NVR is turn...

Страница 33: ...s to install the Finder Upon successful installation run the Finder If the Finder is blocked by the firewall unblock it 3 The Finder detects the NVR servers on the local network If the server has not been initialized you will be prompted to perform quick setup Click Yes to continue Note If the NVR is not found click Refresh to try again ...

Страница 34: ... and password are as below Use name admin Password admin Note Make sure all the IP cameras are configured and connected to the network 5 The quick configuration page will be shown Click Continue and follow the instructions to finish the configuration For further information please refer to Chapter 6 1 ...

Страница 35: ...n to execute the quick configuration 7 After the quick configuration the NVR is ready for use Click Start Monitoring to view the live video from the IP cameras or click Close to return to the home page of the system administration ...

Страница 36: ...36 8 The first time to connect to the monitoring page of the NVR install the ActiveX add on The live video from the IP cameras configured on the NVR and the recording status of each channel are shown ...

Страница 37: ...ro Connect a monitor or TV to the NVR via the HDMI or VGA interface to perform PC less quick configuration monitoring and video playback To use this feature follow the steps below 1 Make sure at least one hard drive has been installed on the NVR 2 Connect the NVR to the network 3 Make sure the IP cameras have been configured and connected to the network 4 Connect an HDMI or a VGA monitor or TV sug...

Страница 38: ... the NVR has not been configured skip the login page and enter Quick Configuration refer to Chapter 3 1 Default user name admin Password admin Click the keyboard icon to enter the necessary information if a USB keyboard is not available The monitoring page will be shown upon successful login refer to Chapter 3 3 for details ...

Страница 39: ...ck Configuration Wizard will be shown Follow the instructions of the wizard to complete the system setup Note All the changes will be effective only after applying the settings in the last step 1 The system information will be shown Select the language and click Next ...

Страница 40: ...40 2 Change the admin password or use the default password admin 3 Select to obtain the network settings automatically or enter the network settings ...

Страница 41: ... Internet time server To enter a domain name for the NTP server make sure the DNS server has been correctly set up 5 Select the disk configuration Click Disk Information to view the hard disk drive details Note that all the disk data will be deleted when the disk volume is initialized ...

Страница 42: ... Configure the IP camera settings If no IP cameras have been set try to search for the cameras on the local network a The cameras found will be shown Select the IP cameras and click Add to add the channels ...

Страница 43: ...43 b To manually add an IP camera or edit the camera settings click c Enter the camera settings Click Test to test the connection Click Remove to delete the camera ...

Страница 44: ...ine the recording settings and click OK Digital Watermarking Enable this option to add digital watermarks to the video files recorded to the NVR Use the Watermark Proof utility to verify if the video files were maliciously modified For more information refer to Chapter 5 2 ...

Страница 45: ...45 7 Verify the settings and click Next to initialize the server 8 After the system has been initialized the NVR is ready for use Click Start Monitoring to enter the monitoring screen ...

Страница 46: ... system settings such as administrator password network and time settings click on the monitoring screen Note that this button option will be shown for administrator access only Select the language and click the icons to configure the settings ...

Страница 47: ...configuration of the system Change the administrator password to login local display Change the network settings Change the date and time settings Configure the disk volume and initialize the hard disks Configure the IP camera settings ...

Страница 48: ... monitoring screen will be shown Monitor the IP cameras change the display mode enable or disable manual recording control the PTZ cameras and so on View video image and IP camera info Camera list Select monitoring mode PTZ camera control panel ...

Страница 49: ...nel Hide the panel on the left of the monitoring page Show left panel Show the panel on the left of the monitoring page Logout Logout the NVR About View the server name NVR model and firmware version Manual recording Enable or disable recording on the IP camera The administrator can select to enable or disable this function in Camera Settings Recording Settings on the web based administration inte...

Страница 50: ...ification When the alarm recording is enabled and an event is detected this icon will be shown Click this icon to view the alert details The alert sound can be turned on or off To clear all the logs click Clear All ...

Страница 51: ...ill be disabled when the PTZ function is in use Icon Description Pan and tilt If the PTZ camera supports pan and tilt functions click these buttons to pan or tilt the camera Preset positions Select the preset positions of the PTZ camera Zoom in Zoom out If the PTZ camera supports zooming click these buttons to zoom in or zoom out Digital zoom Select a channel and click this button to enable the di...

Страница 52: ...annel mode 12 channel mode Select the display page number Sequential mode This mode can be used with other display modes Click to enable or disable sequential mode Click to define the time interval of which the channels will be displayed Note VS 2004 Pro supports 1 to 6 channel display modes only VS 2008 Pro VS 4008 Pro VS 4008U RP Pro support 1 to 10 channel display modes only Other NVR models su...

Страница 53: ...the cameras If the camera supports pan and tilt functions click the channel on the screen and adjust the viewing angle with a mouse If zooming is supported scroll the mouse wheel to zoom in or zoom out the video These functions are available depending on the camera models Please consult the camera s documentation for details ...

Страница 54: ...is IP camera supports PTZ function Manual recording is enabled The recording triggered by advanced event management Camera Settings Alarm Settings Advanced Mode is in process The alarm input 1 of the IP camera is triggered The alarm input 2 of the IP camera is triggered The alarm input 3 of the IP camera is triggered Motion detection recording is in process Digital zoom is enabled ...

Страница 55: ...he Internet open the port on the router or gateway to connect to the IP camera Please refer to Appendix B No Permission No access right to view the channel Please login as a user with the access right or contact the system administrator Server Error Check the camera settings or update the firmware of the IP camera if any Contact the technical support if the error persists Note 1 Enabling or disabl...

Страница 56: ...ided under the General tab Event Notification When this option is enabled and an event is triggered the alert icon will be shown on the monitoring channel instantly Click the icon to view the alert details Display Order Click Reset to reprioritize the monitoring channels to default order ...

Страница 57: ... event is triggered The video window will flash if an event is triggered Display unauthorized channels Select this option to show the channels that the user does not have access right to monitor Display unconfigured channels Select this option to show the channels that have not been configured ...

Страница 58: ... the most appropriate setting automatically To change the screen resolution click Settings under the Screen tab After configuring the resolution settings the monitoring screen will be shown If the monitor model cannot be detected the NVR will provide the options 1400 1050 1280 1024 1024 768 ...

Страница 59: ...he playback access right to the IP cameras is required to play the videos Login the NVR as admin and edit the playback access right in User Management by the web based administration interface When the playback screen is shown select a camera channel on the NVR Next select the start and end time of the video click to start searching The videos which match the search criteria will be played automat...

Страница 60: ...hen playing a video use the scroll bar to adjust the playback speed or click the digital zoom icon to zoom in or zoom out the video Right click the IP camera channel and select the following options a Full screen b Keep aspect ratio c Deinterlace available on particular camera models only d Keep original size ...

Страница 61: ...USB storage device to the front USB port of the NVR and make sure the device has been correctly formatted The access right to play the videos of the IP camera is required to convert the video files Follow the steps below to export the video files of an IP camera from the NVR and convert the files to an AVI file 1 Enter the playback interface of the NVR Click Convert to AVI file ...

Страница 62: ...amera and the recording type 3 Specify the start and end time of the video files 4 Enter the file name of the video file 5 Click OK to convert the video files to an AVI file and save them to the external USB storage device ...

Страница 63: ...ard disks in the server correctly and finish the disk formatting and configuration Otherwise the server will not function properly 4 1 Connect to the NVR Follow the steps below to connect to the monitoring page of the NVR 1 Run the Finder Double click the name of the NVR or enter the IP address of the server in the IE browser to connect to the monitoring page Double click to login the server ...

Страница 64: ...64 2 Enter the user name and password to login the NVR Default user name admin Default password admin 3 To view the live video by Internet Explorer install the ActiveX add on ...

Страница 65: ...toring page will be shown Select the display language Start to configure the system settings and use the monitoring and recording functions of the server View monitoring channel and details PTZ control panel System firmware Adjust display mode Server name ...

Страница 66: ...ion page admin access required Monitoring settings Configure the advanced settings of the monitoring page Specify the source of the video audio stream event notification and snapshot folder Playback Enter the video playback page The administrator can grant access right to the users to playback the videos Help View the system online help Logout Logout the NVR Snapshot Take a snapshot on the selecte...

Страница 67: ...annel Press and hold the left mouse button to zoom in or press and hold the right mouse button to zoom out Press the left mouse button to drag the viewing angle of the IP camera Use the mouse wheel or the PTZ control panel to use the digital zoom function Focus control Adjust the focus control of the PTZ camera Select PTZ camera preset positions View the preset positions of the IP camera by clicki...

Страница 68: ...apshot time is inconsistent with the actual time that the snapshot is taken it is caused by the network environment but not a system error 4 Click the event notification icon to view the event details enable or disable the alert sound or clear the event logs 5 When the digital zoom function is enabled on multiple IP cameras the zooming function will be affected if the computer performance is not h...

Страница 69: ... Pan Tilt Zoom camera control d Preset Select the preset positions of the PTZ camera e Enable live tracking Available on Panasonic NS202 A camera f Disable live tracking Available on Panasonic NS202 A camera g Auto cruising This feature is used to configure the PTZ cameras to cruise according to the preset positions and the staying time set for each preset position h Digital zoom Enable disable di...

Страница 70: ...he data no extra port forwarding is required However the performance of the NVR may be affected Always stream from the network camera If the NVR and the IP cameras are connected to the same local network select this option to stream the video data from the IP cameras If the NVR the IP cameras and the PC are located behind a router virtual server or firewall configure port forwarding on the IP came...

Страница 71: ...inal size Select this option to display an image in its original size if it is smaller than the browser window Specify also how an image will be resized if it is larger than the browser window Shrink image to fit window maintaining aspect ratio Shrink image by 1 2 1 4 1 8 and so on to fit window Video Processing Turn on Deinterlace when there are interlaced lines on the video ...

Страница 72: ...e if the IP camera does not support multiple streams If an IP camera supports different resolution settings the NVR will select the smallest resolution larger than or equal to the size of the browser window If all the supported resolution settings of an IP camera are smaller than the browser window the largest resolution will be selected Let me choose other cameras to apply the same settings Selec...

Страница 73: ...73 ...

Страница 74: ...ive Video Window The live videos of the IP cameras configured on the NVR are shown on the monitoring page Click the channel window to use the features supported by the IP camera e g digital zoom or pan tilt zoom ...

Страница 75: ...sage When the NVR fails to display the video of an IP camera a message will be shown in the channel window to indicate the status Message Description Connecting If the IP camera is located on a remote network or the Internet it may take some time to establish the connection to the camera Disconnected The NVR cannot connect to the IP camera Please check the network connection of the computer and th...

Страница 76: ...ble depending on the camera models Please refer to the user manual of the IP cameras for more information Note that the digital zoom function will be disabled when the PTZ function is in use Single channel mode 4 channel mode 8 channel mode 10 channel mode Full screen Multi channel mode 9 channel mode 6 channel mode Picture in Picture mode Sequential mode Adjust window size Adjust PT angle of the ...

Страница 77: ...onitoring feature of the NVR 1 Click Server List on the monitoring page a Click Auto Detect to search for the NVR on the LAN and add the server to the server list b Click Add to add the NVR to the server list 2 Up to 128 channels from multiple NVR servers can be added for monitoring ...

Страница 78: ... Event Notification When this option is enabled and an event is triggered the alert icon will be shown on the monitoring channel instantly Click the icon to view the alert details Display Order Click Reset to reprioritize the monitoring channels to the default order Browser Select to show or hide the toolbars of the IE browser ...

Страница 79: ...from the IP camera Note that the port forwarding settings on the IP cameras must be configured if the NVR IP cameras and the computer are located behind a router a virtual server or a firewall Video Windows Highlight the video window when an event is triggered The video window will flash if an event is triggered Display unauthorized channels Select this option to show the channels that the user do...

Страница 80: ...80 ...

Страница 81: ...apshots are saved and the image format JPEG or BMP Show timestamp and camera name Show the timestamp and the camera name on the snapshot Save the snapshot as it is displayed Select this option to save the snapshot as it is displayed on the window Otherwise the snapshot will be saved in its original size ...

Страница 82: ...ying time set for each preset position To use the auto cruising feature follow the steps below 1 On the monitoring page of the NVR click to go to the configuration page of the PTZ camera 2 Set the preset positions on the PTZ camera 3 Return to the monitoring page of the NVR Right click the display window of the PTZ camera Select Auto Cruising Configure ...

Страница 83: ...83 4 Click the number buttons to view the preset positions of the PTZ camera When this button is clicked the name of the corresponding preset position is shown on the Preset Name drop down menu ...

Страница 84: ...Update To change a setting on the list highlight the selection Select another preset position from the drop down menu and or change the staying time interval Click Update 7 Delete To delete a setting highlight a selection on the list and click Delete To delete more than one setting press and hold the Ctrl key and select the settings Then click Delete ...

Страница 85: ...The default staying time interval of the preset position is 5 seconds Enter 5 999 seconds for this setting The system supports up to 10 preset positions the first 10 configured on the PTZ cameras Up to 20 settings for auto cruising can be configured In other words the NVR supports maximum 10 selections on the drop down menu and 20 settings on the auto cruising list ...

Страница 86: ...e IP cameras Users can drag and drop the camera icons to the E map and enable event alert to receive instant notification when an event occurs to the IP camera The camera icons are available only when the IP cameras have been configured on the NVR To use the E map feature login the monitoring page of the NVR as an administrator and click ...

Страница 87: ... NVR provides a default E map Add or remove the E maps whenever necessary Note Login as an administrator to edit and view the E map E map Tree menu of E maps and IP cameras Enable Disable E map edit mode Enable Disable event alert on E map ...

Страница 88: ...curs to an IP camera such as a moving object is detected the camera icon will change and flash to alert the administrator To disable event alert on the E map click this icon Note When event alert is enabled the E map cannot be edited The icon will become invisible Icon for a set of E maps Icon for a single E map Icon for a PTZ IP camera Icon for a fixed body or fixed dome IP camera After dragging ...

Страница 89: ...et or an E map To add a map set or an E map to indicate the locations of the IP cameras click to enable Edit mode A list of IP cameras configured on the NVR will be shown on the left Click Default and then to add an E map ...

Страница 90: ...90 Enter the map name and select the file The E map must be in JPEG format Click OK The E map will be shown ...

Страница 91: ...er an E map e g floor1 click the E map icon of floor1 and then click to add the E maps one by one The icon of floor1 will be changed to when more than one E map is added To add another E map of the same level of floor1 select Default and add the E map e g floor2 ...

Страница 92: ...ap and click Enter the new name and click OK To change the picture of the E map delete the E map and add the new file 4 3 4 Delete a Map Set or an E map To delete an E map select the map and click To delete a set of maps under the same level select the map set and click ...

Страница 93: ...ra location The camera name will appear under the E map on the top left column When an icon of a fixed body or fixed dome IP camera is dropped to the E map right click the camera icon and adjust the icon direction The icon of a PTZ IP camera cannot be adjusted To delete a camera icon from the E map right click the icon and select Delete ...

Страница 94: ...he left the E map or the E map with the camera icon will be shown on the right immediately The selected camera icon will be highlighted with a blue bracket When double clicking a camera icon on an E map whether or not Edit mode is enabled the IP camera will be shown in single channel mode on the monitoring screen ...

Страница 95: ...95 4 3 6 Enable Disable Event Alert To enable event alert on an E map click ...

Страница 96: ...the monitor screen will switch to display the alert camera channel in single channel view on the monitor screen automatically The E map with event alert will not be switched to display automatically if the time difference between the event time and the last time the user uses the E map clicks the E map window is less than 20 seconds In this case refer to the tree menu on the left to locate the IP ...

Страница 97: ...ra icon on an E map Icon Description A moving object has been detected The alarm input 1 of the IP camera has been triggered The alarm input 2 of the IP camera has been triggered The alarm input 3 of the IP camera has been triggered An unidentified event has been triggered ...

Страница 98: ... VioStor Player utility over LAN or WAN The first time you connect to the playback interface of the NVR by an IE browser install the ActiveX plugin The VioStor Player utility can be installed from the product CD ROM Upon successful installation it is available on the Windows start menu Programs QNAP VioStor Player ...

Страница 99: ...r will be shown Use this program to search and play the video files on the NVR servers To return to the monitoring page click To enter the system administration page click Note The playback access right to the IP cameras is required to view and play the video files by the VioStor Player Please refer to Chapter 6 5 for the access right configuration ...

Страница 100: ...escribed below Icons Description Configure the options such as playing mode snapshot settings and digital watermark Single view mode 4 view mode 9 view mode 16 view mode Full screen Take a snapshot of the video Convert the video files on the NVR to AVI files ...

Страница 101: ...ay pause a video file Stop Reverse play Previous file Next file Last frame Next frame Play the video at 1 16x 1 8x 1 4x 1 2x 1x 2x 4x 8x 16x speed Control all views Control the playback settings of all the playback windows simultaneously Click once to fit the image to the window and keep the aspect ratio when playing the video When disabled the Player will fit the video to the window only ...

Страница 102: ...102 5 1 1 Play Video Files from NVR Follow the steps below to play the video files on the remote NVR servers by the VioStor Player 1 Click Play by Time ...

Страница 103: ...103 2 The following dialog will be shown To add more NVR servers for playback click Edit ...

Страница 104: ... an NVR server Enter the IP address port number and login information c Modify Modify the login settings of an NVR server d Remove Delete a manually added NVR server from the list e Default settings Enter the default user name and password for all newly added servers The login name and password can be changed manually ...

Страница 105: ...r s and the IP camera s ii Click the Text entry tab iii Select the recording type the start and end time when the video is recorded iv Click Preview to preview the video v Click OK Maximum 16 IP cameras can be selected The IP cameras to which you are denied to access will be shown in grey ...

Страница 106: ...ne search Graphic entry i Select the NVR server s and the IP camera s Maximum 16 IP cameras can be selected The IP cameras to which you are denied to access will be shown in grey ii Click the Graphical entry tab ...

Страница 107: ...ecorded for each IP camera The green cells indicate regular recording files and the red cells indicate alarm recording files Click Apply the selected time period to all the IP cameras to apply the time selection to all the IP cameras v Click Preview to preview the video vi Click OK ...

Страница 108: ...108 Event entry i Select the NVR server s and the IP camera s Maximum 16 IP cameras can be selected The IP cameras to which you are denied to access will be shown in grey ...

Страница 109: ...109 ii Click the Event entry tab iii Select the event type ...

Страница 110: ...nt search Use this function to search for all the events occurred on the IP cameras Refer to the event details to search for the recording data Search all Search for the specified events occurred on all the IP cameras of an NVR within the time range specified Search Search for the specified events occurred on one IP camera within the time range specified ...

Страница 111: ...111 vii The events will be shown Click OK ...

Страница 112: ...the number of IP cameras specified for video search Click the window one by one to view the search results A blank playlist means no files were found on the selected IP camera Note The regular recordings are shown in white and the alarm recordings are shown in red on the playlist ...

Страница 113: ...ck windows at the same time click to enable Control All Views When Control All Views is enabled the playback options play pause stop previous next frame previous next file speed adjustment will be applied to all the playback windows ...

Страница 114: ...114 5 1 2 Play Video Files from Local PC Follow the steps below to play the video files on a local PC by the VioStor Player 1 Click Add files ...

Страница 115: ...115 2 Browse and select the video files from the computer ...

Страница 116: ...116 3 The playlist will be shown Click Play to play the videos ...

Страница 117: ...117 4 To play the video files from the PC in multiple windows by the VioStor Player click the 4 9 or 16 view icon Click the playback window and browse for the video files one by one ...

Страница 118: ...118 5 To control all the playback windows at the same time click to enable Control All Views ...

Страница 119: ...ximum 16 IP cameras at the same time or select to divide the video of one IP camera into multiple time periods 16 and play them in a multi view window Divide the selected time equally into multiple playback windows Follow the steps below to play the video files of one IP camera in multiple playback windows by the VioStor Player 1 Click Playback by Time ...

Страница 120: ...cameras to which you are denied to access will be shown in grey 3 Click Text entry or Graphical entry 4 Enter the search criteria and select the option Divide the selected time period equally into all the playback windows to play 5 Click OK ...

Страница 121: ...121 6 The video files will be divided evenly by 16 windows ...

Страница 122: ...ck windows at the same time click to enable Control All Views When Control All Views is enabled the playback options play pause stop previous next frame previous next file speed adjustment will be applied to all the playback windows ...

Страница 123: ...123 Play the video files of multiple IP cameras Follow the steps below to play the video files of multiple IP cameras by the VioStor Player 1 Click Playback by Time ...

Страница 124: ...124 2 Select multiple IP cameras maximum 16 The IP cameras to which you are denied to access will be shown in grey 3 Enter the search criteria in the Text entry Graphical entry or Event Entry Click OK ...

Страница 125: ...ill display the 1 4 9 or 16 view window according to the number of IP cameras specified for video search Click the window one by one to view the search results A blank playlist means no files were found on the selected IP camera ...

Страница 126: ...ck windows at the same time click to enable Control All Views When Control All Views is enabled the playback options play pause stop previous next frame previous next file speed adjustment will be applied to all the playback windows ...

Страница 127: ...ts new object in the video Missing object Detects missing object in the video Out of focus Detects if the camera is out of focus Camera occlusion Detects if the IP camera is obstructed To use this function follow the steps below 1 Open the VioStor Player Add video files to the playlist from the local PC or search for the video files on the NVR Note The intelligent video analytics support video sea...

Страница 128: ...128 2 When the video files are shown on the playlist click and specify the IVA settings for video search ...

Страница 129: ...the sensitivity for object detection 5 Adjust the time interval for detecting the foreign objects and missing objects If a foreign object appears or a missing object disappears for a period of time which is longer than the time interval the NVR will record an event Note The interval slide bar appears only when foreign object or missing object is selected ...

Страница 130: ...130 6 Define the detection zone Mouse over the edge of the red zone and use the mouse to define the detection zone Click Select all to highlight the entire area ...

Страница 131: ...he yellow zone 8 Enable Disable other options for video search Pause when found Enable this option and the video search will stop when a video file which matches the search criteria is found Highlight the detection zone The moving objects detected in the video will be highlighted in red brackets the foreign or missing objects will be highlighted in yellow brackets the video which is out of focus o...

Страница 132: ...132 9 Click Search to start searching the video by IVA The results will be shown ...

Страница 133: ...ayer will play the video starting from 15 seconds before the event to 15 seconds after the event Right click an entry on the search result dialog to export the video AVI format and save it on the computer The exported video starts from 15 seconds before the event to 15 seconds after the event ...

Страница 134: ...e To convert the video files on the NVR to an AVI file and export the file to the local PC by the VioStor Player follow the steps below Note The playback access right to the IP cameras is required to use this feature 1 Click Convert to AVI file ...

Страница 135: ...135 2 If no NVR servers or IP cameras are shown click Edit to add an NVR server manually ...

Страница 136: ...es by Text entry Select the recording type Note Video search by Graphic entry and Event entry is not available for the video conversion feature 5 Specify the time range Specify a smaller time range or the video file will be too large and take a long time to convert 6 Click Preview to preview the video If no videos are found search again ...

Страница 137: ...137 7 Click OK Enter the file name and specify the location where the file is saved to 8 All the video files which meet the search criteria will be converted to an AVI file ...

Страница 138: ...igital watermarks can be added on the exported videos and snapshots by the VioStor Player The watermark cannot be removed and is only visible to the Watermark Proof software 5 2 1 Export Video Files with Digital Watermark To use digital watermarking by the VioStor Player follow the steps below 1 Open the VioStor Player 2 Click Settings ...

Страница 139: ...139 3 Select to add digital watermark in the exported snapshot or video 4 Click Convert to AVI file refer to Chapter 5 1 5 Digital watermarks will be added to the exported video files and snapshots ...

Страница 140: ...tomatically along with the VioStor Player From the Windows Start menu select All Programs QNAP VioStor Player to locate Watermark Proof Run Watermark Proof The following window will be shown Click to browse and locate the files Multiple files can be selected at one time ...

Страница 141: ...or is detected is selected the checking process will stop if a failed file is detected Otherwise the program will check all the files selected If a video file has been modified or is not exported with digital watermark or not an NVR video file the proof result will be shown as Failed ...

Страница 142: ...es Microsoft Networking SMB CIFS Web File Manager HTTP FTP Server FTP Note To access the video files by these protocols enter the user name and password with the administrator access right To use these services enable the files services in Network Settings File Services in the system administration page ...

Страница 143: ... the web based playback interface click SMB OR Run NVR_IP from the Windows Start menu For example if the NVR IP is 10 11 19 27 enter 10 11 19 27 5 3 2 Web File Manager HTTP To access the recording data on the NVR by a web browser click Web on the web based playback interface and login as an administrator ...

Страница 144: ...P Access the recording data by FTP On the web based playback interface click FTP OR In Windows Internet Explorer enter ftp username password NVRIP For example enter ftp admin admin 172 17 26 154 if the NVR IP is 172 17 26 154 ...

Страница 145: ...145 Chapter 6 System Administration To enter the system configuration page of the NVR login the monitoring page as an administrator and click ...

Страница 146: ...146 Upon successful login the monitoring channels connection and recording status and the network bandwidth of the NVR will be shown on the Advanced Mode page View the settings by Traditional Mode ...

Страница 147: ...the Quick Configuration page will be shown Follow the instructions to finish the setup The functions of the buttons on the configuration page are described below Return to the monitoring page Playback the videos View the on line help Logout the NVR ...

Страница 148: ...148 6 1 Quick Configuration Follow the instructions to configure the NVR Note All the changes will be effective only after clicking Start installation in the last step ...

Страница 149: ... name The server name supports up to 14 characters which may include alphabets A Z and a z numbers 0 9 and dash Space and period are not allowed 2 Change the administrator password or select to use the default password admin ...

Страница 150: ...150 3 Enter the date time and time zone of the server 4 Enter the IP address subnet mask and default gateway of the server ...

Страница 151: ...151 5 Select the disk configuration All the disk data will be cleared unless Do not to set the disk configuration is selected ...

Страница 152: ...able the recording function on each channel test the connection to the IP cameras and then click Save to apply the changes Click Search to search for the IP cameras on the local network Select a channel and click Add to add the camera With the search function the camera model and the IP address are filled in automatically Click Close to close the search results ...

Страница 153: ...153 7 Click Start Installation to apply the changes and initialize the system ...

Страница 154: ...154 8 Click Start Monitoring to view the live video from the IP cameras or click Close to return to the system administration home page ...

Страница 155: ...ic system settings including the server name the date time and view the system settings 6 2 1 Server Name Enter the name of the NVR The server name supports up to 14 characters which can only contain alphabets A Z and a z numbers 0 9 and dash ...

Страница 156: ...ork Time Protocol server Enter the IP address or the domain name of the NTP server for example time nist gov or time windows com The NVR can be configured as the NTP server for the IP cameras or other servers To ensure the date and time of the IP cameras are synchronized with the NVR enter the NVR IP as the NTP server of the IP cameras To set the server time the same as the computer time select Se...

Страница 157: ...157 6 2 3 View System Settings View the system settings such as the server name on this page ...

Страница 158: ...cal network automatically if a DHCP server is available Use static IP address To assign a fixed IP to the NVR enter the IP address the subnet mask and the default gateway Primary DNS Server Enter the IP address of the primary DNS server that provides the DNS service for the NVR on the external network Secondary DNS Server Enter the IP address of the secondary DNS server that provides the DNS servi...

Страница 159: ...159 If the NVR supports two LAN ports select to use failover load balancing or standalone settings To use these features make sure both LAN ports are connected to the network ...

Страница 160: ...the capability of switching over the network transfer port to the redundant port automatically when the primary one fails due to hardware or connection error to avoid network disconnection When the primary network port resumes the connection the network transfer will be switched over to that port automatically ...

Страница 161: ...rates on layer 3 protocol IP NCP IPX only Multicast broadcast and other non routable protocols such as NetBEUI can only be transferred via the main network port Note To optimize the network transfer speed of the NVR in load balancing mode use a managed Ethernet switch and enable 802 3ad or link aggregation on the ports of the switch that the Gigabit LAN ports of the NVR are connected to ...

Страница 162: ... IP settings for each network port The NVR can be accessed by different workgroups on two different subnets When load balancing is enabled failover does not work The DHCP server can only be enabled for the primary network port LAN 1 ...

Страница 163: ...ides the DNS service for the NVR on the external network Secondary DNS Server Enter the IP address of the secondary DNS server that provides the DNS service for the NVR on the external network Enable DHCP Server If no DHCP server is available on the LAN where the NVR locates enable the NVR as a DHCP server to allocate dynamic IP address to the DHCP clients on the LAN Set a range of IP addresses al...

Страница 164: ... IP address of the server To enable the DDNS service register a DDNS account from a DDNS provider Please refer to Appendix A for details The NVR currently supports the DDNS service provided by 1 DynDNS http www dyndns org 2 OSD http ods org 3 DHS http www dhs org 4 DyNS http www dyns cx 5 http www 3322 org 6 No IP http www no ip com 7 http ipcam jp 8 http www nwcam jp ...

Страница 165: ...se the default port range 55536 56559 or specify a port range larger than 1023 When using this function make sure the ports on the router or firewall have been opened Respond with external IP address for passive FTP connection request When passive FTP connection is in use and the NVR is configured behind a router enable this function to allow connection to the NVR on WAN By enabling this function ...

Страница 166: ...ver 1 Allow all connections Default setting Allow the connection from all the hosts to the server 2 Allow connections from the list only Allow the connection from the hosts specified on the list only Note When this function is enabled only the specified IP on the list will be able to find and connect to the NVR 3 Deny connections from the list Deny the connection from the hosts or IP specified on ...

Страница 167: ...ndardized packet format for delivering real time audio and video data of the IP cameras on the Internet The real time data transfer is monitored and controlled by RTP also RTCP The default setting is 6100 6299 If the IP cameras use different RTP ports enable Specify RTP port range and specify the port numbers Note Make sure the ports have been opened on the router or firewall to ensure normal moni...

Страница 168: ...168 6 3 6 View Network Settings View the current network settings and the status of the NVR in this section ...

Страница 169: ...ive s installed on the NVR Other options include formatting the hard disks and viewing the status and scanning the hard drive bad blocks When the hard disks are formatted the NVR will create the following default share folders record_nvr The network share for saving regular recording files record_nvr_alarm The network share for saving alarm recording files snapshot The network share for saving sna...

Страница 170: ...on Applied NVR Models Single disk volume All models RAID 1 JBOD just a bunch of disks 2 bay models or above RAID 5 RAID 6 RAID 5 hot spare 4 bay models or above RAID 6 hot spare 5 bay models or above Note Do NOT turn off the server or unplug any hard drives when RAID rebuilding is in process ...

Страница 171: ...es RAID 0 Striping Disk Volume RAID 0 striping disk combines 2 or more hard disk drives into one larger volume The data is written to the hard disk drives without any parity information and no redundancy is offered The total storage capacity equals to the sum of the capacity of all the member drives RAID 1 Mirroring Disk Volume RAID 1 duplicates the data between two hard disk drives to provide dis...

Страница 172: ...d disks are required The storage capacity of a RAID 5 array equals N 1 size of smallest hard drive N is the total number of hard drive members in the array RAID 6 Disk Volume The data are striped across all the drives in a RAID 6 array RAID 6 differs from RAID 5 that a second set of parity information is stored across the member drives in the array It tolerates failure of two member drives To crea...

Страница 173: ...ration by replacing the member drives one by one This option is supported by RAID 1 RAID 5 or RAID 6 configurations Add hard drive This function enables adding new drive member to a RAID configuration It is supported by RAID 5 configuration Migrate This function enables a drive configuration to be migrated to a different RAID configuration Use this feature to Migrate a single drive to RAID 1 5 or ...

Страница 174: ...ng or removing a spare drive from a RAID 5 configuration The options available are Add a spare drive to a RAID 5 configuration Remove a spare drive from a RAID 5 configuration For detailed operation instructions click Comment on the management interface ...

Страница 175: ... 6 4 3 USB Disk The NVR supports data backup to the external USB storage devices Connect the USB storage device to the USB port of the NVR when the device is successfully detected the details will be shown ...

Страница 176: ...s on the rear side of the NVR Enable UPS Support Select this option to enable the UPS support Enter the time the NVR should wait before shutting down after the AC power fails In general the UPS can supply the power for 5 10 minutes when AC power fails depending on the maximum load and the number of connected devices UPS Model Select the UPS model on the list If the UPS is not available on the list...

Страница 177: ...ights to create and delete new administrators system managers and general users and change their passwords Other newly created administrators have the rights of system administration monitoring and playback but some rights are different from admin and supervisor Please refer to Chapter 6 5 4 for more details 2 system manager The default system manager account is sysmgr default password admin This ...

Страница 178: ...178 3 user The general users have only the rights of monitoring and video playback They have no administration authority Please refer to Chapter 6 5 4 for more details ...

Страница 179: ...re number or contain the following characters Password The password is case sensitive and supports maximum 16 characters It is recommended to use a password of at least 6 characters Select user type Define the user as an administrator system manager or general user Camera Access Control Assign the rights of monitoring video audio playback and PTZ control to the user Note Please refer to Chapter 6 ...

Страница 180: ...ssign the rights of system administration and camera access to the user However the user name cannot be changed 6 5 3 Delete User To delete a user select the user on the list and click Delete Click OK to confirm Note The system administrator admin supervisor sysmgr cannot be deleted ...

Страница 181: ...ers User 1 Create new admin account Default Default No No No No 2 Create new supervisor account Default Default No No No No 3 Create new administrator accounts Yes Yes Yes No No No 4 Delete other administrator accounts Yes Yes No Note 1 No No No 5 Change the password of admin Yes No No No No No 6 Change the password of supervisor No Yes No No No No 7 Change the password of other administrators Yes...

Страница 182: ... Delete other system manager accounts Yes Yes Yes Yes No Note 1 No 18 Change the password of sysmgr Yes Yes Yes No Note 2 No No 19 Change the password of other system managers Yes Yes Yes Yes No Note 2 No 20 Change the user type of sysmgr No No No Default No No 21 Change the user type of other system managers Yes Yes Yes Yes No No 22 Change the camera access control of sysmgr No No No No No No 23 ...

Страница 183: ...r 27 Change the user type of normal users Yes Yes Yes Yes No No 28 Change the camera access control of normal users Yes Yes Yes Yes Yes No 29 System administration Yes Yes Yes Yes Yes No 30 Monitoring Yes Yes Yes No No Default 31 Playback Yes Yes Yes No No Default 32 Open data encryption password Yes Yes No No No No ...

Страница 184: ...low the steps below to configure the IP cameras 1 Select a camera number 2 Select the camera brand 3 Select the camera model 4 Enter the camera name 5 Enter the IP address or domain name of the camera 6 Enter the user name and the password to login the camera 7 Select to enable the recording or not 8 Click Apply to save the settings ...

Страница 185: ...by the CGI command The NVR provides an interface for the users to enter the JPEG CGI command of the IP cameras in order to receive the video and audio streaming data from the IP cameras and monitor record and playback the video of the IP cameras on the NVR Follow the steps below to configure the IP camera 1 Select the IP camera number 2 Select Generic Model for the camera brand 3 Select Generic JP...

Страница 186: ...186 Note The NVR only supports JPEG CGI command interface but does not guarantee the compatibility with all the IP camera brands ...

Страница 187: ...rding Note that the frame rate of the IP camera may be affected by the network traffic 4 Quality Select the image quality for the recording More disk space is required to save higher quality recording 5 Audio recording optional To enable the audio recording click Enable audio recording on this camera 6 Estimated storage space for recording The number of the estimated storage space for recording is...

Страница 188: ...ecordings configured in Camera Settings Advanced Settings 10 Enable auto snapshot Select this option and the settings will be displayed Configure up to 15 schedules for automatic snapshot taking or specify the number of snapshots max 60 the NVR should take every hour The snapshots are saved to the share folder of the NVR by default Specify a remote server to where the files will be saved Read writ...

Страница 189: ...e and time and click Add Click Apply to save the settings for the particular IP camera or click Apply to all cameras to apply the settings to all the IP cameras To delete a schedule click Remove on the schedule list Note Up to 15 schedules can be added All the settings will not take effect until Apply is clicked When applying the changes the recording will stop for a while maximum 1 minute and the...

Страница 190: ...e alarm settings The video recording will be activated when the alarm input of the selected channel is triggered or a moving object is detected When the option Activate alarm recording only on selected schedule is enabled the alarm recording will be activated only when the alarm input is triggered or a moving object is detected within the schedule Test the settings by clicking Test Click Apply to ...

Страница 191: ...process will stop for a while maximum 1 minute and then restart To avoid blocking by the firewall the IP cameras or the video servers configured for alarm recording must be located on the same subnet as the NVR To switch from traditional mode to advanced mode select Advanced Mode and click Go to the settings page ...

Страница 192: ...apply the settings or Exit to exit the settings page If the Advanced Mode is selected on the Alarm Settings page the advanced settings will be applied after the NVR restarts even if you have selected to exit the settings page The settings will be cancelled if Traditional Mode is selected after exiting the Advanced Mode To avoid blocking by the firewall the IP cameras or the video servers configure...

Страница 193: ...ed events Note The camera events available depend on the features supported by the IP cameras or video servers Button Description Add an external event This button is not applicable to the camera events and the NVR events Edit an event This button cannot be used to edit camera disconnection Delete an external event This button is not applicable to the camera events and the NVR events ...

Страница 194: ...when the alarm input of the IP camera or the video server is triggered Select Camera event from the Event List Locate the channel which supports alarm input and click Alarm Input Next click the edit button enable this option configure the settings and click Apply Set the schedule to define the active period of the alarm settings After that define the action on the right discussed in the later sect...

Страница 195: ...ton enable this option configure the settings and click Apply Set the schedule to define the active period of the alarm settings and define the action on the right discussed in the later sections 3 Alarm event The alarm input and the motion detection settings of some IP cameras or video servers may be combined together and called Alarm Event on the Event List Edit the event settings and define the...

Страница 196: ...er that define the action on the right discussed in the later sections 5 Recording failure NVR event This option allows the NVR to trigger an action when the video recording of the IP camera or the video server fails due to the hard disk bad blocks file system crash or other reasons Select NVR event from the Event List Click Recording failure Then define the action settings on the right discussed ...

Страница 197: ...ting an event click the event name and define the action on the right discussed in the later sections After configuring the action settings enter the CGI command including the self defined event name in the web browser Internet Explorer to trigger the action anytime The format of the CGI command is http NVRIP cgi bin logical_input cgi name event name For example http 10 8 12 12 80 cgi bin logical_...

Страница 198: ... byte characters spaces and symbols are allowed Select the day and time when the alarm settings should be active Click to add a schedule or to delete a schedule Up to 6 settings can be defined for each schedule The settings will be shown on the graphical table Click Apply to save the settings To use the same schedule for all the events click Apply to All Events Select to use the default schedule o...

Страница 199: ...se to the event Click Apply to save the settings Edit an action Select an event on the left All the actions defined for this event will be shown Select the box in front of the action name to edit Then click this button on the Action column to edit the action settings Delete an action Select an event on the left All the actions defined for this event will be shown Select the box in front of the act...

Страница 200: ...200 ...

Страница 201: ...ording when the event ends The option ii is applicable to the duration events only A duration event is an event with the start and end time and lasts for a period of time It does not include the events related to status change such as camera disconnection or NVR recording failure If the action is triggered by a duration event and both settings i ii are enabled the NVR will execute the second setti...

Страница 202: ...o the HTTP URL entered when an event is triggered Select a preset position from the drop down menu or enter the HTTP URL Click Select from the list to select an action setting which has been configured before Note The preset names will appear only after the preset settings of the PTZ cameras have been configured ...

Страница 203: ...ii Activate the alarm device when the event starts and stop the alarm device when the event ends The option ii is applicable to the duration events only A duration event is an event with the start and end time and lasts for a period of time It does not include the events related to status change such as camera disconnection or NVR recording failure Click Select from the list to select an action se...

Страница 204: ...ggered enter the SMTP settings Multiple email addresses can be entered as the recipients Snapshots of multiple channels IP cameras video servers can be attached to the alert emails Click Select from the list to select an action setting which has been configured before ...

Страница 205: ...tings The default SMS service provider is Clickatell To add other SMS service providers click Add and enter the provider s name and the URL template text Click Select from the list to select an action setting which has been configured before Note Always follow the standard of the SMS service provider to receive the SMS properly ...

Страница 206: ...option ii is applicable to the duration events only A duration event is an event with the start and end time and lasts for a period of time It does not include the events related to status change such as camera disconnection or NVR recording failure If the action is triggered by a duration event and both settings i ii are enabled the NVR will execute the second setting ii only Click Select from th...

Страница 207: ...er the login account and password IP address port and the HTTP URL of other surveillance devices to manage the devices such as fire protection devices power controller and air conditioning control Click Select from the list to select an action setting which has been configured before ...

Страница 208: ...ast day s Specify the number of days that alarm recordings will be retained Remove recordings after day s Enter the number of calendar days for the NVR to keep the recording files Please make sure the storage capacity is enough to save the data for the number of calendar days specified When the recording data has reached the expiry date all the expired video files will be deleted For example if th...

Страница 209: ...s Stop video recording second s after the event ends Enter the number of seconds to stop the recording after an event ends The maximum number of seconds for the above settings is 300 i e 5 minutes Note All the settings will be effective only after clicking Apply When applying the changes the recording will stop for a while maximum 1 minute and then restart ...

Страница 210: ... map and run the ping test 6 7 1 Alert Notification Enter the email address of the administrator and the IP address of the SMTP server When an error occurs e g power outage or a hard disk drive is unplugged an alert email will be sent to the specified recipients automatically To view the details of all the errors and warnings go to Logs Statistics System Event Logs Note It is recommended to send a...

Страница 211: ... drop down menu When Add SMS service provider is selected enter the name of the SMS provider and the URL template text Note Always follow the standard of the SMS service provider to receive the SMS properly Send a test SMS to verify the settings are correct When the Advanced mode is in use in the Alarm Settings this page will become inactive Go to Camera Settings Alarm Settings Advanced Mode to ed...

Страница 212: ...212 ...

Страница 213: ...213 6 7 3 Restart Shut Down Follow the steps below to restart or shut down the server 1 Go to System Tools Restart Shutdown 2 Click Restart to reboot the server or Shut Down to turn off the NVR ...

Страница 214: ... administrator password and system settings to default Note The configuration reset switch is enabled by default When this option is disabled keep the password safely Otherwise the NVR cannot be reset anymore if the password is lost Auto power on when power resumes after power loss When this function is enabled the server will turn on automatically when the power resumes after a power loss ...

Страница 215: ...emove the device Note The video backup function supports only the USB devices of 10GB storage capacity or above This function is not supported by the VS 8040U RP VS 8032U RP VS 8024U RP Enable light signal alert when the free size of SATA disk is less than the value The status LED flashes red and green when this function is enabled and the free space of the hard disk drive s on the NVR is less tha...

Страница 216: ...e QNAP website http www qnapsecurity com Read the release notes carefully to make sure it is necessary to update the firmware 2 Download and unzip the firmware file to the local computer 3 Before updating the system firmware it is strongly suggested to back up all the disk data on the NVR to avoid any potential data loss during the system update 4 Click Browse to select the correct firmware image ...

Страница 217: ...ttings click Browse to select a previously saved setting file and click Restore To reset all the settings to default click Reset All the disk data will be deleted Caution When the Reset button is clicked all the drive data user accounts network shares and the system settings will be cleared and restored to default Please make sure all the important data and the system settings have been backed up ...

Страница 218: ...ed storage NAS The remote QNAP NAS is hereafter referred to as the remote storage device Note Before using this function make sure the Microsoft networking service of the remote storage device is enabled and the corresponding path and user access right have been correctly configured 1 Login the NVR and go to System Tools Remote Replication ...

Страница 219: ... storage device If this option is unselected the NVR will back up all the recording data to the remote storage device Select Back up the recordings of the latest day s only and enter the number of days the NVR will back up the latest recording data to the remote storage device automatically according to the settings If this option is unselected the NVR will copy all the recording data to the remot...

Страница 220: ... Select Perform mirroring replication by deleting extra files on the remote replication the NVR will synchronize the recording data between itself and the remote storage device and delete any extra files on the remote storage device When the above options are all selected and remote replication is executed the NVR will do the following i The NVR checks if there are files on the remote storage devi...

Страница 221: ...al error occurred View the hard drive status of the NVR or view the Event Logs Note The time required by the NVR to replicate the data to the remote storage device varies depending on the network environment If the remote replication takes too long some recording files may be overwritten by the NVR To avoid this it is recommended to refer to the status messages to analyze the time required for the...

Страница 222: ...ation Displays the hard disk drive details such as the model the serial number and the drive capacity SMART information Displays the hard disk drive S M A R T The items of which the values are lower than the threshold are regarded as abnormal Test To perform a quick or complete hard drive S M A R T test and display the results Settings To configure the temperature alarm When the hard drive tempera...

Страница 223: ...223 6 7 9 Ping Test To test the connection to an IP address enter the IP address and click Test ...

Страница 224: ...of the NVR when the idling time has reached To allow guest access to the monitoring screen of the NVR by local display select Enable anonymous access Note The timeout logoff does not apply to the monitoring playback advanced mode device configuration system update remote replication and logs statistics pages ...

Страница 225: ...um 10 000 recent event logs including warning error and information messages In case of system malfunction the event logs only in English can be retrieved to analyze the system problems Click Save to save the logs as a CSV file Note The logs are only available in English ...

Страница 226: ...226 6 8 2 Surveillance Logs This page shows the surveillance logs such as camera connection motion detection and camera authentication failure Note The logs are only available in English ...

Страница 227: ...ame IP address and login time Note The logs are only available in English 6 8 4 Historical Users List This page shows the information of the users who have logged in the system including the user name IP address login time and the services they have accessed etc Note The logs are only available in English ...

Страница 228: ... are recorded on this page Select to start or stop the logging The file transfer performance may be slightly affected by enabling the event logging Note The logs are only available in English 6 8 6 System Information This page shows the system information such as the CPU usage memory and system temperature ...

Страница 229: ...strator password and the network settings press the reset button of the server for five seconds A beep sound will be heard After resetting the system login the server with the default user name and password Default user name admin Password admin Note To reset the system by the reset button the option Enable configuration reset switch in the Hardware Settings must be activated ...

Страница 230: ...n This function is not supported by the one bay NVR models When a hard drive of a RAID configuration fails the failed hard drive can be replaced by a new one immediately without shutting down the server and the recording data can be reserved However if the hard drives are working properly and the recording is in process do not hot swap the hard drives to avoid damage to the hard drives or to the r...

Страница 231: ...E 3 1 6 9 2 5 4 1 0 0 1 0 0 For the first time installation the LCD panel shows the number of the hard disk drives detected and the IP address Configure the hard drives accordingly Number of hard drives detected Default disk configuration Available disk configuration options 1 Single Single 2 RAID 1 Single JBOD RAID 0 RAID 1 3 RAID 5 Single JBOD RAID 0 RAID 5 4 or above RAID 5 Single JBOD RAID 0 R...

Страница 232: ...ions e g RAID 6 Press the Enter button and the following message shows Press the Select button to select Yes to confirm C h o o s e R A I D 5 Y e s N o When the configuration has finished the server name and the IP address will be shown If the NVR fails to create the disk volume the following message will be shown C r e a t i n g R A I D 5 F a i l e d ...

Страница 233: ...e 4 System 5 Shut down 6 Reboot 7 Password 8 Back 1 TCP IP In TCP IP the following options are available 1 1 LAN IP Address 1 2 LAN Subnet Mask 1 3 LAN Gateway 1 4 LAN PRI DNS 1 5 LAN SEC DNS 1 6 Enter Network Settings 1 6 1 Network Settings DHCP 1 6 2 Network Settings Static IP 1 6 3 Network Settings BACK 1 7 Back to Main Menu In Network Settings Static IP configure the IP address subnet mask gat...

Страница 234: ...RAID configuration and storage capacity the second line shows the member drive number of the configuration R A I D 5 7 5 0 G B D r i v e 1 2 3 4 If there is more than one volume press the Select button to view the information The following table shows the description of the LCD messages for the RAID 5 configuration LCD Display Drive configuration RAID5 S RAID5 spare RAID5 D RAID 5 degraded mode RA...

Страница 235: ...option to restart the NVR Press the Select button to select Yes Then press the Enter button to confirm 7 Password The default password of the LCD panel is blank Enter this option to change the password of the LCD panel Select Yes to continue C h a n g e P a s s w o r d Y e s N o Enter a password of maximum 8 numeric characters 0 9 When the cursor moves to OK press the Enter button Verify the passw...

Страница 236: ...ystem fan fails Sys Overheat The system overheats HDD Overheat The hard drive overheats CPU Overheat The CPU overheats Network Lost Both LAN 1 and LAN 2 are disconnected in failover or load balancing mode LAN1 Lost LAN 1 is disconnected LAN2 Lost LAN 2 is disconnected HDD Failure The hard drive fails Vol1 Full The volume is full HDD Ejected The hard drive is ejected Vol1 Degraded The volume is in ...

Страница 237: ...other subnet the monitoring screen cannot be viewed from the PC Solve the problems by the following methods Method 1 Enter the IP address of the IP camera as the WAN IP on the NVR Method 2 Configure the router to allow internal access to the public IP address and the mapped ports of the IP cameras 3 The recording is not working properly a Install the hard drive s correctly in the NVR b Make sure e...

Страница 238: ...ing Panasonic BB HCM311 cameras the camera firmware must be upgraded to v1 3 for the alarm recording to work properly c If the NVR is installed behind a router while the IP camera is not the alarm recording will not work d When the alarm recording is enabled make sure the number of days that the alarm recordings will be retained have been specified in Camera Settings Advanced Settings Otherwise th...

Страница 239: ...iguration did not take effect After changing the settings on the administration page click Apply to apply the changes 12 The monitoring page cannot be fully displayed in Internet Explorer When using the zooming function of Internet Explorer 7 the page may not be displayed properly Please click F5 to refresh the page 13 I cannot use the SMB FTP and Web File Manager services of the NVR a Login the N...

Страница 240: ...the DDNS service provided by DynDNS Configure and activate the DDNS service to enable the Internet users to connect to the NVR by this dynamic domain name When the ISP assigns a new WAN IP address the NVR will update the new address to the DynDNS server automatically ...

Страница 241: ...name This guide is for reference only If there are any changes please refer to the instructions or the documents on the web site 1 Visit http www dyndns org Click Sign In and Create an Account to register a DynDNS account 2 Enter the information required Then click Create Account ...

Страница 242: ...242 3 A confirmation email will be sent to the registered email address 4 Click the link in the email to confirm the registration ...

Страница 243: ...243 5 Click Confirm Account and login DynDNS 6 Register a host name for the NVR A host name is a unique name that identifies the server Then click Add ...

Страница 244: ...244 7 Activate the host name The DDNS host name is ready for use You can now login the NVR and set up the DDNS service ...

Страница 245: ... IP camera and the monitoring PC are all on the same network IP address NVR 192 168 1 1 PC 192 168 1 100 Camera 1 192 168 1 101 Camera 2 192 168 1 102 Camera 3 192 168 1 103 In the example add the IP cameras to the NVR by entering the IP addresses of the IP cameras ...

Страница 246: ...lled behind the router while the monitoring PC is located remotely IP address Mapped port on the router NVR 192 168 1 1 8000 Camera 1 192 168 1 101 8001 Camera 2 192 168 1 102 8002 Camera 3 192 168 1 103 8003 Router public IP 219 87 144 205 PC 10 8 10 100 ...

Страница 247: ...ess settings Note When configuring the IP camera the WAN IP and LAN IP must be entered To open FTP port 21 and SMB port 445 of the NVR on WAN configure the following port mapping settings From Forward to 219 87 144 205 21 192 168 1 1 21 219 87 144 205 139 192 168 1 1 139 219 87 144 205 445 192 168 1 1 445 After finishing the above two steps connect to the NVR on WAN by entering the IP address http...

Страница 248: ... 87 144 205 Camera 1 61 62 100 101 Camera 2 61 62 100 102 Camera 3 61 62 100 103 In this example add the IP camera to the NVR by adding its IP address to the IP Address settings Note If a particular port is assigned to connect to the IP camera specify the port in the system configuration ...

Страница 249: ... 2003 192 168 1 103 21 Connect to NVR 1 by ftp 219 87 145 205 2001 Connect to NVR 2 by ftp 219 87 145 205 2002 Connect to NVR 3 by ftp 219 87 145 205 2003 Step 2 Enable FTP port mapping on the NVR To connect to each NVR via FTP by clicking FTP on the playback page of each NVR enable FTP port mapping in Network Settings File Services on the system administration page and set the mapped port number ...

Страница 250: ...rt http www qnapsecurity com onlinesupport asp MSN q support hotmail com Skype qnapskype Forum http forum qnapsecurity com Technical Support in the USA and Canada Email q_supportus qnap com TEL 909 595 2819 Address 166 University Parkway Pomona CA 9176 Service Hours 08 00 17 00 GMT 08 00 Pacific Time Monday to Friday ...

Страница 251: ... referring to freedom not price Our General Public Licenses are designed to make sure that you have the freedom to distribute copies of free software and charge for them if you wish that you receive source code or can get it if you want it that you can change the software or use pieces of it in new free programs and that you know you can do these things To protect your rights we need to prevent ot...

Страница 252: ...L as needed to protect the freedom of users Finally every program is threatened constantly by software patents States should not allow patents to restrict development and use of software on general purpose computers but in those that do we wish to avoid the special danger that patents applied to a free program could make it effectively proprietary To prevent this the GPL assures that patents canno...

Страница 253: ...e interface presents a list of user commands or options such as a menu a prominent item in the list meets this criterion 1 Source Code The source code for a work means the preferred form of the work for making modifications to it Object code means any non source form of a work A Standard Interface means an interface that either is an official standard defined by a recognized standards body or in t...

Страница 254: ...he output from running a covered work is covered by this License only if the output given its content constitutes a covered work This License acknowledges your rights of fair use or other equivalent as provided by copyright law You may make run and propagate covered works that you do not convey without conditions so long as your license otherwise remains in force You may convey covered works to ot...

Страница 255: ...odified Source Versions You may convey a work based on the Program or the modifications to produce it from the Program in the form of source code under the terms of section 4 provided that you also meet all of these conditions a The work must carry prominent notices stating that you modified it and giving a relevant date b The work must carry prominent notices stating that it is released under thi...

Страница 256: ... is covered by this License on a durable physical medium customarily used for software interchange for a price no more than your reasonable cost of physically performing this conveying of source or 2 access to copy the Corresponding Source from a network server at no charge c Convey individual copies of the object code with a copy of the written offer to provide the Corresponding Source This alter...

Страница 257: ... work in that User Product from a modified version of its Corresponding Source The information must suffice to ensure that the continued functioning of the modified object code is in no case prevented or interfered with solely because modification has been made If you convey an object code work under this section in or with or specifically for use in a User Product and the conveying occurs as part...

Страница 258: ... You may place additional permissions on material added by you to a covered work for which you have or can give appropriate copyright permission Notwithstanding any other provision of this License for material you add to a covered work you may if authorized by the copyright holders of that material supplement the terms of this License with terms a Disclaiming warranty or limiting liability differe...

Страница 259: ...except as expressly provided under this License Any attempt otherwise to propagate or modify it is void and will automatically terminate your rights under this License including any patent licenses granted under the third paragraph of section 11 However if you cease all violation of this License then your license from a particular copyright holder is reinstated a provisionally unless and until the...

Страница 260: ...transaction who receives a copy of the work also receives whatever licenses to the work the party s predecessor in interest had or could give under the previous paragraph plus a right to possession of the Corresponding Source of the work from the predecessor in interest if the predecessor has it or can get it with reasonable efforts You may not impose any further restrictions on the exercise of th...

Страница 261: ...ange in a manner consistent with the requirements of this License to extend the patent license to downstream recipients Knowingly relying means you have actual knowledge that but for the patent license your conveying the covered work in a country or your recipient s use of the covered work in a country would infringe one or more identifiable patents in that country that you have reason to believe ...

Страница 262: ...veying the Program 13 Use with the GNU Affero General Public License Notwithstanding any other provision of this License you have permission to link or combine any covered work with a work licensed under version 3 of the GNU Affero General Public License into a single combined work and to convey the resulting work The terms of this License will continue to apply to the part which is the covered wo...

Страница 263: ...CTIVE YOU ASSUME THE COST OF ALL NECESSARY SERVICING REPAIR OR CORRECTION 16 Limitation of Liability IN NO EVENT UNLESS REQUIRED BY APPLICABLE LAW OR AGREED TO IN WRITING WILL ANY COPYRIGHT HOLDER OR ANY OTHER PARTY WHO MODIFIES AND OR CONVEYS THE PROGRAM AS PERMITTED ABOVE BE LIABLE TO YOU FOR DAMAGES INCLUDING ANY GENERAL SPECIAL INCIDENTAL OR CONSEQUENTIAL DAMAGES ARISING OUT OF THE USE OR INAB...

Страница 264: ...264 ...

Отзывы: