187
6.6.2
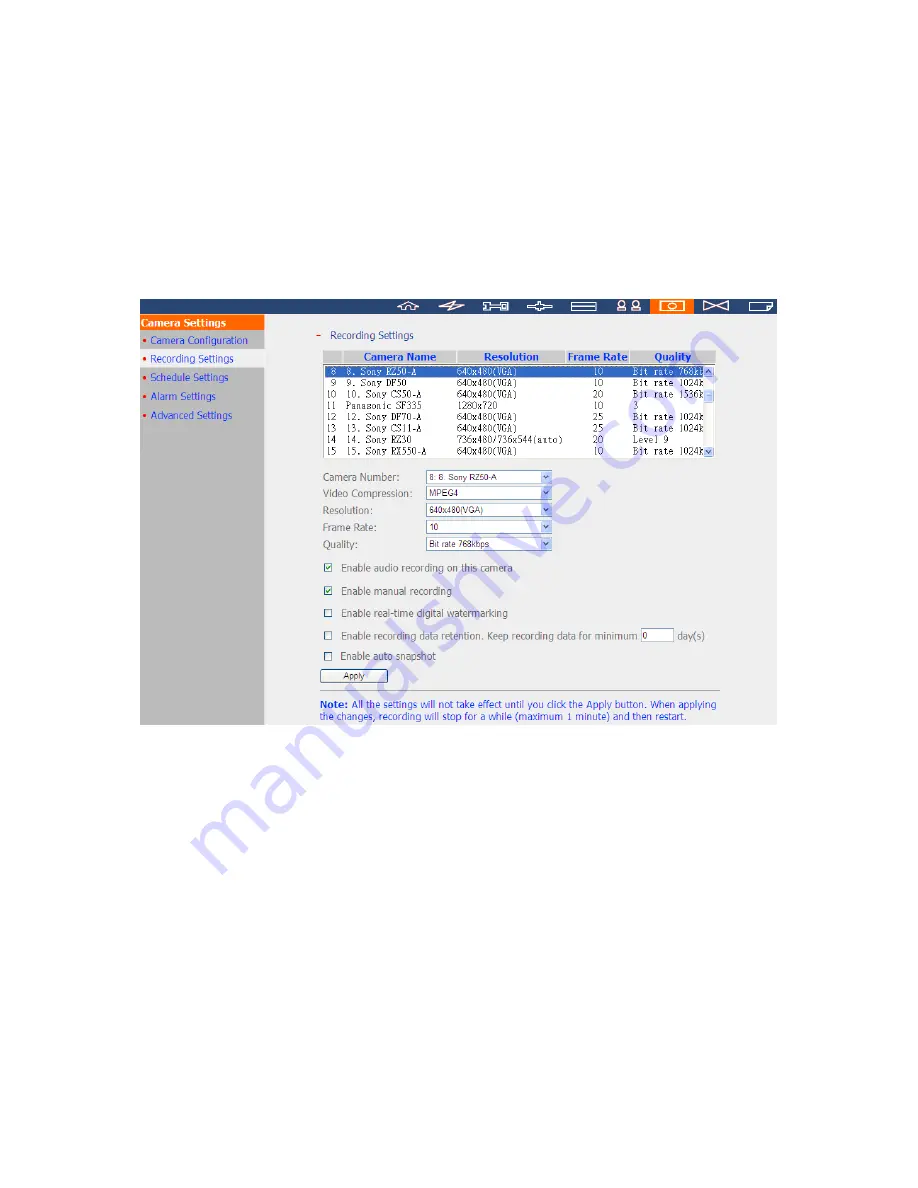
Recording Settings
Select a camera on the list and configure the recording resolution, frame rate, and quality.
Enable audio recording, manual recording, recording data retention, real-time digital
watermarking, and auto snapshot settings. Click ‘Apply’ to save the settings.
1.
Video compression: Choose a video compression format for the recording.
2.
Resolution: Select the recording resolution.
3.
Frame rate: Adjust the frame rate for the recording. Note that the frame rate of the
IP camera may be affected by the network traffic.
4.
Quality: Select the image quality for the recording. More disk space is required to
save higher quality recording.
5.
Audio recording (optional): To enable the audio recording, click ‘Enable audio
recording on this camera’.
6.
Estimated storage space for recording: The number of the estimated storage space for
recording is only for reference. The actual space required depends on the network
environment and the camera performance.
7.
Manual recording: To allow manual activation and deactivation of manual recording
function on the monitoring page, enable this option.
Содержание VIOSTOR NVR
Страница 73: ...73 ...
Страница 80: ...80 ...
Страница 90: ...90 Enter the map name and select the file The E map must be in JPEG format Click OK The E map will be shown ...
Страница 95: ...95 4 3 6 Enable Disable Event Alert To enable event alert on an E map click ...
Страница 103: ...103 2 The following dialog will be shown To add more NVR servers for playback click Edit ...
Страница 109: ...109 ii Click the Event entry tab iii Select the event type ...
Страница 111: ...111 vii The events will be shown Click OK ...
Страница 115: ...115 2 Browse and select the video files from the computer ...
Страница 116: ...116 3 The playlist will be shown Click Play to play the videos ...
Страница 118: ...118 5 To control all the playback windows at the same time click to enable Control All Views ...
Страница 121: ...121 6 The video files will be divided evenly by 16 windows ...
Страница 128: ...128 2 When the video files are shown on the playlist click and specify the IVA settings for video search ...
Страница 132: ...132 9 Click Search to start searching the video by IVA The results will be shown ...
Страница 135: ...135 2 If no NVR servers or IP cameras are shown click Edit to add an NVR server manually ...
Страница 153: ...153 7 Click Start Installation to apply the changes and initialize the system ...
Страница 157: ...157 6 2 3 View System Settings View the system settings such as the server name on this page ...
Страница 168: ...168 6 3 6 View Network Settings View the current network settings and the status of the NVR in this section ...
Страница 200: ...200 ...
Страница 212: ...212 ...
Страница 223: ...223 6 7 9 Ping Test To test the connection to an IP address enter the IP address and click Test ...
Страница 244: ...244 7 Activate the host name The DDNS host name is ready for use You can now login the NVR and set up the DDNS service ...
Страница 264: ...264 ...


