


6
1.1 Introduction
This manual explains how to install and configure your TAB10b device. It explains also how to install a third party APK and make a AQS operating
system upgrade.
Content of the package
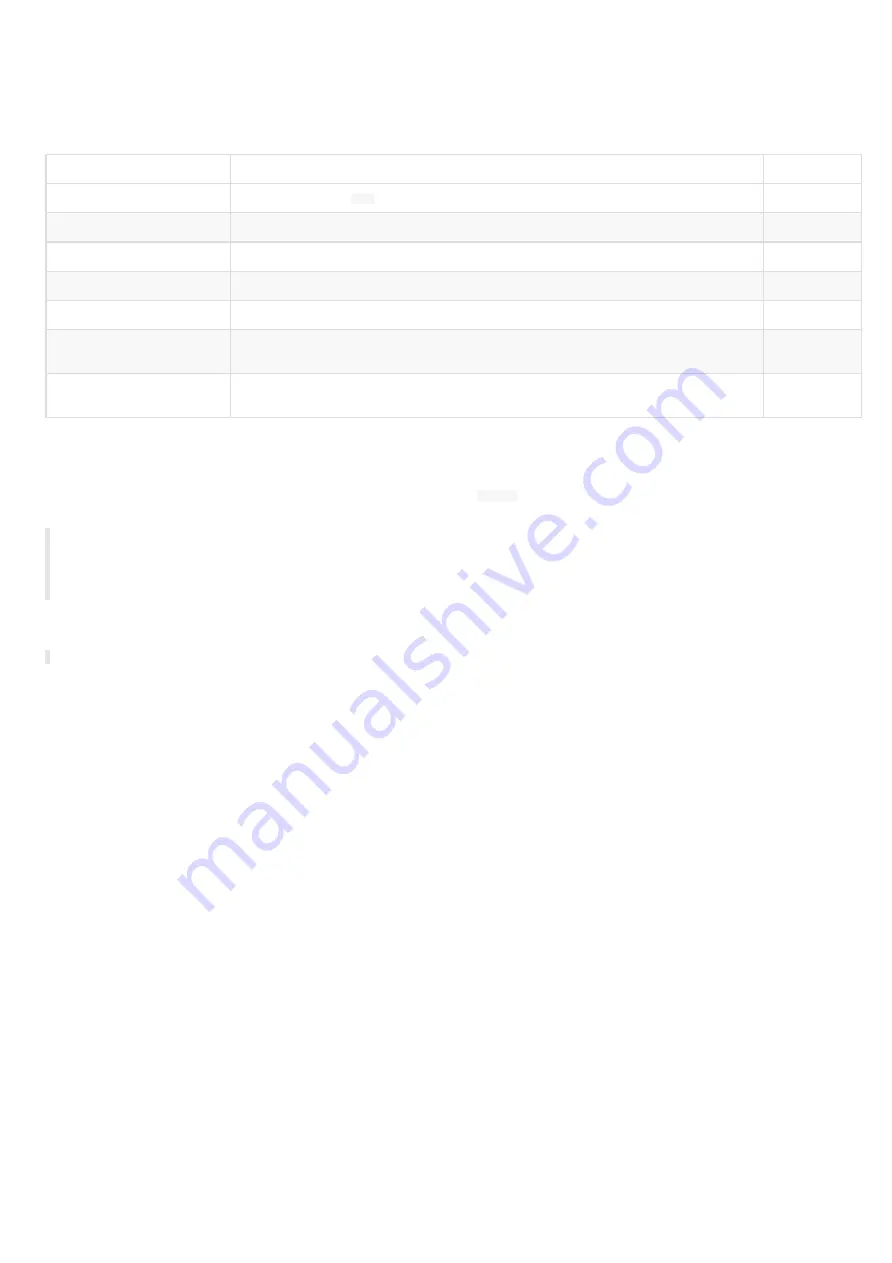
Items
Description
Quantity
Device
TAB10b device with
AQS
embedded
1
Screen protection film
Stuck on the screen
1
Mounting bracket
Bracket for wall mounting
1
Drilling pattern leaflet
Drilling pattern
1
Screws
M2 x 35 mm (1,37 ") slotted countersunk screw (DIN 963) - a2 stainless steel
2
Adhesive tape
3M double sided tape 4905, material: VHB
W x H x D: 65 mm (2.56 ") x 19 mm (0.75 ") x 0.5 mm (0.02 ")
2
Pads
3M single sided tape, material: silicone
∅: 8 mm (0,314 "), D: 1 mm (0,039 ")
4
Recommendations and warnings
This device is designed to be used indoor and can work 24/7.
The device is delivered without a power supply unit. Depending on your needs,
Qeedji
is making recommendation for suitable power supply
references in the chapter §
◬
Before supply the TAB10b device with the USB connector of your computer, check with your computer's manufacturer that the USB
connectors is suitable to deliver a sufficient power.
◬
In case you had to remove the micro SD card, ensure first that the TAB10b device is powered off before removing or inserting the micro SD
card. In case of bad handling, the micro SD card replacement would not be covered by the warranty.
This device is a Class A device. In a residential environment, this device may cause radio interference. In this case, the user is asked to take
appropriate measures.
☛
In this documentation, the unit of measurement for dimensions is done in millimeters followed by its equivalent value in inches.
Содержание TAB10b
Страница 1: ...User manual TAB10b 9 10 18 001A TAB10b 8 30...
Страница 5: ...5 Part I Description and installation...
Страница 10: ...10 1 3 1 Device dimensions...
Страница 13: ...13...
Страница 26: ...26 Part II System con guration...
Страница 42: ...42 This message is then displayed until the device is rebooting automatically once...
Страница 50: ...50 Part III Applicative user interface...
Страница 52: ...52 Part IV Administration console user interface...
Страница 63: ...63...
Страница 95: ...95 Part V Technical information...
Страница 99: ...99 5 3 Antenna return loss This is the return loss diagram for the WIFI Bluetooth antenna...
Страница 101: ...101 Part VI Contacts...
Страница 103: ...103 Part VII Appendix...
Страница 132: ...132 Scroll to the bottom and click on the Power BI Service button Select then the Delegated permissions button...


