background image

Assembly 

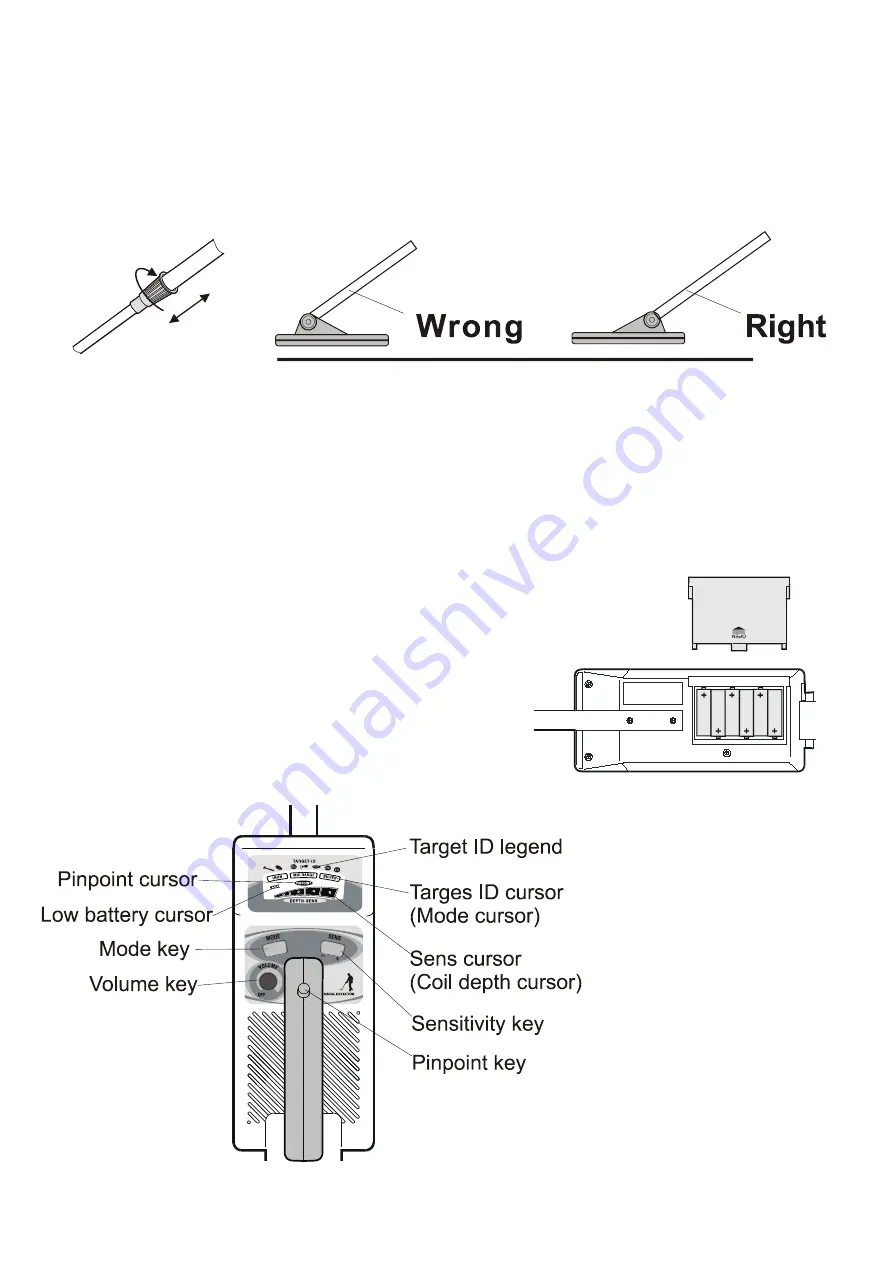
Wind the cable around the aluminum tube arm, keep the elastic moderately tight/loose, so that the cable 
won’t sway or interfere with operation and clothing. Tighten appropriately the two ends nuts, and adjust the 
search coil location to let the search coil be parallel with the ground. Be careful not to mistake the search 
coil location. 

Battery 

Please use 6 Alkaline 'AA' batteries. 
Slide the cover labeled    “OPEN”    on the battery tray cover slot in the direction of the arrow, to pull out 
the battery cover. Then insert the 6 x 'AA' batteries into the compartment as indicated by the polarity 
symbols marked inside the compartment. Be sure to observe proper polarity when inserting batteries. 

Once the batteries are inserted correctly, replace the battery cover. 
You will hear a beep tone. Don’t mix the new and old batteries. 

Control Panel and LCD screen 

www.PyleAudio.com 

Содержание PHMD55

Страница 1: ......

Страница 2: ...tone and or lighting indication can be differentiated Please note not all metal detectors feature a diverse and or wide array of detection elimination options and differentiation Discrimination The de...

Страница 3: ...to determine the exact location of the buried metals during pinpoint targeting Using the non motion detection technology it allows the search coil to center align with the location of the buried meta...

Страница 4: ...location Battery Please use 6 Alkaline AA batteries Slide the cover labeled OPEN on the battery tray cover slot in the direction of the arrow to pull out the battery cover Then insert the 6 x AA batt...

Страница 5: ...on the digital display The metal detector will now be in the Non Motion mode you should be able to locate and pinpoint the metal target beneath the search coil The metal detector also features a low...

Страница 6: ...to detect and discriminate optimally PINPOINT Mode Press and hold down the red PINPOINT button on the handle the detector will switch to non motion mode and it no longer has the discrimination abilit...

Страница 7: ...de This is the general typical metal detector mode that provides indication of any recognizable and compatible metal object found Operation Indication tone LCD TARGET ID LCD DEPTH SENS LCD Chart Note...

Страница 8: ...D RANGE is illuminated and flickers DEPTH 2 is illuminated and flicker Sweep 25 high tone SILVER is illuminated and flickers DEPTH 2 is illuminated and flicker Eliminate Medium Conductivity Metals Eli...

Страница 9: ...e remember familiar and nearby known metals and electrical equipment will bring interference signals and provide false readings by your metal detector Field detection can include more complications wh...

Страница 10: ...als When a clear sounding tone is heard you can get the approximate target type and target depth on the LCD digital display screen Some practice and experience may be needed to develop the proper meta...

Страница 11: ...he PINPOINT cursor will be lighted Let the search coil approach the ground and continue your metal detection Once a possible object is located press the PINPOINT button again to rescan and confirm the...

Страница 12: ...ng 1 Scan at a different angle in order to determine whether you can get a more stable signal 2 If the target is buried deeply you could try to increase the sensitivity or speed up the search coil sca...

Страница 13: ......

Отзывы: