


џ
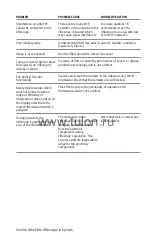
Select icon “delete distance”.
џ
Select “Yes” in the dialog box to delete a distance. “No” – to cancel deletion.
џ
When selecting “Yes” you go to the submenu “list of distances”; “No” – return to
the previous screen “operating the distances”.
Attention!
If the primary distance is deleted, the first distance on the list
automatically becomes the new primary distance.
Additional menu for zeroing parameters setup
Having selected a zeroing distance and having entered the submenu , the
display shows the following:
џ
Windage/Elevation correction
џ
Magnification
џ
Zeroing with the FREEZE function
џ
Edit distance title
Additional menu option “Windage/Elevation correction” allows you to correct the
reticle position as described in section 9 “Zeroing”.
Magnification
џ
This submenu allows you to increase the riflescope's digital zoom when zeroing
which reduces the click value this improving accuracy of zeroing.
џ
Having selected a zeroing distance and having entered the submenu, select
submenu “Magnification” with a brief press of the M button.
џ
Select the digital zoom value (i.e. 3x) with the UP (8) and DOWN (10) buttons.
џ
Confirm you selection with a brief press of the M button.
Freeze
Function FREEZE is designed to zero your riflescope.
The highlight of the function is that, unlike in the “one shot zeroing” method, you
do not need to hold the riflescope in the aiming point.
џ
Having selected a zeroing distance and having entered the submenu, enter the
submenu FREEZE with a brief press of the M button or press briefly the ON button
when in the zeroing mode.
џ
A screen shot (image freezing) will be made – icon will appear on the display.
џ
For detailed description of the zeroing procedure, please refer to section 9
“Zeroing”.
Edit distance title
This submenu allows you to change the value of the current distance.
џ
Having selected a zeroing distance and having entered the submenu, enter the
submenu “Edit distance title” with a brief press of the M button.
џ
Select values for each digit with the UP/DOWN buttons. Toggle between the
digits with a brief press of the M button.
џ
Confirm you selection with a long press of the M button.
Wi-Fi settings
This menu option allows you to set up your riflescope for operation in a Wi-Fi
network.
Password setup
This submenu allows you to set a password to access your riflescope from an
external device.
The password is used to connect an external device (i.e. smartphone) to your
riflescope.
џ
Hold down the M (9) button to enter the main menu.
џ
Select submenu with UP (8) and DOWN (10) buttons.
џ
Press briefly the M button to enter submenu . Press briefly M to confirm.
џ
The default password “12345” appears on the display.
џ
Set the desired password with the UP and DOWN buttons (button UP to increase
value; button DOWN to reduce). Switch between digits with a brief press of the M
button.
џ
Save the password and exit the submenu with a long press of the M button.
Access level setup
This submenu allows you to set required access level of the Stream Vision
application to your riflescope.
Access level Owner. The Stream Vision user has the complete access to all
riflescope’s functions.
Access level Guest. The Stream Vision user has the access only to the real time video
stream from the riflescope.
џ
Hold down the M (9) button to enter the main menu.
џ
Select submenu with UP (8) and DOWN (10) buttons.
џ
Press briefly the M button to enter the submenu.
џ
Set the desired access level with the UP and DOWN buttons.
џ
Save your selection and exit the submenu with a long press of the M button.
Tab 2
Settings
The following settings are available:
Interface language selection
џ
Hold down the M (9) button to enter the main menu.
џ
Select submenu “General settings” with UP (8) and DOWN (10) buttons.
џ
Press briefly the M button the enter the submenu “Language”.
џ
Select one of the available interface languages with a brief press of the UP/DOWN
buttons: English, French, German, Spanish, Russian.
џ
Switch between languages with a brief press of the M button.
џ
Save selection and exit the submenu with a long press of the M button.
Date setup
џ
Hold down the M (9) button to enter the main menu.
џ
Select submenu “General settings” with UP (8) and DOWN (10) buttons.
џ
Press briefly the M button to enter the submenu “Date”.
џ
Date format is displayed as: YYYY/MM/DD (2019/01/01).
џ
Select the correct values for the year, month and date with a brief press of the
UP/DOWN buttons.
џ
Switch between digits with a brief press of the M button.
џ
Save selected date and exit the submenu with a long press of the M button.
www.tulon.ru


