Version 1.0
Version 1.0
Operation
28
28
Start with Operational Test
7.
Avoid any obstacles while hoisting or traveling the load.
8.
Start movement of the trolley and ensure that the load is not swinging and there are no obstacles in its path. Stop
movement and make necessary adjustments if one of these conditions is present.
9.
Once the desired position is reached, slowly stop the trolley. Position the load completely vertical to the desired spot
where load will be lowered.
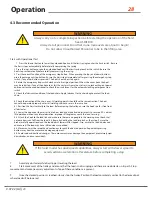
4.3 Recommended Operation
Always carry out a complete inspection before starting the operation of the hoist.
See ASME B30.
Always let all personnel know that crane maneuvers are about to begin!
Do not allow Unauthorized Personnel to be in the lifting area.
If the hoist model has dual/speed capabilities, always start with slower speed to
avoid sudden accelerations. Decelerate before completing a stop.
V.07.22 [LA]
1. Press the (down) button to lower the unloaded hook until the limit spring touches the limit switch. Be sure
the hoist stops automatically before totally compressing the spring.
2. Press the (up) button to raise the unloaded hook until the limit spring touches the switch. Be sure the
hoist stops automatically before totally compressing the spring.
3. Test the correct function of the emergency stop button. When pressing the (up), and (down) buttons,
press the emergency stop button. Ensure the hoist stops immediately after pressing the emergency stop
switch. If any other button is pressed. The hoist should not start again.
4. Rotate the emergency stop switch clockwise to its original position. When it bounces back, the hoist
may be restarted. If any of the above tests fail, the unit must remain out of service, lockout/tag-out power,
and request authorized personnel to check the circuit layout for the automatic locking emergency stop
switch.
5. Check the lubricant condition of the load chain. Apply lubricant to the chain bag to protect the load
chain.
6. Check the direction of the chain eyes. All welding points should face the same direction. The hoist
cannot be operated properly unless all welding chain eyes are in the same line.
6.1. Position the hoist vertically to the load. Before moving the trolley, ensure the hook’s path is free from
all obstacles.
6.2. Lower the hook near the master link to hoist load and make final adjustments to secure a 90º vertical
lift operation without any lateral deviation. Improper lift angle may cause the load to swing.
6.3. Attach the hook to the load link and make sure there are no people in the working area. Check that
no loose items can fall from the load. 6.4. Begin by hoisting the load two inches, then stop. Ensure the
brakes are fully operational and the load doesn’t lower while stopped. Also, ensure the load is balanced
and secured. The load may have shifted when suspended.
6.5. Movement must be smooth and continuous to reach the desired position. Repeatedly pressing
buttons may heat the motor and damage equipment.
6.6. Avoid sudden directional changes. These movements may damage the equipment, prematurely wear
down brakes, and cause accidents
Содержание PWJTHF
Страница 2: ...This page intentionally left blank...
Страница 19: ...Version 1 0 19 Specifications 19 V 07 22 LA...
Страница 20: ...Version 1 0 Specifications 20 20 V 07 22 LA...
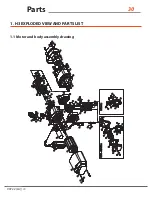
Страница 30: ...Version 1 0 Parts 30 30 1 H3 EXPLODED VIEW AND PARTS LIST 1 1 Motor and body assembly drawing V 07 22 LA...
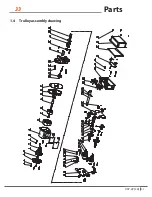
Страница 33: ...Version 1 0 33 Parts 33 1 4 Trolley assembly drawing V 07 22 LA...
Страница 49: ...49 Wiring Diagram 49 7 CONVENTIONAL HOIST WIRING DIAGRAM PWJTHF PWJTHT V 07 22 LA...
Страница 50: ...Wiring Diagram 50 50 V 07 22 LA...

