background image


Page 14 


Mounting the Motors 

 
Right or Left Hand Actuators – The Kit Diamond motors are supplied in 

one

 version. Suitable to both 

left and right hand installation.  

Anchor the Pivot Bracket (S1) onto your pillar by welding or bolting. 
Depending on the width and fabric of your pillar, 13mm Bolts minimum 
can be used. However if your pillar is less than 6”, Bolt-through 
application should be used. In cases of masonry pillars, use chemical or 
resin to secure bolts or stone (cement) the bracket into position. Fit the 
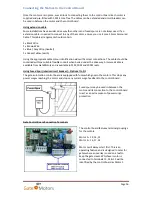
motor into position on its pivot bracket as illustrated left.  

The motor has a slot designed to be specifically used with the pivot bracket (S1). Slide the motor 
over the bracket, taking care to align the fixing holes of the bracket and the motor, located on the 
underside of the motor.  

Support the weight of the motor arm so that the full weight of the motor is not hinged on the 
bracket – if the bracket is not secured in your pillar, the bracket may move or come loose. 


Fix motor securely into position by sliding the motor over the bracket, 
align the fixing holes and place the pivot pin (PR1) through the holes. 
Secure in place using the grub screw (G1). 
 
Ensure grub screw is tight to keep the pivot pin in place. 


Use the motor release key to unlock the motor and extend the arm fully. Turn back the arm 2cms to 
allow room for initial mounting to the gate for first time installation. This avoids the arm over 
stretching if the initial in-rush of power causes the motor to “leap forward”. 


Содержание Diamond 3Ti

Страница 1: ...ds and Public Holidays Email support gatemotors co uk UK calls to this number are billed by the second and cost 1 02 per minute from a standard landline other networks charges may also apply IRISH cal...

Страница 2: ...4Ti gate automation is designed for installation on a pull to open double leaf gate gates that open into the property The motors can be used on vinyl aluminium farm tube and wrought iron gates The Ki...

Страница 3: ...the Motors to the Control Board 16 Installation Complete 18 Warranty 18 Obtaining Repairs Replacements 18 Kit Diamond 230v FAQ s 19 Will my gates still open in the winter when it is very cold and icy...

Страница 4: ...ensure that the total system is safe for its intended use For The End User A WARNING To reduce the risk of injury or death A1 Read and follow all instructions Failure to meet the requirements set for...

Страница 5: ...re installed they should be within sight of the gate yet located at least 3 Metres 10ft away from all moving parts of the gate Never install any access control device where a user will be tempted to r...

Страница 6: ...ays turn power to the control board OFF before performing any maintenance Regularly grease the gate hinges and the motors triangular mounting bracket pivot point Clean the push pull ram arm tube with...

Страница 7: ...Page 7 Kit Diamond 3Ti 4Ti Technical Specification Kit Diamond 3Ti 4Ti Dimensions...

Страница 8: ...Page 8 NB Please quote above part numbers when enquiring about replacement model 3Ti 4Ti components from GateMotors...

Страница 9: ...that are to be laid across your driveway Surge Protection A form of circuit breaker should be fitted between the house and the main gate to protect both the gate control board and the house main fuse...

Страница 10: ...the gate only If hinges are stiff loosen with lubricating oil The gate must be able to move throughout its arc without binding or dragging on the ground The pillars posts must be secured into the grou...

Страница 11: ...e table on the next page These quotes are calculated in order to obtain an average lateral speed that does not exceed 12m minute and will open the gate to 90 degrees FIG B In this scenario the gate ca...

Страница 12: ...to left hand or right hand mounting illustrated left The bracket is fabricated from mild steel and has galvanised coating for durability in weathering The bracket is designed to be cut down using an...

Страница 13: ...osen hole on the pillar bracket to the point of contact on your gate leaf where the gate leaf bracket is to be attached and mark accordingly A minimum of 30mm must be allowed from the edge of the pill...

Страница 14: ...et S1 Slide the motor over the bracket taking care to align the fixing holes of the bracket and the motor located on the underside of the motor Support the weight of the motor arm so that the full wei...

Страница 15: ...red on the gate engage the locking mechanism of the motor using the release key and remove the release key Ensure the release keys for the motors are kept in a secure place Motor Release Keys IMPORTAN...

Страница 16: ...ontained within a suitable flexible conduit when buried under the driveway Armoured cable is available from GateMotors and is available in 25M 50M and 100M reels Using Fused Spur interim circuit break...

Страница 17: ...each motor If a capacitor is not fitted the motor may physically vibrate gently and will fail to operate upon command The control board may display a communication fault code N1 N2 The capacitors are...

Страница 18: ...Motors and does not cover repair or replacement of any goods or part thereof damaged by misuse moisture liquids proximity or exposure to heat and accident abuse non compliance with the installation an...

Страница 19: ...ess of the transmitter button will open the gate and hold it open for a predetermined time adjustable to between five 90 seconds and then close it automatically This way no one needs to remember to sh...

Страница 20: ...illars Blinker Warning Light A flashing blinker warning light can alert people to the operation of the gates The blinker light is compatible with of the Electric gate kits that we sell Oval blinker wi...

Страница 21: ...ease let us know by email on sales gatemotors co uk Author G Opie Published September 2011 For more information on GateMotors full line of automatic gate openers and access controls visit our website...

Отзывы: