background image

PRONAR T023, PRONAR T023M 

SECTION 5 

5.18 

  Prevent the trailer from rolling by placing chocks under the wheels. Immobilise 

tractor and trailer with parking brake. 

  Start the tractor in order to supplement air in the trailer braking system tank. 

  In single line systems air pressure should amount to approx. 5.8 to 6.5 

bar. 

  In double conduit systems air pressure should amount to approx. 5.8 

bar. 

  Turn off tractor engine. 

  Check system components after releasing brake pedal in tractor. 

  Give particular attention to conduit connections and brake cylinders. 

  Repeat system check with depressed tractor brake pedal. 

  The help of a second person is required. 

In the event of the appearance of leaks, compressed air will escape at the places of damage, 

with  a  characteristic  hiss.  Lack  of  system  tightness  may  be  also  detected  by  covering 

checked  elements  with  washing  fluid  or  other  foaming  preparations,  which  will  not  react 

aggressively  with  system  components.  It  is  recommended  to  supply  preparations 

commercially  available  designed  to  facilitate  detecting  air  leaks.  Damaged  components 

should be replaced or repaired. If leaks appear at connections then tighten the connections. If 

air continues to escape, replace connection components or seals. 


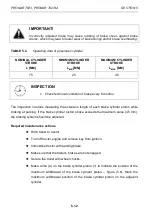
INSPECTION 


  After travelling the first 1,000 km. 

  Each time after making repairs or changing system components, 

  Every 12 months. 


Содержание T023

Страница 1: ...fore using the machine the user must carefully read this Operator s Manual and observe all recommendations This guarantees safe operation and ensures failure free work of the machine The machine is designed to meet obligatory standards documents and legal regulations currently in force The manual describes the basic safety rules and operation of PRONAR T023 and PRONAR T023M agricultural trailers I...

Страница 2: ...articularly important information and instructions the observance of which is essential are distinguished in the text by the sign and also preceded by the word ATTENTION Failure to observe the instructions may lead to damage to the machine as a result of improper operation adjustment or use In order to focus the user s attention on the need to perform maintenance the relevant section of the Operat...

Страница 3: ...orward travel Right side side to the right hand of the operator facing in the direction of machine s forward travel REQUIRED MAINTENANCE ACTIONS Maintenance actions described in the manual are marked with the sign Result of maintenance adjustment actions or comments concerning the performance of actions are marked with the sign ...

Страница 4: ......

Страница 5: ...NSPORT ON VEHICLE 1 10 1 5 2 INDEPENDENT TRANSPORT BY THE USER 1 12 1 6 ENVIRONMENTAL HAZARDS 1 13 1 7 WITHDRAWAL FROM USE 1 14 2 SAFETY ADVICE 2 1 2 1 SAFETY INFORMATION 2 2 2 1 1 BASIC SAFETY RULES 2 2 2 1 2 DRIVING ON PUBLIC ROADS 2 6 2 1 3 DESCRIPTION OF RESIDUAL RISK 2 7 2 2 INFORMATION AND WARNING DECALS 2 8 3 DESIGN AND OPERATION 3 1 3 1 TECHNICAL SPECIFICATION 3 2 3 2 TRAILER CONSTRUCTION ...

Страница 6: ... USE 4 4 4 2 HITCHING AND UNHITCHING THE TRAILER 4 5 4 3 LOADING AND SECURING LOAD 4 8 4 3 1 GENERAL INFORMATION ABOUT LOADING 4 8 4 3 2 SECURING LOAD 4 9 4 3 3 TENSIONER OPERATION 4 10 4 4 TRANSPORTING LOADS 4 10 4 5 UNLOADING 4 12 4 6 PROPER USE AND MAINTENANCE OF TYRES 4 12 5 MAINTENANCE 5 1 5 1 PRELIMINARY INFORMATION 5 2 5 2 MAINTENANCE OF WHEEL AXLE 5 2 5 2 1 PRELIMINARY INFORMATION 5 2 5 2 ...

Страница 7: ...20 5 4 2 CLEANING DRAIN VALVE 5 21 5 4 3 CLEANING AND MAINTAINING PNEUMATIC CONDUIT CONNECTIONS AND PNEUMATIC SOCKETS 5 22 5 5 HYDRAULIC SYSTEM MAINTENANCE 5 23 5 5 1 PRELIMINARY INFORMATION 5 23 5 5 2 CHECKING HYDRAULIC SYSTEM TIGHTNESS 5 23 5 5 3 CHECKING TECHNICAL CONDITION OF HYDRAULIC CONNECTIONS AND SOCKETS 5 24 5 5 4 REPLACEMENT OF HYDRAULIC CONDUITS 5 24 5 6 LUBRICATION 5 24 5 6 1 CONSUMAB...

Страница 8: ......

Страница 9: ...SECTION 1 BASIC INFORMATION ...

Страница 10: ...of vehicle identification number VIN Pronar T023 and Pronar T023M agricultural trailers are marked with the data plate 1 and vehicle identification number VIN 2 The serial number and data plate are located in the central part of the frame front beam figure 1 1 When buying the agricultural trailer check that the serial numbers on the machine agree with the number written in the WARRANTY ...

Страница 11: ...ose B Symbol Machine type C Year of manufacture D Seventeen digit vehicle identification number VIN E Official certificate number F Machine tare weight G Maximum gross weight H Carrying capacity I Permissible hitching system loading J Permissible front axle load K Permissible rear axle load 1 1 2 AXLE IDENTIFICATION The serial number of the axle shaft and its type are stamped onto the data plate 1...

Страница 12: ...4 FIGURE 1 2 Location of the axle data plate 1 data plate 2 wheel axle 1 1 3 LIST OF SERIAL NUMBERS TABLE 1 2 List of serial numbers VIN S Z B 0 2 3 0 X X SERIAL NUMBER OF FRONT AXLE SERIAL NUMBER OF CENTRAL AXLE SERIAL NUMBER OF REAR AXLE ...

Страница 13: ...d 1 200 800 144 EUR pallet 1 2 800 600 144 EUR pallet extended 1 200 1 200 144 ISO 1 200 1 000 144 The above mentioned harvested crops and agricultural products may be transported provided that the recommendations included in this manual especially the recommendations concerning protection of loads included in Section 4 3 2 are adhered to The trailer may only be hitched to the agricultural tractor...

Страница 14: ...the machine s operating principle and how to operate it safely and correctly adhere to the established maintenance and adjustment plans comply with general safety regulations while working prevent accidents comply with the road traffic regulations and transport regulations in force in a given country in which the machine is used carefully read the Operator s Manual and comply with its recommendati...

Страница 15: ...uit pneumatic system Double conduit pneumatic system Hydraulic system bar bar bar according to A DIN 74 294 according to ISO 1728 according to ISO 7421 1 5 8 6 5 5 8 150 Electrical system Electrical system voltage Connection socket V 12 7 polar compliant with ISO 1724 Tractor hitches Type of hitch upper transport hitch Other requirements Min tractor power hp kW 83 2 61 1 3 EQUIPMENT TIP Informatio...

Страница 16: ...lbox Rear hitch Folding resistance ladders for mounting with a linking chain 1 Folding resistance ladders for mounting with a linking cable 2 Fixed resistance ladders for mounting with a linking chain 1 Belt winders 1 Adjustable rear frame extending load area Spare wheel winch with spare wheel Mudguards front and rear Side under run protection devices Linking chain 1 Rear hitch Slow moving vehicle...

Страница 17: ...o those parts and sub assemblies of the machine which are subject to wear in normal usage conditions regardless of the warranty period Consumables include the following parts sub assemblies drawbar hitching eye pneumatic system connector filters tyres seals bearings bulbs and LED lamps brake shoes The warranty service only applies to factory defects and mechanical damage that is not due to the use...

Страница 18: ...ed to the user either transported on a vehicle or after being attached to a tractor independently towing with a tractor 1 5 1 TRANSPORT ON VEHICLE Loading and unloading of the agricultural trailer from vehicle shall be conducted using loading ramp with the aid of agricultural tractor overhead crane or hoisting crane During work adhere to the general principles of Health and Safety at Work applicab...

Страница 19: ...ring catches bent or corroded hooks as well as other damage may disqualify use of the given element from use Carefully read the information stated in the Operator s Manual for the given securing measure The number of securing elements cables straps chains and stays etc and the force necessary for their tensioning depends on a number of things including weight of the machine the construction of veh...

Страница 20: ...river of the vehicle should be particularly careful during travel Centre of gravity of the vehicle transporting the machine is shifted upwards which poses a threat to stability of the vehicle and transported machine Use only certified and technically reliable securing measures Carefully read the manufacturer s instructions for the securing measures 1 5 2 INDEPENDENT TRANSPORT BY THE USER In the ev...

Страница 21: ...the risk of an oil leak this work should take place on an oil resistant floor or surface In the event of oil leaking into the environment first of all contain the source of the leak and then collect the leaked oil using available means Remaining oil should be collected using sorbents or by mixing the oil with sand sawdust or other absorbent materials The oil pollution once gathered up should be ke...

Страница 22: ...s withdrawn from use Before proceeding to dismantle equipment oil shall be completely removed from hydraulic system Worn out or damaged parts that cannot be reclaimed should be taken to a collection point for recyclable raw materials Hydraulic oil should be taken to the appropriate facility dealing with the re use of this type of waste DANGER During dismantling use the appropriate tools equipment ...

Страница 23: ...SECTION 2 SAFETY ADVICE ...

Страница 24: ...or using this machine should be the application of safety rules and sensible behaviour The trailer must never be used by persons who are not authorised to drive agricultural tractors including children and people under the influence of alcohol or other drugs Non compliance with the safety rules of this Operator s Manual can be dangerous to the health and life of the operator and others The trailer...

Страница 25: ...ring of the load and danger while working or driving Before each use of the trailer check the technical condition of the trailer and tractor hitching system and connection elements of the braking system and electrical system Exercise caution when connecting and disconnecting machine from the tractor When hitching there must be nobody between the trailer and the tractor During hitching the trailer ...

Страница 26: ... make independent repairs of control valve brake cylinders and braking force regulator In the event of damage to these elements repair should be entrusted to an authorised service point or elements should be replaced with new ones When working on the tyres chocks or other objects without sharp edges should be placed under the wheels of the trailer to prevent it from rolling Wheels can be taken off...

Страница 27: ...sinfected In the event of more serious injuries seek a doctor s advice Repair maintenance and cleaning work should be carried out with the tractor engine turned off and the ignition key removed Regularly check the condition of the bolt and nut connections Before welding or electrical work the trailer should be disconnected from the power supply During the warranty period any repairs may only be ca...

Страница 28: ...mage it and also threaten the safety of traffic Do not exceed the maximum speed limit Adjust driving speed to the road conditions The trailer must NOT be left unsecured Securing the trailer involves immobilising the trailer with the parking brake and optionally placing chocks under trailer wheels While driving on public roads the trailer must be fitted with a certified or authorised reflective war...

Страница 29: ...nning and when the machine is being attached operation of the trailer by persons under the influence of alcohol or other intoxicating substances operation of the trailer by unauthorised persons being on the machine when it operates careless cleaning maintenance and technical checks of the trailer The residual risk may be kept to a minimum by following the recommendations below prudent and unhurrie...

Страница 30: ...ng decals may be purchased directly from the Manufacturer or your PRONAR dealer Part numbers of information decals are given under pictogram description in table 2 1 and in SPARE PARTS LIST New assemblies changed during repair must be labelled once again with the appropriate safety signs During agricultural trailer cleaning do not use solvents which may damage the coating of information label stic...

Страница 31: ...y Keep a safe distance from ladders and drawbar 147N 00000002 4 Regularly check if the nuts and bolts fixing the wheels and other components are properly tightened 104N 00000006 5 Grease the machine according to the recommendations in the OPERATOR S MANUAL 104N 00000004 6 Machine type 65N 0000004 ...

Страница 32: ...Pronar T023 Pronar T023M SECTION 2 2 10 FIGURE 2 2 Locations of information and warning decals ...

Страница 33: ...SECTION 3 DESIGN AND OPERATION ...

Страница 34: ...of load surface with extended rear frame with retracted rear frame Width mm mm mm 10 770 9 880 2 435 10 770 9 880 2 517 Technical specification Carrying capacity Maximum gross weight Tare weight Height of platform from ground Load surface with extended rear frame with retracted rear frame kg kg kg mm m2 m2 11 300 15 000 3 700 1 100 26 2 24 11 300 15 000 3 700 1 150 26 2 24 Other information Electr...

Страница 35: ... sides can be ended with a welded flat bar T023 or a profiled side strip T023M The load platform in its front part and rear part is limited by ladders 2 and 3 Depending on the trailer version the ladders can be folding or fixed Deflection angle of folding ladders is limited by means of steel cables or a tensioning chain FIGURE 3 1 Trailer construction 1 frame load platform 2 front ladder 3 rear la...

Страница 36: ...by means of bolts located under the frame floor At the end of the trailer frame there is a lights support beam 5 which is designed for fixing electrical equipment license plate and retroreflectors FIGURE 3 3 Rear suspension 1 leaf spring 2 rocker arm 3 wheel axle 4 rubber fender FIGURE 3 2 Extendible frame 1 external extendible frame 2 internal extendible frame 3 tensioning cable 4 rear ladder 5 l...

Страница 37: ...e from rectangular rod terminated with pins on which wheel hubs are mounted on cone bearings The wheels are single and equipped with shoe brakes activated by mechanical cam expanders 3 2 2 SIDE UNDER RUN PROTECTION DEVICES Two side under run protection devices can be installed in the central part of the chassis frame on the left side and the right side of the trailer The complete under run protect...

Страница 38: ...m Before driving off make certain that side under run protection devices are set in transport position 3 2 3 MAIN BRAKE Depending on the version the trailer is equipped with one of the four types of main brake double conduit pneumatic system with three position regulator figure 3 6 standard equipment double conduit pneumatic brake system with automatic regulator figure 3 7 optional equipment singl...

Страница 39: ...e is to activate the trailer s brakes when the brake pedal is depressed in the tractor Furthermore in case of an inadvertent disconnection of the conduit between the trailer and the tractor the control valve will automatically activate trailer s brakes refers only to pneumatic systems FIGURE 3 6 Diagram of double conduit pneumatic system with manual regulator FIGURE 3 7 Diagram of double conduit p...

Страница 40: ...onduit pneumatic system with manual regulator FIGURE 3 9 Hydraulic system diagram TABLE 3 2 List of symbols used on the diagrams SYMBOL MEANING Pneumatic connection plug Pneumatic connection with cut off valve socket Air filter Drain valve Main control valve Relay valve ...

Страница 41: ...tor of braking force Three position manual regulator of braking force Conduit connection connector Air tank Cylinder Valve control connection FIGURE 3 10 Pneumatic brake cylinders 1 membrane cylinder 2 control connection 3 short fork 4 long fork 5 pneumatic conduit 6 plug ...

Страница 42: ...omatically applying the brakes now changes its position to allow normal brake operation Three step braking force regulator 2 figure 3 12 adjusts braking force depending on setting Switching to a suitable working mode is done manually by machine operator using the lever 4 prior to moving off Three working positions are available A no load B half load and C full load In double conduit systems with a...

Страница 43: ...ander levers using a steel cable Rotation of the crank increases tension of the steel cable Expander arms exert pressure on brake shoes and cause the axle to brake Prior to moving off handbrake must be released steel cable must hang loose 3 2 5 ELECTRIC LIGHTING SYSTEM The trailer s electrical system is designed for supplying from direct current source of 12 V Connection of the trailer s electrica...

Страница 44: ...T023 Pronar T023M SECTION 3 3 12 FIGURE 3 13 Arrangement of electrical system components 1 front parking light white 2 7 pin connection socket 3 rear clearance light 4 rear lamp assembly 5 license plate light ...

Страница 45: ... view of socket B view of socket on the wiring harness fixing side TABLE 3 3 Marking of connection socket s connections MARKING FUNCTION 31 Weight 54 Power supply 12V L Left indicator 54 STOP light 58L Rear left parking light 58R Rear right parking light R Right indicator ...

Страница 46: ...ar T023M SECTION 3 3 14 3 2 6 SPARE WHEEL WINCH FIGURE 3 15 Design of spare wheel winch 1 spare wheel 2 winch mechanism 3 crank 4 wheel fixing holder 5 fixing bolt with securing cotter pin 6 crank handle 7 steel cable ...

Страница 47: ...SECTION 4 CORRECT USE ...

Страница 48: ...by the seller about the method of use of the machine risks resulting from the use for purposes other than intended the method of the machine hitching and the principles of the machine construction and design Detailed information concerning the machine hand over are included in the WARRANTY BOOK Checking the trailer after delivery Check completeness of the machine according to order Check technical...

Страница 49: ...rve all the recommendations contained in it Adapt the height of the trailer drawbar to the tractor hitch Visually inspect the trailer according to the guidelines presented in section PREPARING THE TRAILER FOR NORMAL USE Hitch machine to tractor Immobilise tractor with parking brake Test start Check all the trailer s lubrication points lubricate the machine as needed according to recommendations pr...

Страница 50: ...inders other faults stop operating the trailer and do not operate it until the malfunction is corrected If a fault cannot be rectified or the repair could void the warranty please contact retailer for additional clarifications or to perform the repair 4 1 4 PREPARING THE TRAILER FOR NORMAL USE Scope of inspection activities Visually inspect if the tyres are properly inflated In case of doubt caref...

Страница 51: ... In order to hitch the trailer to the tractor perform the actions below in the sequence presented Hitching to tractor Position agricultural tractor directly in front of the trailer s drawbar eye Reverse tractor hitch trailer to appropriate hitch on tractor check hitch lock protecting machine against accidental unhitching If the agricultural tractor is equipped with an automatic coupler ensure that...

Страница 52: ... not in working order When turning connecting conduits must hang loosely and not become tangled with moving elements of machine and tractor DANGER When hitching there must be nobody between the trailer and the tractor When hitching the machine tractor driver must exercise particular caution and make sure that nobody is present in the hazard zone When connecting the hydraulic or pneumatic conduits ...

Страница 53: ...een tractor and machine Before disconnecting conduits and drawbar eye close tractor cab and secure it against access by unauthorised persons Turn off tractor engine The trailer must not be disconnected when loaded Disconnect braking system conduits If the trailer is equipped with a double conduit pneumatic system first disconnect the red conduit and then disconnect the yellow conduit If the traile...

Страница 54: ...ing Do not allow anyone to approach the place where works are carried out Load should be uniformly distributed along the length and width of the platform in order to ensure proper distribution of axle loads and proper stability of the trailer Load must not extend beyond the outline of the load platform Number of load layers depends on size of pressed bales or blocks their arrangement on the load p...

Страница 55: ...ith a tightening mechanism The belts may be attached to the following structural elements left and right longitudinal member of the platform front beam rear beam of the extendible frame transport lugs welded to the longitudinal members oblong structural holes in the side part of profiled floor tensioners bolted to front beam grips welded to front ladder and rear ladder The extent of protection dep...

Страница 56: ...be released Release lever 4 and remove belts 4 4 TRANSPORTING LOADS When driving on public roads respect the road traffic regulations exercise caution and prudence Listed below are the key guidelines for driving the tractor and trailer combination Before moving off make sure that there are no bystanders especially children near the trailer or the tractor Take care that the driver has sufficient vi...

Страница 57: ...ublic roads the trailer must be fitted with a certified or authorised reflective warning triangle When driving comply with all road traffic regulations indicate an intention to turn using indicator lamps keep all road lights and indicator lights clean at all times and ensure they are in good condition Any damaged or lost lamps or indicator lights must be immediately repaired or replaced Avoid ruts...

Страница 58: ...ractor Unloading should only take place when the trailer is placed on flat level surface and hitched to tractor DANGER Ensure that during unloading nobody is in the vicinity of the load handled During work keep a safe distance from overhead electric power lines It is recommended to unload the trailer using a loader conveyor or forklift truck During work ensure good visibility and exercise particul...

Страница 59: ...ual especially if trailer is not used for a longer period Pressure and tyres should be also checked during the whole day of intensive work Please note that higher temperatures could raise tyre pressure by as much as 1 bar At high temperatures and pressure reduce load or speed Do not release air from warm tyres to adjust the pressure or the tyres will be underinflated when temperatures return to no...

Страница 60: ...Pronar T023 Pronar T023M SECTION 4 4 14 ...

Страница 61: ...SECTION 5 MAINTENANCE ...

Страница 62: ...event of unauthorised repairs changes to factory settings and other actions which are not regarded as possible for the trailer operator to perform the user shall invalidate the warranty 5 2 MAINTENANCE OF WHEEL AXLE 5 2 1 PRELIMINARY INFORMATION Work connected with the repair change or regeneration of axle components should be entrusted to specialist establishments having the appropriate technolog...

Страница 63: ...ESS OF WHEEL AXLE BEARINGS FIGURE 5 1 Lifting jack support point 1 wheel axle 2 U bolt Preparation procedures Hitch trailer to tractor immobilize tractor with parking brake Park the trailer on hard level ground Tractor must be placed to drive forward Place chocks under the trailer s wheel that will not be raised Ensure that machine will not move during inspection Raise the wheel opposite to the si...

Страница 64: ...ed under the wheel supporting the other end on the floor Lower the lifting jack relocate the chocks to the other wheel and repeat the inspection procedure for the other wheels TIP If hub cover is damaged or missing contamination and dampness enter the hub which causes significantly faster wear of bearing and hub seals Bearing life is dependent on working conditions of trailer loading speed of trav...

Страница 65: ...ere to the manufacturer s instructions The lifting jack must be stably supported by the ground and so must the axle Ensure that trailer shall not move during inspection of axle bearing slackness 5 2 3 ADJUSTMENT OF SLACKNESS OF WHEEL AXLE BEARINGS The wheel should turn smoothly without stiffness or detectable resistance Adjustment of bearing slackness may only be conducted when the trailer is not ...

Страница 66: ...nditions of the bearings may deteriorate Secure castellated nut with cotter pin and mount hub cap Delicately tap hub cap with rubber or wooden hammer 5 2 4 MOUNTING AND DISMOUNTING WHEEL INSPECTION OF WHEEL NUT TIGHTENING Wheel removal Place chocks under wheel that will not be dismounted Ensure that trailer shall not move during wheel dismounting Loosen wheel nuts according to the sequence shown i...

Страница 67: ...r The arm of the spanner L figure 5 5 should be selected according to the weight of the person F tightening the nut Remember that this method of tightening is not as accurate as the use of a torque spanner Tightening of nuts should be checked with the frequency given in the below table The activities should be repeated after each removal of a wheel from the wheel axle INSPECTION After the first us...

Страница 68: ... work ensure that correct tightening torque value is set 5 2 5 CHECKING AIR PRESSURE IN TYRES EVALUATING TECHNICAL CONDITION OF TYRES AND STEEL WHEELS TIP Tyre pressure values are specified in information decal placed on wheel or on the frame above machine wheel Tyre pressure should be checked each time after changing spare wheel and not less than every month In the event of intensive use air pres...

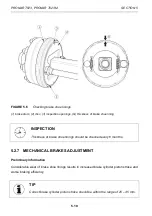
Страница 69: ...act with tyre INSPECTION Every month of use Every week during intensive work 5 2 6 CHECKING THICKNESS OF BRAKE SHOE LININGS During the trailer operation drum brake linings are subjected to wear In such a case the complete brake shoes should be replaced with new ones Excessive wear of brake shoes is the condition in which the thickness of linings which are glued or riveted to steel structures of br...

Страница 70: ...hoe lining INSPECTION Thickness of brake shoe linings should be checked every 6 months 5 2 7 MECHANICAL BRAKES ADJUSTMENT Preliminary information Considerable wear of brake shoe linings results in increased brake cylinder piston stroke and worse braking efficiency TIP Correct brake cylinder piston stroke should be within the range of 25 45 mm ...

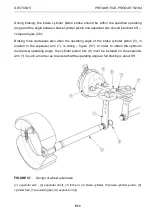
Страница 71: ...rating angle of the brake cylinder piston 5 in relation to the expander arm 1 is wrong figure 5 7 In order to obtain the optimum mechanical operating angle the cylinder piston fork 6 must be installed on the expander arm 1 in such a manner as to ensure that the operating angle at full braking is about 90 FIGURE 5 7 Design of wheel axle brake 1 expander arm 2 expander shaft 3 fork pin 4 brake cylin...

Страница 72: ...ng the extension length of each brake cylinder piston while braking at parking If the brake cylinder piston stroke exceeds the maximum value 45 mm the braking system should be adjusted Required maintenance actions Hitch trailer to tractor Turn off tractor engine and remove key from ignition Immobilise tractor with parking brake Make sure that the trailer s brakes are not engaged Secure the trailer...

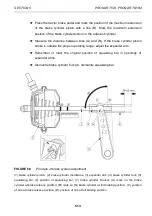
Страница 73: ...djust the expander arm Remember or mark the original position of equalising bar in openings of expander arms Dismantle brake cylinder fork pin dismantle equalising bar FIGURE 5 8 Principle of brake system adjustment 1 brake cylinder piston 2 brake cylinder membrane 3 expander arm 4 brake cylinder fork 5 equalising bar 6 position of equalising bar 7 brake cylinder bracket A mark on the brake cylind...

Страница 74: ...ing the expander arm Shift the expander arm to align the marked expander arm opening with the equalising bar fixing hole During adjustment membrane 2 must rest on the rear wall of the brake cylinder compare figure 5 8 Repeat all the above mentioned activities for the second cylinder After completed adjustment expander arms of both cylinders must be positioned in parallel with regard to each other ...

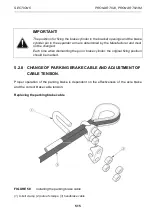
Страница 75: ...d Each time when dismantling the pin or brake cylinder the original fixing position should be marked 5 2 8 CHANGE OF PARKING BRAKE CABLE AND ADJUSTMENT OF CABLE TENSION Proper operation of the parking brake is dependent on the effectiveness of the axle brake and the correct brake cable tension Replacing the parking brake cable FIGURE 5 9 Installing the parking brake cable 1 U bolt clamp 2 nuts of ...

Страница 76: ...or with parking brake Fully unscrew the bolt of the handbrake mechanism Loosen all nuts 2 figure 5 9 of handbrake cable clamps on the brake mechanism side Tighten cable and tighten clamps Length of parking brake cable should be so selected that at total release of working and parking brake the cable would be loose and hanging by 1 2 cm IMPORTANT Parking brake cable clamps must be installed as show...

Страница 77: ... force regulator etc should be entrusted to specialist establishments having the appropriate technology and qualifications for this type of work The duties of the operator connected with the pneumatic system include checking tightness and visual inspection of the system cleaning the air filter filters draining water from air tank cleaning drain valve cleaning and maintaining pneumatic conduit conn...

Страница 78: ...essed tractor brake pedal The help of a second person is required In the event of the appearance of leaks compressed air will escape at the places of damage with a characteristic hiss Lack of system tightness may be also detected by covering checked elements with washing fluid or other foaming preparations which will not react aggressively with system components It is recommended to supply prepara...

Страница 79: ...erate the ageing process Bent permanently deformed cut or worn conduits should be replaced INSPECTION Each time during tightness inspection 5 4 CLEANING THE AIR FILTERS Depending on trailer working conditions but not less than once in three months take out and clean air filter inserts which are located in pneumatic system connection conduits Inserts are used many times and are not subject to chang...

Страница 80: ...it Pressure in conduit can be reduced by pressing the head of the pneumatic connection until resistance is felt Remove securing slide 1 Hold the filter cover 2 with the other hand After removing slide lock the cover is pushed off by the spring in the filter housing The insert and the filter body should be carefully washed out and blown through with compressed air Assembly should be done in reverse...

Страница 81: ...whole drain valve must be unscrewed and cleaned or replaced if it is damaged see section CLEANING DRAIN VALVE 5 4 2 CLEANING DRAIN VALVE DANGER Release air from tank before dismantling drain valve Required maintenance actions Reduce pressure in air tank Reduction of pressure in tank is achieved by tilting the drain valve stem Unscrew both valves Clean the valve and blow it with compressed air Chan...

Страница 82: ...able elements Contact of pneumatic connector seals with oils grease petrol etc may cause damage and accelerate ageing process If the trailer is unhitched from the tractor connections should be protected by cover or placed in their designated socket Before the winter period it is recommended to preserve the seal with special preparations e g silicon grease for rubber elements Each time before conne...

Страница 83: ...LIC SYSTEM TIGHTNESS Required maintenance actions Hitch trailer to tractor Connect conduits of hydraulic braking system according to the recommendations in the Operator s Manual Clean connectors and hydraulic cylinders Start the tractor s engine and depress brake pedal several times Leave the cylinders in the maximally extended position Switch off tractor engine and check hydraulic cylinders If oi...

Страница 84: ...nce of permanent contamination which may cause damage to precision system components INSPECTION Each time before hitching trailer to tractor 5 5 4 REPLACEMENT OF HYDRAULIC CONDUITS INSPECTION Every 4 years Rubber hydraulic conduits must be replaced every 4 years regardless of their technical condition This should be entrusted to specialised workshops 5 6 LUBRICATION Trailer lubrication should be p...

Страница 85: ...cation of axle bearings shall be performed at least once in 2 years TABLE 5 3 Lubrication schedule ITEM LUBRICATION POINT NUMBER OF LUBRICATION POINTS TYPE OF GREASE FREQUENCY 1 Hub bearing 12 A 24M 2 Drawbar eye 1 B 14D 3 Handbrake mechanism 1 A 6M 4 Handbrake cable guide wheel axle 2 A 6M 5 Expander shaft slide sleeve 6 A 3M 6 Drawbar pin 2 B 3M 7 Leaf spring absorbers 6 C 3M 8 Leaf spring absor...

Страница 86: ...ine general purpose grease lithium lime B Grease for heavily loaded elements with addition of MoS2 or graphite C Anti corrosion and penetrating preparation in aerosol Empty grease or oil containers should be disposed of according to the recommendations of the lubricant Manufacturer ...

Страница 87: ...SECTION 5 PRONAR T023 PRONAR T023M 5 27 FIGURE 5 12 Trailer s lubrication points ...

Страница 88: ...f necessity of changing hydraulic oil for another oil check the recommendations of the oil Manufacturer very carefully If it is recommended to flush the system with the appropriate preparation then comply with these recommendations Attention should be given so that chemical substances used for this purpose do not damage the materials of the hydraulic system During normal trailer use change of hydr...

Страница 89: ... less loaded sub assemblies the application of general purpose machine greases is recommended which contain anticorrosion additives and have significant resistance to being washed away by water Similar characteristics should typify aerosol preparations Silicon greases and anticorrosive lubricant substances Before starting to use greases acquaint oneself with the content off the information leaflet...

Страница 90: ...rations designed for this purpose Do not apply organic solvents preparations of unknown origin or other substances which may cause damage to lacquered rubber or plastic surfaces In the event of doubt it is recommended to make a test on an unseen surface area Surfaces smeared with oil or grease should be cleaned by application of benzene or other degreasing agents and then washed with clean water w...

Страница 91: ... those which initiate corrosion of steel have aggressive impact on anticorrosion coating and accelerate tyre ageing During this time the machine must be unloaded Trailer should be very carefully washed and dried Corroded places should be cleaned of rust degreased and protected using undercoat paint and then painted with surface paint according to colour scheme In the event of prolonged work stoppa...

Страница 92: ...10 310 M20 300 425 610 M24 530 730 1 050 M27 820 1 150 1 650 M30 1 050 1 450 2 100 1 resistance class according to DIN ISO 898 standard Unless other tightening parameters are given during maintenance repair work apply appropriate torque to tightening nut and bolt connections Recommended tightening torque values for the most frequently used bolt and nut connections are given in table 5 6 Given valu...

Страница 93: ...e drawbar should be selected individually depending on the height of the hitch on the tractor that will pull the trailer If possible adjust the tractor hitch in such a manner that the trailer drawbar is set in horizontal position Scope of adjustment activities Immobilise trailer with parking brake Prevent the trailer from rolling by placing chocks under the wheels Drive the tractor to the trailer ...

Страница 94: ...OOTING 5 11 1 TROUBLESHOOTING FAULT CAUSE REMEDY Brake system conduits not connected Connect brake conduits applies to pneumatic systems Applied parking brake Release parking brake Damaged pneumatic system connection conduits Replace Leaking connections Tighten replace washers or seal sets replace conduits Problem with moving off Control valve or braking force regulator damaged Check valve repair ...

Страница 95: ...ing of expander arms Excessive heating of axle hubs Worn brake linings Change brake shoes Improper hydraulic oil viscosity Check oil quality make sure that the oil in both machines is of the same type If necessary change oil in tractor or in trailer Insufficient tractor hydraulic pump output damaged tractor hydraulic pump Check tractor hydraulic pump Damaged or contaminated cylinder Check cylinder...

Страница 96: ... positioned wheel axles Damaged leaf spring on one side of the suspension system Replace leaf springs Worn tyre tread Damaged suspension system broken leaf spring Damaged brake system blocking of brakes incorrectly adjusted brake system Too frequent and violent braking Check suspension system for looseness check leaf springs Replace damaged or worn elements Check brake system for malfunctions Adju...

Страница 97: ...NOTES ...

Страница 98: ... ...

Страница 99: ...ANNEX A TYRE WHEEL DISC 400 60 15 5 145A8 13 00x15 5 ET 15 360 65 16 148A8 11x16 ET 20 ...

Отзывы: