background image

too much fluid, especially if the ambient temperature is cold because subsequent expansion could cause 
leaking or damage to your system.  Refer to the owner’s manual that was provided by your engine 
manufacturer. 
 
After every 24 hours of operation check all nuts, caps, and hose fittings for tightness.  Make sure the 
hoses are not chafing or kinking on sharp corners.  Also, check that hose ends are not damaged or 
distorted.  The fluid should be changed annually under normal conditions and every six months during 
times of heavy usage.  If your steering does


not operate properly, check the following: 


• 

Drive entanglements


• 

Level of the hydraulic steering fluid


• 

Hoses and/or fittings for leaks


• 

Air in the steering system.


To properly check the steering system on the 24 Super Sport, start by turning the steering wheel port to 
starboard.  If the engine does not respond the same time as the steering wheel is being turned, this 
means that there is air in the steering system and the steering system needs re-bleeding.  When there is 
air in the steering, the steering wheel will feel “loose”.  Contact your dealer to have them bleed the 
steering system. 

 
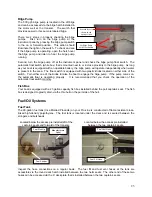
Steering Wheel 

The stainless steel steering wheel is mounted at the helm 
along with the binnacle, switch panel and other controls.  
Please refer to the Care and Maintenance section of this 
manual for cleaning recommendations. 


Power Trim


The power trim unit is located on the engine and can be operated by using the trim button on the engine 
or by using the trim toggle switch on the binnacle.  To ensure the power trim is working, start by pressing 
the toggle trim switch in the up position and trim the engine to the full up position.  Repeat the same 
process by pressing the trim toggle switch down and the engine will go into the full down position.  See 
the Trim and Tilt information in the Operations section of this manual. 


13

Содержание 2006 24 Walk

Страница 1: ...ual 23 Walk Specifications subject to change without notice Actual boats may vary from drawings and or photos Copyright 2005 Pro Line Boats Inc PO Box 1348 Crystal River FL 34423 All rights reserved D...

Страница 2: ...ii...

Страница 3: ...Hazardous Conditions 9 Passenger Safety 9 Regulations 10 Rules of the Road 10 Alcohol 10 Controls Throttle Shift Controls 11 Ignition Binnacle Fwd Neutral Reverse Gear Operation 11 Key Switch Alarm 1...

Страница 4: ...l and or Washdown Pump 21 Bilge Pump 23 Fish Box 23 Fuel Oil Systems 23 Fuel Tank 23 Vented Fuel Fill Fitting 24 Fuel Sender Fuel Pick Up 24 Fuel Water Separator 24 Primer Bulb 24 Oil Tank and Oil Fil...

Страница 5: ...37 Loading 37 Trailering and Launching Selecting A Trailer 38 Check Before You Go Out On The Highway 38 Backing a Trailer 40 Pre Launching Preparations 40 Launching 41 Retrieval 41 Storage 41 Service...

Страница 6: ...Once A Year 51 Boat Identification Information 52 Trouble Shooting Chart 53 Wiring Diagrams 54 While we endeavor to be as accurate as possible certain changes in standard equipment options and the li...

Страница 7: ...ituation we urge you to read this manual carefully and familiarize yourself with the boat before using it If a specific method or procedure is not recommended you must make sure that whatever action y...

Страница 8: ...use your boat Be proficient in boat handling and safety This manual is not intended to provide complete training on all aspects of general boat operations We at Pro Line urge all boat owners and opera...

Страница 9: ...re factory installed Dealer installed items are the responsibility of the dealer All warrantable repairs are to be completed by an authorized Pro Line dealer Your dealer should be able to assist you w...

Страница 10: ...lubricants or fluids used in normal maintenance Air freight next day or second day air or any special delivery fees unless pre approved Gelcoat cracking chalking crazing discoloration yellowing or bli...

Страница 11: ...5...

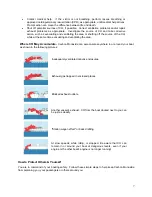
Страница 12: ...confused with seasickness So be aware of the following CO symptoms Itchy and watery eyes flushed appearance throbbing temples inability to think coherently ringing in the ears tightness across the che...

Страница 13: ...lating the area Where CO May Accumulate Carbon Monoxide can accumulate anywhere in or around your boat as shown in the following pictures Inadequately ventilated canvas enclosures Exhaust gas trapped...

Страница 14: ...alarm manufacturer Get a Vessel Safety Check A VSC is a free bow to stern safety examination Fire Be aware of and avoid conditions that can lead to accidental fire Guard against and watch for fuel spi...

Страница 15: ...psize or sink if water enters the boat faster than the bilge pump can expel it Hazardous Conditions Keep track of weather developments and avoid hazardous conditions whenever possible When forced to o...

Страница 16: ...d Navigational Rules International Inland Your local USGC The United States Coast Guard Info Line 800 368 5647 The USCG Headquarters by logging on to uscg mil The information here is only a brief over...

Страница 17: ...depending upon the engine package that was selected ey Switch Alarm is located in the binnacle and sounds when the ignition key is turned on The key anyard Stop Switch p switch also called the emerge...

Страница 18: ...ON Use care in shifting to avoid advancing the throttle more than intended Steering Hydraulic Steering systems will differ depending upon your selection of engine package Please carefully read the own...

Страница 19: ...he engine does not respond the same time as the steering wheel is being turned this means that there is air in the steering system and the steering system needs re bleeding When there is air in the st...

Страница 20: ...h battery positions while the engines are running To ensure that the battery switch switches will turn off place the switch switches in the off position and try to start up the engine engines When the...

Страница 21: ...reaker for the aft bilge pump is located at the helm next to the manual switch Keep the bilge area clean and free from debris that could clog ports or inhibit float movement Also keep the battery star...

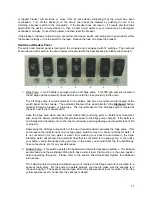
Страница 22: ...when the ignition switch is turned on Middle position All lights are off Back Aft position Anchor all around light is on bow and gauge lights are off 5 Accessory This 5 amp switch can be used for an a...

Страница 23: ...the down or aft position to turn on the anchor all around light The U S Coast Guard requires that the anchor light be installed at the highest point on the boat and must be secured in the up position...

Страница 24: ...rent and sometimes dangerous situations to you or someone around you See the Safety section in this manual for more information Avoid any horn use without an appropriate purpose Additional information...

Страница 25: ...t coincides with the actual trim of the engine When finished trimming the engine all the way up the level on the trim gauge should read in the full up position Volts To system check the volt gauge tur...

Страница 26: ...e switch panel Depress the switch to the on position Next go into the transom shower faucet press the lever on the faucet nozzle and verify that water is coming out of the faucet nozzle If the fresh w...

Страница 27: ...oast Guard local marina or your dealer for the rules and or laws that may apply specifically in your area Porta Potti With Filler Board A porta potti with a 2 8 gallon holding tank comes standard with...

Страница 28: ...ss the switch to the forward position to turn on the pump When the baitwell pump is operating go to the baitwell tub open the baitwell lid and visually check to see if water is pumping into the tub th...

Страница 29: ...ther side of the switch Turn either one of the knobs to raise the float to engage the bilge pump If the pump comes on the automatic float is operating properly It is recommended that you check the ope...

Страница 30: ...When in doubt always defer to the engine manufacturer s instructions and or recommendations If your engine package requires the installation of a fuel water separator it will be mounted in the bilge o...

Страница 31: ...nd fittings to ensure they are double clamped where needed and that there are no fuel leaks in any of the hoses Also inspect the oil system if applicable and ensure that the oil tank and hoses remain...

Страница 32: ...de Optional When activating your satellite service your service provider will request that you provide them with the Radio ID You will find this 8 character ID alpha numeric on the paperwork in your o...

Страница 33: ...ssengers to sit or stand on the hatch as they could break the hatch The hatch should be in the closed and latched position when the vessel is underway There is a black plastic cylinder on each mountin...

Страница 34: ...s just lift the handle of the latch from the recessed area of the hatch twist it and lift the hatch open Make sure that all hatches are closed and secured before you get underway In addition to the de...

Страница 35: ...Baitwell Drain Baitwell Thru Hull Cockpit Light Fuel Fill Aft Hard Top Stanchion Aft Hard Top Stanchion Fuel Sender Fuel Pick Up Dual Battery Switch Main Breaker Cockpit Deck Drain Thru Hull Fresh Wa...

Страница 36: ...er and Rope Locker Storage An aluminum anchor roller has been installed at the bow pulpit The anchor not included as standard equipment can be held on the line beneath the bow pulpit This allows you t...

Страница 37: ...ted to the drains it is recommended that you occasionally run water through each of the cockpit drains and visually inspect the thru hulls to verify that water flows freely and that there is no blocka...

Страница 38: ...Thru Hull Locations Port Side Bilge Pump Fish Box Deck Drain Starboard Side Rope Locker Drain Deck Drain Baitwell Tub 32...

Страница 39: ...mounted to the aft edge along the top of the frame providing you with additional rod holder capacity A storage box is installed below the fiberglass top and includes the dome shaped courtesy light Th...

Страница 40: ...that you refer to the owner s manual provided by the manufacturer of your electronics equipment for operational procedures and for information related to the warranty and the care and maintenance of t...

Страница 41: ...on for best acceleration to plane Lowers the bow which provides better stability and ride in rough water Reduces boat speed and economy due to increased drag of hull and drive More spray over bow Gene...

Страница 42: ...mance increase fuel consumption and may introduce undesirable handling characteristics The vibration caused by running a damaged prop could cause costly damage to your lower drive unit Starting Follow...

Страница 43: ...Open the doors and hatches to ventilate the boat before starting the engines Check for fumes in the bilge and continue to ventilate if fumes are present Loading The performance of any boat is continge...

Страница 44: ...t of the boat motor and equipment Check the certification label on the forward port left side of your trailer to insure it has an adequate gross vehicle weight rating GVWR for the combined boat and tr...

Страница 45: ...a safe stopping distance The side view mirrors are large enough to provide an unobstructed rear view on both sides of the vehicle Check tires including spare and wheel bearings Improper inflation may...

Страница 46: ...ge was caused by the trip Remove any covers and tie downs Place lines and fenders if needed Verify that your safety equipment is aboard Raise the lower unit remove supports to the proper height for la...

Страница 47: ...or velocity the change in current and or tide any increase in boating traffic visibility etc Unload the boat at a dock or mooring if possible Back down the ramp so that the trailer is half submerged M...

Страница 48: ...ice a year more often if the boat is stored in the sun If neglected the surface will take on a dull appearance that is not restorable by waxing Hand buff with a rubbing compound such as Dupont No 7 or...

Страница 49: ...paint This is done so that the epoxy coat will properly adhere to the hull and when done correctly will not void the hull warranty Pro Line Boats does not recommend using an etching primer in lieu of...

Страница 50: ...cking Proper care will preserve the weld strength and beauty of your aluminum Always clean frequently with a mild non abrasive soap and lots of fresh water Most glass cleaners work well Always protect...

Страница 51: ...an with acids or bleaches Never leave stainless in contact with iron steel or other metals which cause contamination leading to rust or corrosion Always protect with a wax especially around welds to g...

Страница 52: ...s Painted Surfaces Clean with fresh water periodically Touch up scratches and areas where paint has chipped off with touch up spray paint Touch up kits are available from the windshield manufacturer B...

Страница 53: ...creen Material When maintaining the Isinglass material maintenance means rinsing with cold water and trying not to rub the dirt into the Isinglass Never Dry dust the Isinglass panels Any rubbing acts...

Страница 54: ...e materials used in making the cabin cushions and pillows recommends the following cleaning procedures Spot clean only with water based shampoo or foam upholstery cleaner Pretest a small inconspicuous...

Страница 55: ...removed Power steering cooler hose removed All other water hoses disconnected left in place with hose clamps tightened to prevent their loss Fitting Out After Storage Check entire fuel system for loo...

Страница 56: ...berglass and Non Skid Fiberglass non skid decks and colored gelcoat Electrical and Engines Electrical equipment electrical connections wiring harnesses outboards engines Plastics Plastic vinyl seats P...

Страница 57: ...oses for burned cracked or deteriorated sections All rubber hoses should be pliable and free of kinks Clean the bilge and all bilge components with a mixture of bleach and water Then follow up by mist...

Страница 58: ...tical Clearance Hull Deck Interior Warranty Registration Date Fuel Capacity Gallons Ignition Key Cabin Head Door Key Other Key Radio Call Letters Bat Engine Make Model HP Port Engine S N Port Drive S...

Страница 59: ...unit Entangled in lines or weeds Anchor is down Prop cavitates Trim out too far Motor is too high Weeds on prop Bow heavy damage to hull Prop is damaged Excessive vibration Propeller engine or drive...

Страница 60: ......

Страница 61: ......

Страница 62: ......

Страница 63: ......

Страница 64: ......

Отзывы: