15
EN
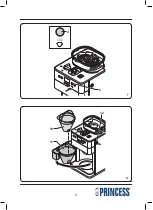
Open the cover (22).
•
Fill the water reservoir (14) with water up
•
to the required mark on the water level
indicator (15).
Do not fill the water reservoir with more
•
water than required for making the coffee.
Only use the amount of water required for
making the coffee. The appliance automatically
stops when the water reservoir is empty.
Close the cover (22).
•
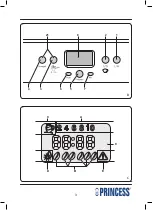
Setting the coffee quantity (fig. B & C)
The coffee quantity selector (3) is used for
setting the required coffee quantity. The coffee
quantity selector (3) can be set to 2, 4, 6, 8 or
10 cups.
Note:
The appliance can only be used when
the display is activated. If the display is not
activated, press any button to activate the
display. The appliance is ready for use.
Repeatedly press the coffee quantity selector
•
(3) to set the coffee quantity. The number
of cups (A) is shown on the display (8).
Setting the coffee strength (fig. B & C)
The coffee strength selector (4) is used for
setting the required coffee strength. The coffee
strength selector (4) can be set to mild coffee
(1 coffee bean), medium coffee (2 coffee
beans) and strong coffee (3 coffee beans).
Note:
The appliance can only be used when
the display is activated. If the display is not
activated, press any button to activate the
display. The appliance is ready for use.
Repeatedly press the coffee strength selector
•
(4) to set the coffee strength. The number
of coffee beans (B) is shown on the display
(8).
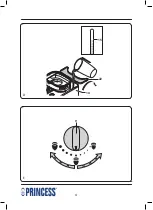
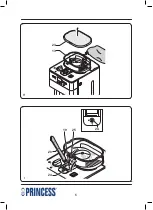
Setting the ground coffee fineness
(fig. E)
The ground coffee fineness selector (9) is used
for setting the required fineness of the ground
coffee when using coffee beans. The ground
coffee fineness selector (9) can be set to different
positions from fine coffee grounds to coarse
coffee grounds.
Turn the ground coffee fineness selector
•
(9) to the required position to set the
fineness of the ground coffee.
Switching on and off (fig. B)
Note:
The appliance can only be used when
the display is activated. If the display is not
activated, press any button to activate the
display. The appliance is ready for use.
To switch on the appliance, press the on/off
•
button (1). The on/off indicator (1) comes
on.
To switch off the appliance, press the on/off
•
button (1) again. The on/off indicator (1)
goes off.
Grinding function (fig. B & F)
Note:
The appliance can only be used when
the display is activated. If the display is not
activated, press any button to activate the
display. The appliance is ready for use.
To switch off the grinding function, first
•
press the grinding function on/off button (2)
and subsequently press the on/off button (1)
to start making coffee. The on/off indicator
(1) and the grinding function on/off indicator
(2) come on.
To switch on the grinding function, press
•
the grinding function on/off button (2).
The grinding function on/off indicator (2)
goes off.
Making coffee with coffee beans
(fig. A - H)
Before you proceed, we would like you to
focus your attention on the following notes:
- Only use coffee beans that are suitable for
the appliance.
- Only use paper coffee filters (1x4) that are
suitable for the appliance.
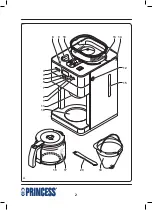
Fill the water reservoir (14) with the required
•
amount of water.
Do not fill the water reservoir with more
•
water than required for making the coffee.
Only use the amount of water required for
making the coffee. The appliance auto ma-
tically stops when the water reservoir is
empty.
To use coffee beans, take the following
•
actions:
Содержание 249401
Страница 2: ...2 2 8 9 13 14 19 12 15 11 4 3 6 5 7 2 1 18 16 17 20 10 A...
Страница 3: ...3 8 C A E B D 8 2 21 1 5 6 3 4 7 C B...
Страница 4: ...4 9 15 22 14 E D...
Страница 5: ...5 12 10 11 2 2 G F...
Страница 6: ...6 24 25 20 24 19 23 13 I H...
Страница 85: ...85 EL 8 3 4 8 D C 8 3 4 8 D C on off 1 14 D 8 3 x 1 mm2...
Страница 86: ...86 EL...
Страница 87: ...87 AR...
Страница 88: ...88 AR 8 4 3 C 8 8 3 4 C 8 1 14 8 2 1 3...
Страница 89: ...89 AR 20 24 25 19 20 25 20 24 A D 8 Princess 14 18 16 8 4 3 C 8 8 3 4 8 C 1 1 3 16 1 30 1 16 14 8 14 15 16 18...
Страница 90: ...90 EL 1 1 1 C 1 C B 5 PROGRAM 5 PROGRAM 6 HOUR 7 MINUTE 5 PROGRAM 5 PROGRAM 5 PROGRAM 5 PROGRAM I C E 19 8 19...
Страница 91: ...91 AR A H 4 1 14 23 13 23 12 11 10 11 12 18 16 1 1 1 C 1 G D C B A 4 1 14 12 11 10 11 12 16 18 2 2...
Страница 92: ...92 AR 22 14 15 22 C B 3 3 10 8 6 4 2 3 A 8 C B 4 1 4 3 2 4 8 B E 9 9 9 B 1 1 1 1 F B 2 1 1 2 2 2...
Страница 94: ...94...
Страница 95: ...95...
Страница 96: ...Princess 2011 08 11 V4...

