background image

109

7 Internet

7.1 Browser

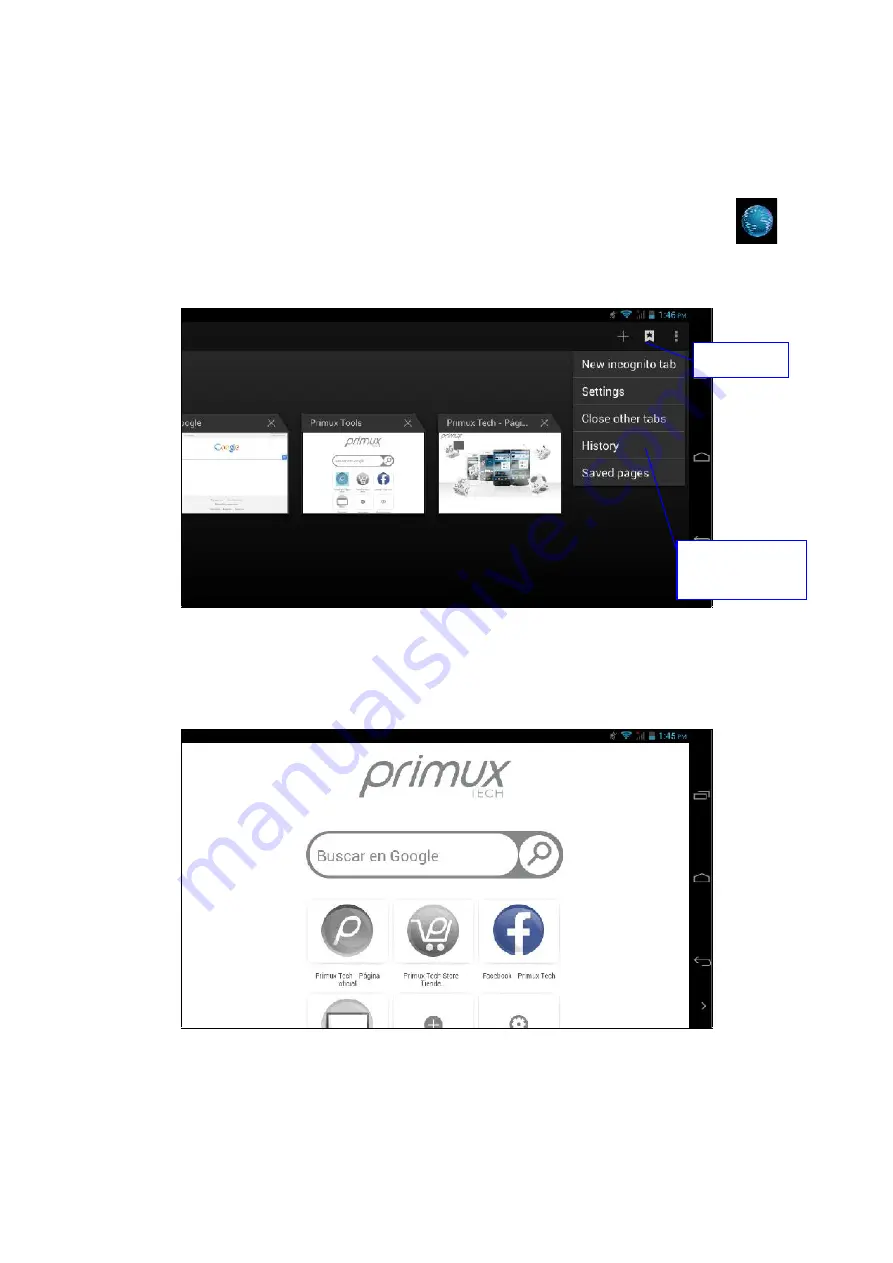
When Wireless or mobile network is connected (refer to 4.1 Wireless and network), click the browser

in the

main menu or desktop to enter

IE interface, as shown in figure 7.1

Figure 7.1

Click the address bar to enter the URL and then click start to visit and browse the website. As shown in figure 7.2

Figure 7.2

View bookmark

and history

Bookmark

Содержание Beta 2

Страница 1: ......

Страница 2: ...Conexión USB 12 3 8 Introducir textos 13 3 9 Consejos para el uso 14 4 Ajustes 15 4 1 Gestión de la tarjeta SIM 15 4 2 Wireless e Internet 17 4 3 Bluetooth 19 4 4 Uso de datos 21 4 5 Más 22 4 6 Perfiles de Audio 26 4 7 Almacenamiento 30 4 8 Batería 32 4 9 Aplicaciones 32 4 10 Cuentas y Sincronización 33 4 11 Servicio de localización 34 4 12 Localización y Búsqueda de Google 35 4 13 Seguridad 35 4 ...

Страница 3: ...3 Contactos 48 7 Internet 49 7 1 Navegador 49 7 2 Email 50 8 Otras aplicaciones 52 8 1 Reloj 52 8 2 Calculadora 52 8 3 Gestión de archivos 53 8 4 Grabador de sonidos 54 9 Instalación de Apps 55 9 1 Instalar 55 9 2 Desinstalar 55 9 3 Actualizar 55 10 Solución de problemas 56 11 Declaración de Conformidad 57 ...

Страница 4: ...mente alta o baja para evitar daños Mantenga el dispositivo la batería y el cargador lejos de impacto o vibración para evitar daños intensos No golpee el Smartphone e intente evitar impactos sobre el Nunca desmonte el dispositivo ni sus accesorios de lo contrario no estarán cubiertos por la garantía 1 3 Precauciones de seguridad Por favor lea la información de esta sección y transmíteselas a sus h...

Страница 5: ...martphone y respete los derechos privados y legales Utilice el cable USB de acuerdo con las instrucciones del manual para evitar daños en su Smartphone o PC No use su Smartphone en lugares húmedos tales como baños Manténgalo también alejado de líquidos para evitar que se viertan sobre ella por accidente ...

Страница 6: ... columna y deslice el dedo por la pantalla para abrir la lista de notificaciones Haga clic en la opción para ver la información detallada A continuación haga clic en la columna de la información y deslice hacia arriba para cerrar la ventana de información Los iconos de la barra de estado se muestran de la siguiente manera Nuevo email Modo avión USB conectado USB debug conectado Volver Descargando ...

Страница 7: ...rá abrir el panel de notificaciones para ver la información de forma detallada Abrir el panel de notificaciones Cuando un nuevo icono de notificaciones aparezca en la columna de notificaciones haga click en él para abrir dicho panel ...

Страница 8: ...r lo que necesitará desbloquearlo antes de proceder con su manipulación Apagar el aparato Mantenga pulsado el botón de encendido y aparecerán las siguientes opciones Modo silencio Modo avión y Apagar Cliquee en ésta última para apagar el dispositivo 3 3 Apagado Encendido de la pantalla Apagar la pantalla 1 La pantalla será apagada de forma automática cuando el Smartphone esté inactivo durante un t...

Страница 9: ...egundos para abrir las opciones de un objeto tales como links o páginas web o muévalo a acceso directo a la página de Inicio Deslizar Podrá deslizar suavemente los ítems vertical y horizontalmente con su dedo por la pantalla Arrastrar Pulse en la pantalla con el dedo antes de arrastrar y mantenga el dedo en la pantalla hasta que el elemento sea arrastrado hasta su destino Girar En la mayoría de lo...

Страница 10: ...o La figura 3 2 muestra la pantalla de Inicio Presione cualquier espacio vacío para abrir apps definir accesos directos en el fondo de pantalla etc Figura 3 2 Batería Hora Cobertura Barra de notificaciones Buscar ...

Страница 11: ...a derecha fuera de la pantalla Hay más de dos pantallas en la interfaz principal como se muestra en la Figura3 2 1 Figura 3 2 1 Administrar los iconos de la aplicación en el escritorio Para Android 2 3 y versiones anteriores se puede crear una carpeta en el escritorio y poner los iconos en la misma carpeta Para Android 4 0 es aún más fácil de crear una carpeta que incluye los siguientes pasos 1 Mu...

Страница 12: ...de la carpeta para cambiar su lugar Figura 3 2 3 Borrar iconos del escritorio 1 Haga click y mantenga presionado en el icono que desea eliminar Encontrará el icono de Eliminar 2 Arrastre el icono a la parte alta del Escritorio y quite el dedo cuando el icono aparezca en rojo para así borrarlo Cambia tu fondo de pantalla 1 En el interfaz de Inicio mantenga presionado cualquier espacio vacío en la p...

Страница 13: ...rtphone en modo almacenamiento 1 Conecte el teléfono al PC a través del cable USB Rápidamente le aparcera un aviso en la Columna de Notificaciones 2 Abra el Panel de Notificaciones Para más detalles de cómo abrirlo vaya al punto 2 3 Estado del Smartphone y Notificaciones 3 En el Panel de Notificaciones pulse en USB conectado luego abra el dispositivo USB tal y como muestra la figura 3 4 4 Será en ...

Страница 14: ...er a la tarjeta de almacenamiento en el Smartphone Si desea hacerlo desconecte la conexión USB Nota 2 Antes de copiar asegúrese de que la tarjeta SD se inserta en el Smartphone y se detecta 3 8 Introducir textos Para usar el teclado en pantalla Cuando se inicia una aplicación o se selecciona un cuadro de texto que requiere textos o de ingresar números aparecerá el teclado en pantalla El teclado pr...

Страница 15: ...r la interfaz de widgets Haga clic y mantenga cualquier Widget para crear un acceso directo en el escritorio A continuación puede introducir tal aplicación haciendo clic en el acceso directo en el escritorio Crear icono de acceso directo de la aplicación en el escritorio En la interfaz del widget o aplicación haga clic y mantenga sobre cualquier icono para volver al escritorio a continuación puede...

Страница 16: ...eta SIM Llamadas de voz Pulse Ajustes en el Menu Principal seleccione Administración de la tarjeta SIM Imagen 4 1 Imagen 4 1 Pulse LLamadas de Voz seleccione la tarjeta SIM con la que desea realizar llamadas de voz Imagen 4 2 Imagen 4 2 ...

Страница 17: ...SIM y pulse Video Llamadas seleccione la tarjeta SIM con la que desee hacer videollamadas Imagen 4 3 Imagen 4 3 Mensajes Pulse Ajustes en el Menu Principal seleccione Administración de la tarjeta SIM pulse Mensajes selecione la tarjeta SIM con la que desee enviar mensajes Imagen 4 4 Imagen 4 4 ...

Страница 18: ...conexión de datos Imagen 4 5 Imagen 4 5 4 2 Wireless e Internet 1 Conexión Wi Fi 1 En el Menu Principal seleccione Ajustes 2 Pulse WIFI las redes WIFI disponibles se mostrarán automaticamente Imagen 4 6 1 Seleccione la red WIFI a la que se desea conectar si tiene contraseña la ventana para introducirla se mostrará automaticamente teclee la contraseña pulse Conectar Imagen 4 6 ...

Страница 19: ...respondiente y pulse Conectar Imagen 4 8 Imagen 4 8 3 Notificación de Red Disponible Si la opción Notificación de Red Disponible está activada aparecerá un aviso en la esquina inferior derecha cuando el Smartphone detecte una red WIFI disponible recordándole que puede conectarse a dicha red La conexión WIFI debe estar activada para que esta opción funcione Imagen 4 6 4 Usar WIFI en suspensión Puls...

Страница 20: ... Bluetooth pulse buscar dispositivo en la esquina superior derecha el Smartphone buscará automaticamente los dispositivos Bluetooth cercanos Imagen 4 10 Imagen 4 10 4 Pulse el dispositivo Bluetooth apropiado se cargará automaticamente una ventan pidiendo la contraseña introdúzcala para conectarse al dispositivo correspondiente ...

Страница 21: ...probar el Tiempo de Visibilidad Seleccione Tiempo de Visibilidad como en la Imagen 4 12 seleccione el tiempo que desee como en la Imagen 4 13 Nota tenga en cuenta la cuenta atrás que le irá notificando el tiempo que le queda estando visible para los demas dispositivos Bluetooth Imagen 4 13 3 Mostrar archivos recibidos Seleccione Mostrar Archivos Recibidos en la Imagen 4 12 para ver descargar y sub...

Страница 22: ...mpruebe el Uso de Datos de su tarjeta SIM Imagen 4 15 Imagen 4 15 Compruebeel Uso de Datos de sus redes WIFI Pulse el icono situado en la esquina superior derecho en la Imagen 4 15 Pulse Uso de Datos Imagen 4 16 Imagen 4 16 ...

Страница 23: ... el GSM no reciven señal alguna Si el Modo Avión se desactiva el Wireless y el modulo GSM recuperan su estado previo VPN Abre VPN pulse Añadir Red VPN Imagen 4 17 Introduzca el nombre y la dirección del servidor y guarde Imagen 4 17 Pulse VPN como en la Imagen 4 18 introduzca el nombre y la contraseña de la red VPN pulse Conectar Imagen 4 18 ...

Страница 24: ...abra Anclaje a Red y Zona Wireless Imagen 4 19 3 Pulse el icono a la derecha de Zona con Cobertura Inalámbrica para activarla 4 Pulse Zona con Cobertura Inalámbrica para acceder a la configuración del punto de acceso Imagen 4 20 5 Configure el nombre de red la seguridad y la contraseña que desee Recuerde que la contraseña debe contener más de 8 caracteres numéricos ...

Страница 25: ... 4 21 seleccione la tarjeta SIM que desee utilizar GSM son redes 2G WCDMA son redes 3G Imagen 4 21 2 Access Point Name APN Pulse Redes Móviles Imagen 4 22 Imagen 4 22 Seleccione APN seleccione la tarjeta SIM que desee utilizar Seleccione el tipo Imagen 4 23 ...

Страница 26: ... también puede loguearse in páginas web de equipos Y las cargas también son diferentes Operadores de Red Pulse Operadores de Red seleccione la tarjeta SIM que desee conectar el Sistema buscará las redes GSM y WCDMA disponibles Imagen 4 24 Imagen 4 24 Modo de Prioridad de datos GPRS Después de abrir el Modo de Prioridad de datos GPRS el Sistema priorizará las redes escogidas ...

Страница 27: ...io Abra Ajustes pulse Perfiles de Audio Imagen 4 26 Imagen 4 26 Pulse General para ver la configuración del perfil Imagen 4 27 Imagen 4 27 Vibración Imagen 4 27 pulse vibración el Smartphone vibrará cuando reciba una llamada ...

Страница 28: ...ificación y el volume de la alarma Imagen 4 28 Imagen 4 28 Tono de Llamada Imagen 4 27 pulse Tono de Llamada para escoger el Tono de Llamada Imagen 4 29 Imagen 4 29 Tono de VideoLlamada En la Imagen 4 27 pulse Tono de Videollamada para escoger el Tono de Videollamada como en la Imagen 4 30 ...

Страница 29: ...olo para seleccionar no se pueden configurar 4 7 Pantalla Ajustar el brillo de la pantalla 1 Pulse Ajustes 2 Pulse Pantalla seleccione Brillo 3 Arrastre el icono circular para cambiar el brillo Imagen 4 31 Imagen 4 31 4 Pulse OK despues de que el brillo estea ajustado ...

Страница 30: ...s por defecto del Sistema Fondos de Pantalla con video Imagen 4 32 Imagen 4 32 Autorotación La autorotación viene activada en el Sistema por defecto cuando esta se desactiva lo que el Smartphone muestra en pantalla no rota al girar el dispositivo gracias al sensor G sensor Suspensión 1 Pulse Ajustes 2 Pulse Pantalla 3 Pulse Suspensión 4 Configure el tiempo de suspension que desee Imagen 4 33 Image...

Страница 31: ...e instalar por defecto sus aplicaciones Compruebe el espacio de almacenamiento disponible en la memoria de su Smartphone y en su tarjeta SD 1 Entre en Ajustes 2 Pulse Almacenamiento compruebe el espacio de almacenamiento 1 Almacenamiento Interno Memoria del Sistema La memoria del Sistema es el espacio que el Smartphone deja para los archivos del Sistema Imagen 4 38 El usuario no tiene acceso a ell...

Страница 32: ...magen 4 39 Tarjeta SD Puede comprobar el espacio de almacenamiento memoria disponible en la tarjeta SD desmontar la tarjeta SD y biorrar la tarjeta Imagen4 40 Imagen 4 40 Etracción segura de la tarjeta SD Pulse Ajustes Pulse memoria Pulse desinstalar tarjeta SD Ahora puede retirar su tarjeta SD con seguridad Nota Retirar su Tarjeta SD con seguridad puede proteger la Tarjeta SD e incrementar su tie...

Страница 33: ... Imagen 4 41 4 9 Aplicaciones 1 Pulse Ajustes 2 Seleccione Aplicaciones despues entre aquí puede gestionar y borrar aplicaciones instaladas y comprobar el espacio de memoria del Sistema utilizado y disponible Imagen 4 42 Imagene 4 42 3 Ver espacio usado y disponible de la memoria interna Imagen 4 43 ...

Страница 34: ...el espacio utilizado y el espacio disponible Imagen 4 44 Imagen 4 44 4 10 Cuentas y Sincronización 1 Seleccione Ajustes 2 Pulse Añadir una Cuenta Imagen 4 46 Imagen 4 46 3 Una vez que este correctamente cargada se abrirá la función de sincronización Imagen 4 47 ...

Страница 35: ...ar el Smartphone 2 GPS Conecte el GPS puede usar el GPS para posicionar el Smartphone 3 Asistencia GPS Conecte la Asistencia GPS esto puede incrementar la velocidad de posicionamiento del GPS pero necesita introducer una tarjeta SIM y utilizer su transmission de datos 4 Conecte la Asistencia GPS esto puede incrementar la velocidad de posicionamiento del GPS pero necesita introducer una tarjeta SIM...

Страница 36: ...para proteger su Smartphone Nota Despues de ajustar el bloqueo de Pantalla deberá introducer el código de desbloqueo cada vez que quiera encender la pantalla del dispositivo o desbloquear la pantalla Configurar Patrón de Bloqueo 1 Pulse Ajustes en el Menu principal 2 Pulse Seguridad 3 Pulse Bloquear Pantalla 4 Seleccione Patrón de Bloqueo en la zona de ajustes de texto 5 Pulse Siguiente en el mens...

Страница 37: ...Nuevo código PIN números y pulse Continuar 6 Introduzca el Nuevo código PIN otra vez y pulse Confirmar Configuración de Código de Bloqueo 1 Pulse Ajustes en el Menu Principal 2 Pulse Seguridad 3 Pulse Bloqueo de Pantalla 4 Configure la contraseña en la zona de configuración 5 Configure la nueva contraseña letras y números y pulse en Continuar 6 Introduzca la contraseña nuevamente y pulse Confirmar...

Страница 38: ...gen Desconocido activada 4 14 Lenguaje y Teclado Pulse Ajustes seleccione Lenguaje y teclado seleccione Lenguaje para escoger el lenguaje Imagen 4 55 Picture 4 55 Pulse Ajustes seleccione lenguaje y teclado seleccione Ajustes de Teclado android pulse Lenguaje de Teclado Imagen 4 56 ...

Страница 39: ...s de seguridad y Reseteo Conecte la WIFI y logueese con su cuenta de Google seleccione Hacer Copia de Seguridad de Mis Datos el Sistema guardará una copia de sus datos en el servidor de Google Si necesita recuperar los datos de fábrica porfavor pulse Reset Imagen 4 59 si necesita resetear el NAND porfavor pulse Reset ...

Страница 40: ...de Zona escoja la zona de la lista Desplace lista hacia abajo para ver más zonas 6 Pulse Fecha pulse los botones arriba o abajo para ajustar el día mes y año pulse Ajustar cuando termine 7 Pulse Hora pulse los botones arriba o abajo para ajustar las Horas y Minutos pulse AM o PM para cambiar a maña o tarde Esto no es necesario si selecciona el formato 24 Horas Pulse Ajustar para terminar 8 Pulse F...

Страница 41: ... internet no necesitas habilitar la configuración de fecha hora y zona 4 17 Programación de Encendido y Apagado 1 Pulse Ajustes en el Menu Principal 2 Pulse Programación de Encendido y Apagado Picture 4 61 3 Realizar las operaciones que indica la Imagen 4 61 ...

Страница 42: ... Web Permitirá instalar scripts de páginas web cuando la sabras con el Sistema pero incrementará el riesgo cuando tu estés navegando por la red 4 19 Desarrollo Depuración USB Después de abrir Depuración USB puede utilizer algún software para leer el software del Smartphone pero cuando Depuración USB está conectada el almacenamiento USB necesita ajustes manuales Mantener estado activo Si active Man...

Страница 43: ...ona que se está refrescando Uso CPU Después de abroir Uso de CPU en la esquina superior derecha del Smartphone se mostrará el porcentaje de uso de la CPU Imagen 4 63 Imagen 4 63 4 20 Acerca del Teléfono Comprueba el estado del Smartphone 1 Pulsa Ajustes en el Menu Principal 2 Pulsa Acerca del Teléfono compruebe el estado modelo version de Android 3 Pulse Estado compruebe el estado de la Batería Vo...

Страница 44: ...anción deseada en la Lista de reproducción tal y como muestra la Figura 5 1 Figura 5 1 Figura 5 2 Arrastre la barra de reproducción en curso para acceder al instante de la reproducción deseado Para otras operaciones relacionadas con la reproducción véase la Figura 5 2 Portada Album Pausa Play 播放 Siguiente Anterior Artista Album Título canción Reproducción aleatoria Repetir ...

Страница 45: ... clasificará estas fotos y videos en diferentes carpetas Puede ver y editar las fotos establecer como fondo de pantalla y ver las imágenes Ver imágenes 1 Haga clic en Álbum en el menú principal 2 Introduzca el disco y haga clic en una carpeta para ver las imágenes del mismo 3 Haga clic en la imagen deseada para verla en pantalla completa de forma automática 4 Para acercar la imagen poner dos dedos...

Страница 46: ... centro para ajustar el tamaño del corte 4 Haga click en cortar cuando consiga el tamaño del corte deseado 5 Si quiere cancelar el recorte pulse en Cancelar para retornar al album Editar 1 Acceda a las opciones de Menú 2 Click Editar 3 En la ventana aparecerán la siguientes opciones Brillo Estilo Color y Efectos 4 Click Guardar 5 Si desea cancelar la edición pulse la tecla de Volver y seleccione V...

Страница 47: ...RDS seleccione el elemento que desee agregar Buscar canal haga clic en el botón Menú en el radio y haga clic en Buscar el sistema buscará los canales de forma automática Los canales encontrados se guardarán en la lista de canales Seleccione como favorite haga click en el siguiente icono en el Menu principal para ajustar el canal como favorite y almacenarlo en la lista de canales Lista de canales M...

Страница 48: ...léfono 1 Seleccione Dial para marcar el número 2 Siga la figura 6 1 Figura 6 1 6 2 SMS 1 Entre en el Menú principal y seleccione Figura 6 2 Número a llamar Llamar Nuevo mensaje Busqueda Números Historial de llamadas Contactos ...

Страница 49: ... Haga click en el Menú para acceder a sus Contactos Véase figura 6 4 Figura 6 4 Búsqueda de contactos Pulse para comenzar la búsqueda Añada una nueva entrada Pulse e introduzca el nuevo contacto Introducir número Añadir contacto destinatario Enviar Mensaje ...

Страница 50: ... and network haga click en el buscador en el Menú principal o escritorio para acceder a Internet Ver figura 7 1 Figura 7 1 Clicar en la barra de direcciones para introducir el URL y pulsar en Ir para visitar dicha dirección de Internet Ver figura 7 2 Figura 7 2 Ver Marcadores e Historial Marcadores ...

Страница 51: ... de correo electrónico está disponible 10 Introduzca el nombre de cuenta y el nombre para mostrar a continuación haga clic en Completa 11 Si el correo electrónico se encuentra disponible se guarda en la bandeja de entrada de forma automática b Borre la cuenta de email Puedes borrar las cuentas POP3 o IMAP de tu Smartphone 1 Click 2 Entre en su bandeja de entrada 3 Pulse en el botón Menú 4 Vaya a a...

Страница 52: ...el nuevo email 5 Introduzca la dirección de correo del receptor 6 Introduzca asunto y el mensaje 7 Haga click en añadir adjunto 8 Seleccione el documento adjunto que desee enviar ej fotos vídeos etc 9 Pulse en Enviar para enviar el mensaje Figura 7 4 Añadir adjunto ...

Страница 53: ... en su interfaz tal y como muestra la figura 9 1 Podrá ver los botones de Reloj Foto Música e Inicio Figura 9 1 8 2 Calculadora 1 Pinche en 2 Entre en la interfaz de la calculadora 3 Pulse en los números y opere para realizar los diferentes cálculos 4 Figura 9 2 ...

Страница 54: ...9 3 a Para copiar cortar borrar o cambiar el nombre del archivo o carpeta seleccione un archivo o una carpeta haga clic y mantenga pulsado para entrar en la interfaz como se muestra en la figura 9 4 donde se pueden llevar a cabo operaciones relacionadas con el archivo o carpeta Figura 9 4 b Comparte un archivo Seleccione un archivo haga click y mantenga pulsado Aparecerá una lista en la cual tendr...

Страница 55: ...peta haga click en en la esquina superior derecha seleccione la nueva carpeta y continue siguiendo las instrucciones 8 4 Grabador de sonidos En el Menú principal o en el Escritorio Pinche en el icono para entrar en el interfaz de la grabadora de sonidos Pulse en el botón de grabación para empezar a grabar Pulsen para pararla Pulse la tecla para reproducir el archivo de audio grabado El Sistema te ...

Страница 56: ...a opción de instalación en las ventanas emergentes haga clic en Instalar apk 4 Siga el asistente de instalación Nota las aplicaciones de terceros adquiridos a través de Internet son todos archivos apk 9 2 Desinstalar 1 Vaya a ajustes 2 Pinche en App y aparecerán la lista de todas las apps instaladas en el sistema 3 Haga click en el archivo APK que desee eliminar y seleccione Desinstalar 4 Pulse Co...

Страница 57: ...orreo electrónico o registrar aplicación Asegúrese de que la red está conectado correctamente Asegúrese de que el cálculo de la cuenta de correo electrónico es correcta Asegúrese de que la hora del sistema sigue siendo el mismo con la hora local 5 El sistema no está funcionando correctamente Ciertas aplicaciones de terceros instaladas en el sistema pueden dar lugar a un fallo del sistema En este c...

Страница 58: ...s eléctricos y electrónicos cumpliendo con los siguientes estándares de conformidad Para consultar la declaración de conformidad extendida visite http www primux es conformidad Salud SAR EN 50360 2001 EN 62209 1 2006 EN 62479 2010 EMC EN301 489 1 V1 9 2 2011 09 EN301 489 3 V1 4 1 2002 08 EN301 489 7 V1 3 1 2005 11 EN301 489 17 V2 1 1 2009 05 EN301 489 24 V1 5 1 2010 10 Radio EN 301 511 V9 0 2 2003...

Страница 59: ...58 ...

Страница 60: ...59 U S E R M A N U A L ENGLISH ...

Страница 61: ...60 ...

Страница 62: ...6 Starting Apps 72 3 7 USB Connection 72 3 8 Enter texts 73 3 9 Tips for use 74 4 Basic Setting 75 4 1 SIM Management 76 4 2 Wireless and Internet 77 4 3 Bluetooth 79 4 4 Data Usage 81 4 5 More 81 4 6 Contextual Model 86 4 7 Display 88 4 8 Storage 90 4 9 Battery 92 4 10 Application program 92 4 11 Account and Sync 94 4 12 Location service 94 4 13 Safety setting 95 4 14 Language and Input Method 97...

Страница 63: ...07 6 2 SMS 107 6 3 Contacts 108 7 Internet 109 7 1 Browser 109 7 2 Email 110 8 Other Apps 112 8 1 Clock 112 8 2 Calculator 112 8 3 File manager 113 8 4 Audio recorder 114 9 Installing Apps 115 9 1 Install 115 9 2 Uninstall 115 9 3 Updating 115 10 Troubleshooting 116 11 Declaration of Conformity 117 ...

Страница 64: ...o avoid damage Keep the device battery and charger away from extremely high or low temperature to avoid damage Don t impact or strike the Smartphone with sharp articles and avoid dropping extruding or bending it Never disassemble the device and its accessories otherwise the device or the accessories will not be covered by our warranty 1 3 Safety precautions Please read the information in this sect...

Страница 65: ... laws and regulations when using the Smartphone and respect other s privacy and legal rights Use the USB cable in strict accordance with the instructions in this manual to avoid damage to your Smartphone or PC No not use the Smartphone in humid environment such as the bath room Keep the Smartphone away from any liquid ...

Страница 66: ...on panel click the column and slide your finger on the screen to open the notification list Click the option to view the detailed information Then click the information column and slide up to close the information window The icons in the status bar are shown as follow New email Flight mode USB connected USB debugging connected Return Downloading Setting Home button press and hold it to viwe histor...

Страница 67: ...66 Open notification panel When new notification icon appears in the notification column click it to open the notification panel ...

Страница 68: ... welcome screen The screen is locked when the device turned on you need to unlock the screen first Turn off the device 1 Press and hold the POWER button the shut down options will appear 2 The shut down options include mute mode flight mode and shut down 3 Click Shut down to turn off the device 3 3 Turning of off the screen The screen will be turned off automatically when idle 1 The screen will be...

Страница 69: ...uch as the links in the textbox or webpage or move the shortcuts or apps in the home menu Swiftly slide or slide Swiftly slide or slide refers to swiftly drag on the screen vertically or horizontally with your finger Drag Press on the screen with your finger before dragging and keep your finger on the screen until the item is dragged to the destination Rotate In most cases if you rotate the Smartp...

Страница 70: ... 3 5 Home Refer to figure 3 2 for the Home interface Press any where blank on the main screen you can open apps shortcuts define the wallpaper etc Figure 3 2 Battery Time Prompt Notification column Search ...

Страница 71: ...ght outside the screen There are more than two screens on the main interface as shown in Figure 3 2 1 Figure 3 2 1 Manage the App icons on desktop For Android 2 3 and below you can create folder on the desktop and put the icons in the same folder For Android 4 0 it is even simpler to create a folder including the following steps 1 Move all icons that you want to put together onto the same icon as ...

Страница 72: ...hold any icon in the folder to change its place Figure 3 2 3 Delete the icons on the desktop 1 Click and hold the icon you want to delete you will see the Delete icon 2 Drag the icon to the top of the Delete icon and remove your finger when the icon becomes red to delete it Change wallpaper 1 In Home interface click and hold any blank on the screen a popup window will allow you to set the wallpape...

Страница 73: ... you must complete the storage mode setting of your Smartphone 1 Connect the Smartphone and PC via USB cable A prompt will appear in the notification column 2 Open the notification panel for details about how to open it please refer to 2 3 Smartphone status and notification 3 In the notification panel click USB Connected then click Open USB device as shown in figure 3 4 4 Now the USB is successful...

Страница 74: ...l not be able to access to the storage card on Smartphone If you want to do so disconnect the USB connection Note 2 Before copying make sure the SD card is inserted into the Smartphone and is detected 3 8 Enter texts Using on screen keypad When an app is started or a textbox requiring entering texts or numbers is selected the on screen keypad will appear The keypad provides the following input met...

Страница 75: ...de left on the screen to switch to the Widget interface Click and hold any widget to create a shortcut on the desktop Then you can enter such app by clicking its shortcut on the desktop Create shortcut icon of app on the desktop In the Widget or App interface click and hold any icon to switch back to the desktop then you can drag the icon to any place on the desktop Prompt the system may require y...

Страница 76: ...75 4 Basic Setting 4 1 SIM Management Voice call Click settings in main menu choose SIM Management as Figure 4 1 4 1 Figure Click voice call choose defaulted SIM card as Figure 4 2 Figure 4 2 ...

Страница 77: ...M Management and click video call choose defaulted SIM card when makes video call as Figure 4 3 Figure 4 3 Message Click settings in main menu choose SIM Management click message choose the defaulted SIM card when sends message as Figure 4 4 Figure 4 4 ...

Страница 78: ... 4 5 4 2 Wireless and Internet Connect Wi Fi 1 In the main menu or interface choose setting application procedure 2 Click WLAN open wifi Smartphone will automatically search the available Wifi wireless internet As Figure 4 6 3 Choose the Wi Fi internet you want to connect if it has password it will popup the password window enter password click connect ...

Страница 79: ...Input network SSID the wireless network name click save Click user name already saved click connect to use network as Figure 4 8 Figure 4 8 Network Notice If you open Network Notice when WIFI signal appears the right bottom will remind you available WLAN network as Figure 4 6 ...

Страница 80: ...Figure 4 9 Figure 4 9 4 3 Bluetooth Bluetooth function operation 1 Click setting application in main menu interface 2 Click bluetooth and open it 3 If somebody open bluetooth in your surroudings click search device in right above then Smartphone will automatically search the bluetooth device nearby As Figure 4 10 Figure 4 10 ...

Страница 81: ... Figure 4 12 select rename tablet you can rename it as you want Figure 4 12 Check visibility timeout Select visibility timeout setting in Figure 4 12 choose the time you want to set as Figure 4 13 Note check overtime setting is the time setting when Bluetooth is checked Figure 4 13 Display the file you received Choose display the file you received in Figure 4 12 you can view download and upload fi...

Страница 82: ...in right top of Figure 4 15 click Data Usage as Figure 4 16 Figure 4 16 4 5 More Airplane Mode Airplane Mode can turn off WIFI and GSM card function quickly when airplane mode is turned on WIFI and GSM can t get any signal then airplane mode is turned off WIFI and GSM module will recover to previous state ...

Страница 83: ...en save Figure 4 17 Click VPN as Figure 4 18 input VPN user name and password click connect Figure 4 18 Network sharing and portable hotspots Portable WI FI hotspots 4 Click setting application in main menu 5 Click more when wifi is well connected open network share and portable hotspo ...

Страница 84: ...ous menu open portable WLAN hotspots click configure WI FI hotspots Figure 4 20 8 Set passwords you want to password should be more than 8 numbers Mobile Networks 1 3G service Click 3G service as Figure 4 21 choose available defaulted SIM card GSM is 2G network WCDMA is 3G network ...

Страница 85: ...84 Figure 4 21 2 Access Point Name APN Click mobile network as Figure 4 22 Figure 4 22 Choose access points name APN choose SIM card you need to connect Choose connect type as Figure 4 23 ...

Страница 86: ...e phone network it can also log in webpage in computer And the charges are also different Network Operator Click network operator choose SIM card you need to connect system will search available GSM and WCDMA network as Figure 4 24 Figure 4 24 GPRS data prior mode After Open GPRS data prior mode systems will priority chooses your network ...

Страница 87: ...l as Figure 4 26 Figure 4 26 2 Click standard to enter into Figure 4 27 Figure 4 27 Vibrate In Figure 4 27 click vibrate Smartphone will vibrate when someone calls you Volume In Figure 4 27 click volume you can set ringtone notice and alarm volume as Figure 4 28 ...

Страница 88: ...ce call Ringtone In Figure 4 27 click voice call ringtone to choose voice call ringtone as Figure 4 29 Figure 4 29 Video call ringtone In Figure 4 27 click video call ringtone to choose video call ringtone as Figure 4 30 ...

Страница 89: ... they can t be set 4 7 Display Adjust the screen brightness Click Settings application procedure Click Display choose Brightness Drag the portlito to adjust the brightness volume As Figure 4 31 Figure 4 31 Click OK after brightness is adjusted Wallpapers Click setting application ...

Страница 90: ...ined wallpapers system defect video wallpaper as Figure 4 32 Figure 4 32 Auto rotation System is defaulted as open auto rotation when it is turned off system won t rotate Smartphone screen by G sensor Sleep Click setting appliation Click display Click sleep Set the sleep time as you want as Figure 4 33 Figure 4 33 ...

Страница 91: ...ed install location you can choose isntall new application to choose preferred install location Check SD card and Smartphone storage space Enter into settings application Click storage check storage space Internal storage System storage System storage is the spcae Smartphone leave for system file as Figure 4 38 It can t be viewed Figure 4 38 ...

Страница 92: ...f you need to check the storage content you can check it in main menu Figure 4 39 SD card You can check storage space SD card available space unmount SD card and erease SD card as Figure 4 40 Figure 4 40 Safely remove SD card Click setting application Click memory Click uninstall SD card ...

Страница 93: ...tery Click setting function select battery you can view the battery situation as Figure 4 41 Figure 4 41 4 10 Application program Click setting application in Apps Select application after enter you can manage and delete installed application and check system used storage space and left space As Figure 4 42 Figure 4 42 ...

Страница 94: ...93 View internal storage used space and left space as Figure 4 43 Figure 4 43 View the working device used space and available space as Figure 4 44 Figure 4 44 ...

Страница 95: ...etting application Click add an account as Figure 4 46 Figure 4 46 After successfully load it will open the sync function as Figure 4 47 Figure 4 47 4 12 Location service Click setting select location service as Figure 4 48 Figure 4 48 ...

Страница 96: ...n EPO setting Click EPO settings enter into Figure 4 46 Then check if EPO positioning information and EPO has turned on auto download Figure 4 49 Location and Google search Open location and allow google search you can use your location information to improve search result and other services 4 13 Safety setting Set locked screen Lock the touch screen by unlock icon or password to protect your Smar...

Страница 97: ...nger from the screen when finish The system will record yous new unlock pattern 7 Click continue 8 When you see the reminder enter the unlock pattern then click confirm Figure 4 53 Set unlock PIN code 1 Click settings application in main interface 2 Click safe 3 Click screen locked 4 Choose PIN in text setting area 5 Enter new PIN code numbers and click continue 6 Ener new PIN code again and click...

Страница 98: ...firm Unknown source 1 In main interface click setting 2 Click safety 3 Click unknown source as Figure 4 54 Figure 4 54 Note Manual installing APK files needs to turn on unknown source 4 14 Language and Input Method Click setting select language and input method choose language to switch language as Figure 4 55 ...

Страница 99: ...anguage you want to change in the language list as Figure 4 57 Figure 4 57 4 15 Backup and Reset Connect WIFI and login your google account choose backup my data system will backup your data into google server If you need to recovery factory reset please click reset as Figure 4 59 if you need to formulate NAND please click reset tablet ...

Страница 100: ...ide down the list to view more zones Click Date setting then click upper or down buton to adjust date month and year click setting when you finish selection Click Time setting then click upper or down button to adjust hour and minute click AM or PM to change morning or afternoon there is no such selection when you se 24 hour format Click Settings to finish Click 24 hour format switch between 12 ho...

Страница 101: ... the time internet provided you will not able to set the date time and time zone 4 17 Fixed time Startup and Shutdown Click Setting application procedure Click fixed tine startup and shutdown Figure 4 61 Operate as below Figure 4 61 ...

Страница 102: ...ou install webpage scrip when you open system but it will increase the risk when you are browsing webpage 4 19 Engineer Selection USB adjustment After opening USB adjustment you can use some software to read Smartphone software but when USB adjustment is turned on USB storage needs to manual adjust Keep awaken state If you open keep awaken state it wll never auto sleep when your Smartphone is char...

Страница 103: ...t will display related area when the area is refreshing Show CPU usage After open CUP usage in the right top of Smartphone will show CPU usage situation as Figure 4 63 Figure 4 63 4 20 About Tablet Check Smartphone state Check Setting application Click about tablet check state message model Android version version No and so on Click state message check battery state battery volumne SIM state IMEI ...

Страница 104: ... start music player Click the desired music in the list to play it As shown in figure 5 1 Figure 5 1 Figure 5 2 Drag the progress bar to adjust play progress For operation of the music player refer to figure 5 2 Album cover Pause Play 播放 Next Previous Artist Album Track name Random play Repeat ...

Страница 105: ...y these pictures and videos in different folders You can view and edit the photos set as wallpaper and view the pictures View picture 1 Click Album in the main menu 2 Enter the album and click a folder to view the pictures in it 3 Click the desired picture to view it in full screen automatically 4 To zoom in the picture put your two fingers on the screen and separate them shut your fingers to zoom...

Страница 106: ...tions 2 Then click Cut and click and drag to adjust the cutter 3 Drag from the center of the cutter to adjust the cutting size 4 Click Cut if adjusted to your desired size 5 If you cancel the cutting click Cancel to return to album Editing 1 Click Menu button to display menu options 2 Click Edit 3 In the popup options you can select Brightness Style Color and Effect 4 Click Save 5 If you cancel th...

Страница 107: ...g button to enter RDS setting interface select the item you want to add Search channel click Menu button in the radio and click Search the system will search for channels automatically The found channels will be saved in channel list Set as favorite click button in the main menu to set the channel as favorite and store it into the channel list Channel list Bookmark Previous Next Current frequency ...

Страница 108: ...ommunication 6 1 Telephone 1 Select Dial to dial a number 2 Follow figure 6 1 Figure 6 1 6 2 SMS 1 Enter the main menu and select Figure 6 2 Display number Dial New message Numbers Call history Contacts Search ...

Страница 109: ...6 3 Contacts Click in the main menu to enter Contacts As shown in figure 6 4 Figure 6 4 Search for contacts click button to start searching Add new entry click button to enter relevant interface Enter number Add receiver Send the message ...

Страница 110: ...1 Wireless and network click the browser in the main menu or desktop to enter IE interface as shown in figure 7 1 Figure 7 1 Click the address bar to enter the URL and then click start to visit and browse the website As shown in figure 7 2 Figure 7 2 View bookmark and history Bookmark ...

Страница 111: ... Enter the account name and the display name then click Complete 5 If the email is available it will be saved in your inbox automatically b Delete email account You can delete the POP3 or IMAP email accounts from your Smartphone 1 Click 2 Enter your inbox 3 Click menu button menu 4 Click Setting 5 Select the account you want to delete in the drop down list 6 Click Confirm to delete it c Send an E ...

Страница 112: ...ut the email address of the receiver 6 Input subject and message 7 Click Add attachment 8 Select the attachment you want to send such as picture video etc 9 Click Send to send the email Figure 7 4 Add attachment ...

Страница 113: ...to enter the interface as shown in figure 8 1 You can see Clock Picture Music and Home buttons Figure 8 1 8 2 Calculator 1 Click 2 Enter calculator interface 3 Click the numbers and operators on the calculator to make calculations Figure 8 2 ...

Страница 114: ...lick the File manager icon to enter it Figure 8 3 a To copy cut delete or rename the file or folder select a file or folder click and hold it to enter the interface as shown in figure 8 4 where you can conduct relevant operations to such file or folder Figure 8 4 b Share a file select a file click and hold it select Share in the popup list and select the way of sharing in the popup list ...

Страница 115: ... folder and continue according to the instructions 8 4 Audio recorder In the main menu or desktop click the icon to enter audio recording interface Click the Record button to start recording Click the Stop button to stop recording Click the Play button to play the recorded audio The system will prompt you to use the recording or not you can select manually Play recording to play the recording via ...

Страница 116: ...pp you want to install 3 In the popup installation option click Install apk 4 Follow the installation wizard Note the third party apps acquired from the Internet are all apk files 9 2 Uninstall 1 Click Setting in the main menu 2 Click App all apps installed in the system will be listed 3 Click the APK file you want to delete and click Uninstall 4 Click Confirm to uninstall 9 3 Updating Update Andr...

Страница 117: ...t hot and this is normal 4 Can not set email account or register app Make sure the network is properly connected Make sure the method of setting email account is correct Make sure your system time stays the same with the local time 5 The system is not running properly Certain third party apps installed in the system may lead to failure of the system In this case you may press the Reset button besi...

Страница 118: ... on Electromagnetic Compatibility with the standards For an extended version of declaration of conformity visit http www primux es conformidad Health SAR EN 50360 2001 EN 62209 1 2006 EN 62479 2010 EMC EN301 489 1 V1 9 2 2011 09 EN301 489 3 V1 4 1 2002 08 EN301 489 7 V1 3 1 2005 11 EN301 489 17 V2 1 1 2009 05 EN301 489 24 V1 5 1 2010 10 Radio EN 301 511 V9 0 2 2003 03 EN 301 908 1 V5 2 1 2011 05 E...

Страница 119: ...118 ...

Страница 120: ......

Отзывы: