background image

24

Logic (MCU) 

4.6  

Fader Modes

FaderPort™ 8 

Owner’s Manual

4.6  

Fader Modes

The 8 faders on the FaderPort 8 can be used to set levels, control plug-
in parameters, set send levels, and panning for every channel.

1

2

3

4

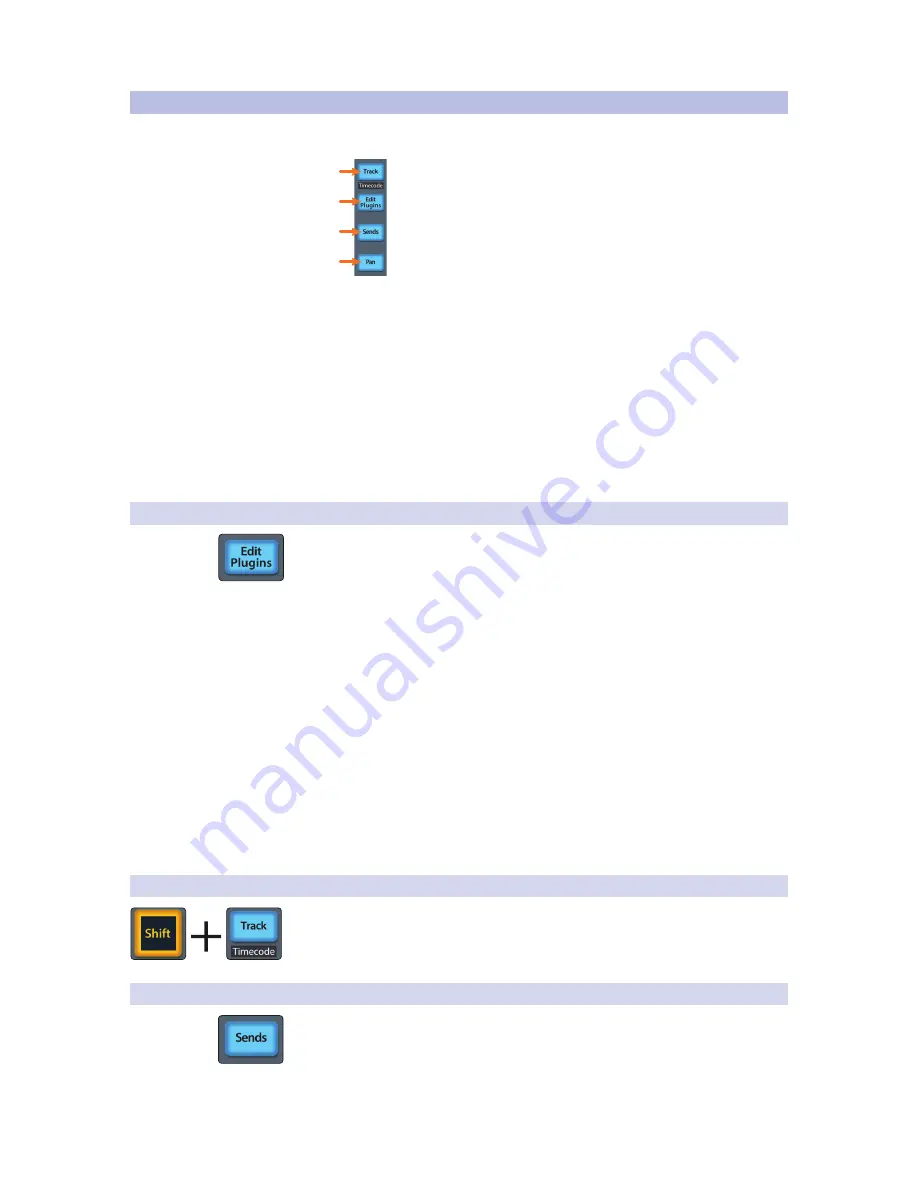
1.  Track. When Track mode is active, the motorized faders will display and 

control channel levels. Press Shift and Track simultaneously to display 
Timecode on the scribble strips. 

See Section 4.6.2

 for more information.

2.  Edit Plug-ins. When Edit Plug-ins mode is active, the motorized faders 

will control the parameter settings. The scribble strips will display the 
parameter each fader controls. 

See Section 4.6.1

 for more information.

3.  Sends. When Sends mode is active, the motorized faders will control the 

send levels for the selected channel. 

See Section 4.6.3

 for more information.

4.  Pan. When Pan mode is active, the motorized faders will display and 

control channel pan. When not active, the Pan/Param knob to the left of the 
scribble strips controls the panning for the currently selected channel.

4.6.1 

Edit Plug-ins

The FaderPort 8 provides two different modes to control plug-ins within Logic: Mix 

Focus and Channel Focus
To engage Mix Focus mode:

1.  Press Edit Plug-ins once. This will display the first Insert 

Slot for every channel in your Logic session.

2.  Press the Select button below the plug-in you’d like to edit. This 

display the plug-in parameters on the scribble strips and allow 
you to control each parameter with the corresponding fader. Use 
the Navigation buttons to access additional parameters

To engage Channel Focus mode:

1.  Press Edit Plug-ins twice. This will display every insert slot of 

the currently selected channel in the scribble strips.

2.  Press the Select button below any of the insert slots to edit that plug-in’s 

parameters. Use the Navigation buttons to access additional parameters.

Power User Tip:

 If the insert slot is empty in either mode, move the corresponding fader to 

scroll through the available plug-ins. Press the Select button once to instantiate the 
desired plug-in.

4.6.2 

Timecode

Press the Shift and Track buttons simultaneously to view the Timecode on the 
scribble strips. This follows the type of Timecode you have selected from within Logic. 
While Timecode is active, the faders will continue to control level. 

4.6.3 

Sends

Like Edit Plug-ins, engaging Sends offers two different modes: Mix View and  
Channel Focus.
To engage Mix View, press Sends once. In this mode, the Faders 
will control the first send for every channel and the Select button 
will control the first send Mute for every channel.

Содержание FaderPort 8

Страница 1: ...FaderPort 8 8 channel Production Controller Owner s Manual www presonus com English...

Страница 2: ...s 15 3 3 Transport Controls 15 3 4 The Session Navigator 16 3 5 Automation Controls 16 3 6 Fader Modes 17 3 6 1 Edit Plug ins 17 3 6 2 Sends Mode 18 3 6 3 Pan Mode 18 3 6 4 Timecode 18 3 7 Mix Managem...

Страница 3: ...unction Buttons 40 7 5 Automation Controls 40 7 6 Fader Modes 41 7 6 1 Sends Mode 41 7 6 2 Pan Mode 41 7 6 3 Timecode 41 7 7 Mix Management 41 8 Studio One Artist Quick Start 42 8 1 Installation and A...

Страница 4: ......

Страница 5: ...real experts our valued customers We appreciate the support you have shown us through the purchase of this product and are confident that you will enjoy your FaderPort 8 1 2 About this manual We sugg...

Страница 6: ...les in your user account Studio One Artist provides all the tools and features you need for modern recording and production While the FaderPort 8 works as both an MCU and a HUI device in most major DA...

Страница 7: ...FaderPort 8 Quick Start Guide 6 1 8m USB cable External Power Supply Studio One Key Commands Guide Power User Tip Studio One Artist and a more in depth Owner s Manual are available for download from...

Страница 8: ...this commitment we offer periodic firmware updates that add features improve functionality and resolve issues that are discovered in the field Because of this it is highly recommended that you downloa...

Страница 9: ...re button will begin the update process This process will take approximately five minutes At the end of the firmware update you will be prompted to reboot your FaderPort 8 Once rebooted your FaderPort...

Страница 10: ...cted your mode press the Select button below the Exit screen to reboot your FaderPort 8 This mode will be selected automatically every time you boot your FaderPort 8 If you would like to change the mo...

Страница 11: ...Owner s Manual 2 Click the Add button 3 From the manufacturers list at the left click on PreSonus and then select the FaderPort 8 4 Set the Send To and Receive From fields to FaderPort 8 on your Fade...

Страница 12: ...ve chosen in your session 6 Solo Isolates the corresponding channel s output signal in the mix Press and hold to solo momentarily 7 Mute Mutes the corresponding channel s output signal Press and hold...

Страница 13: ...th any of these buttons to access the F1 F8 Functions The functions are user definable See Section 2 6 2 for more information 2 1 4 3 6 5 8 7 1 Channel Encoder and navigation buttons control individua...

Страница 14: ...ve your session 2 Trim Redo At this time Trim Automation is not available in Studio One Press the SHIFT and Trim buttons simultaneously to redo the last action 3 Off Undo Turns Automation off on curre...

Страница 15: ...scribble strips controls the panning for the currently selected channel Press the Pan button again to view metering on the scribble strip displays 2 6 1 Edit Plug ins To control plug ins in Studio On...

Страница 16: ...o view all Input channels 2 VI Press to view Instrument tracks only 3 Bus Outputs Press to view buses only Press Shift Bus to view Output channels 4 VCA FX Press to view VCAs Press Shift VCA to view a...

Страница 17: ...ct button below the Exit screen to reboot your FaderPort 8 Once selected your FaderPort 8 will automatically boot into HUI mode every time it is powered on If you would like to change the mode at any...

Страница 18: ...ncoder in the Session Navigator 3 Pan Position Displays the Channel s current pan position 4 Pan Param This push button encoder controls pan for the currently selected channel while in Track mode For...

Страница 19: ...Inserts When Edit Plug ins mode is active the inserted plug ins for the Selected channel will be displayed See Section 3 6 1 for more information Sends Sends When Sends mode is active the aux sends fo...

Страница 20: ...er Encoder and navigation buttons scroll through markers Press Encoder to drop a marker Press Shift and Marker to toggle between Smart Tools 3 5 Automation Controls 3 4 2 5 1 6 1 Latch Save Engages La...

Страница 21: ...engaging Edit Plug ins will allow Faders and Select buttons 1 4 to control the parameters and switches of the focused plug in The scribble strip above each fader will display the parameter that the fa...

Страница 22: ...e the faders to adjust the send level of each channel Power User Tip While Sends mode is active you can use the Pan Param knob to the left of the scribble strips to adjust the send for the currently s...

Страница 23: ...button below the Exit screen to reboot your FaderPort Once you have set the operation mode your FaderPort 8 will retain this information If you would like to change the mode at any point power on the...

Страница 24: ...ressing SHIFT plus the push button encoder in the Session Navigator 3 Pan Position Displays the Channel s current pan position 4 Pan Param This push button encoder controls the pan of the currently se...

Страница 25: ...nnel will be displayed See Section 4 6 1 for more information Sends Sends When Sends mode is active the aux sends for the Selected channel will be displayed See Section 4 6 3 for more information 4 3...

Страница 26: ...ronome 5 Scroll Encoder and navigation buttons control timeline scrolling By default Scroll mode is set to Coarse tune scrolling press the Scroll button a second time to engage Fine tune scrolling 6 S...

Страница 27: ...te nearest marker 4 5 Automation Controls 3 4 2 5 1 6 1 Latch Save Engages Latch Automation on currently selected track Press the SHIFT and Latch buttons simultaneously to save your session 2 Trim Red...

Страница 28: ...Edit Plug ins once This will display the first Insert Slot for every channel in your Logic session 2 Press the Select button below the plug in you d like to edit This display the plug in parameters on...

Страница 29: ...the Fader to switch between pre and post fader send positions Fader 3 sets this position for Insert Slot 1 Fader 7 sets this position for Insert Slot 2 Send Active Mute Use Faders 4 and 8 to enable di...

Страница 30: ...ou have selected your mode press the Select button below the Exit screen to reboot your FaderPort Once you have set the operation mode your FaderPort 8 will retain this information If you would like t...

Страница 31: ...button encoder in the Session Navigator 3 Pan Position Displays the Channel s current pan position 4 Pan Param This push button encoder controls the pan of the currently selected channel while in Trac...

Страница 32: ...utton Edit Plug ins Inserts When Edit Plug ins mode is active the inserted plug ins for the Selected channel will be displayed See Section 5 6 1 for more information Sends Sends When Sends mode is act...

Страница 33: ...o 1 1 1 5 Scroll Encoder scrolls insert marker 6 Section This function is not available in Live 7 Bank Encoder scrolls through channels in banks of eight 8 Marker Sets play marker to 1 1 1 5 5 Automat...

Страница 34: ...not active the Pan Param knob to the left of the scribble strips controls the panning for the currently selected channel 5 6 1 Edit Plug ins Because of the way Mackie Control Universal is implemented...

Страница 35: ...hift Audio to access an assignable MIDI message D 3 2 VI MIDI VI view is not available in Live Press Shift VI to access an assignable MIDI message D3 3 Bus Outputs Bus view is not available in Live Pr...

Страница 36: ...nce you have selected your mode press the Select button below the Exit screen to reboot your FaderPort Once you have set the operation mode your FaderPort 8 will retain this information If you would l...

Страница 37: ...6 2 Channel Strip 1 Channel Name and Level Displays the Channel name and current fader level 2 Metering Displays the channel metering This can be turned on or off by pressing SHIFT plus the push butto...

Страница 38: ...e pan position for that track Edit Plug ins Inserts When Edit Plug ins mode is active the inserted plug ins for the Selected channel will be displayed See Section 6 6 1 for more information Sends Send...

Страница 39: ...trol with the encoder and navigation buttons 6 Section The Encoder will control Timeline scrolling Navigation buttons control rewind and fast forward 7 Bank Encoder and navigation buttons scroll throu...

Страница 40: ...y selected channel 4 Pan When Pan mode is active the motorized faders will display and control channel pan When not active the Pan Param knob to the left of the scribble strips controls the panning fo...

Страница 41: ...lected your mode press the Select button below the Exit screen to reboot your FaderPort Once you have set the operation mode your FaderPort 8 will retain this information If you would like to change t...

Страница 42: ...r provides several useful preferences from the ACT panel in the tool bar From here you can enable options like Fader Touch selects channels and Select highlights track Both are recommended for the bes...

Страница 43: ...1 Stop Stops playback 2 Loop This button is unavailable in Sonar Looping is controlled by the Click button in the Session Navigator See Section 7 4 3 Play Pause Starts playback at the current playback...

Страница 44: ...trols individual channel scrolling Use the navigation buttons to navigate through the Help module 6 Section Encoder and navigation buttons control rewind and fast forward 7 Bank Encoder and navigation...

Страница 45: ...tion 7 6 2 for more information 7 6 1 Sends Mode Pressing the Sends button will allow you to adjust the first assigned sends for every track in the session Press the Sends button twice to control all...

Страница 46: ...nstallation and Authorization Once you have installed the drivers for your audio interface and connected it to your computer you can use the included PreSonus Studio One Artist music production softwa...

Страница 47: ...ish to add and click Install The content will automatically begin to download and install from your My PreSonus user account Power User Tip You may be prompted to enter your My PreSonus user account i...

Страница 48: ...e pull down menu From this page you can also adjust your device buffer block size Click OK when you are finished 8 2 2 Configuring MIDI Devices From the External Devices window in Studio One Artist yo...

Страница 49: ...erPort 8 from the Setup area in the Start page Before you begin make sure your FaderPort 8 is connected to one of your computer s USB ports is powered on and set to Studio One mode 1 Click on the Conf...

Страница 50: ...t views the controller and tone generation functions as two different devices a MIDI keyboard controller and a sound module The MIDI controls keyboard knobs faders etc will be set up as a Keyboard The...

Страница 51: ...r any or all of these messages 6 In the Receive From drop down menu select the MIDI interface input from which Studio One Artist will receive MIDI data that is the MIDI port to which your keyboard is...

Страница 52: ...rated into a MIDI instrument such as a keyboard synthesizer Studio One Artist refers to all tone generators as Instruments Once you have set up your MIDI keyboard controller take a moment to configure...

Страница 53: ...DI devices let s create a new Song We ll start by setting up your default audio I O 1 From the Start page select Create a New Song 2 In the New Song window name your Song and choose the directory in w...

Страница 54: ...rate and resolution and configure your audio I O 2 Click on the Audio I O Setup tab 3 From the Inputs tab you can enable any or all of the inputs on your audio interface that you d like to have availa...

Страница 55: ...Studio One click the Make Default button 8 3 2 Creating Audio and InstrumentTracks 1 In the upper left corner of the Arrange window you will notice several buttons The button furthest to the right is...

Страница 56: ...Source list for Instrument tracks lists available external MIDI devices as well as any virtual instruments that have been added to the Song 8 3 3 Recording an AudioTrack 1 To begin recording create an...

Страница 57: ...d closes the Mixer window Browse The Browse button opens the browser which displays all of the available virtual instruments plug in effects audio files and MIDI files as well as the pool of audio fil...

Страница 58: ...an be quickly located auditioned and imported into your Song by dragging them from the file browser into the Arrange view If you drag the file to an empty space a new track will be created with that f...

Страница 59: ...to 5 Slower speeds will provide smoother fader movements Faster speeds will provide snappier fader recall When you are done press the Select button beneath the Back screen This will return you to the...

Страница 60: ...e strip display Test LEDs This mode allows you to confirm the functionality of all the LEDs on your FaderPort 8 You can turn every LED on off as well as blink them Test RGBs Your FaderPort 8 is equipp...

Страница 61: ...you are in the correct mode for your DAW application and that the FaderPort is configured as the correct device type in your DAW Studio One Native ProTools HUI All others MCU Track Names Not Updating...

Страница 62: ......

Страница 63: ...epper and minced garlic Cook until vegetables are very tender Do not cover 5 Slowly add 1 quart of chicken broth and bring to a low boil stirring constantly 6 Transfer roux mixture to a soup pot and b...

Страница 64: ...FaderPort 8 8 channel Production Controller Owner s Manual 18011 Grand Bay Ct Baton Rouge Louisiana 70809 USA 1 225 216 7887 www presonus com Part XX XXXXXXX X...

Отзывы: