Prebena 11-WP130 Скачать руководство пользователя страница 52


Page 

24

 of 

30


Warranty 

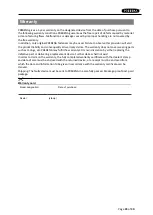
PREBENA gives a 1-year warranty on the designated device from the date of purchase pursuant to 
the following warranty conditions. PREBENA guarantees the free repair of defects caused by material 
or manufacturing flaws. Malfunctions or damage caused by improper handling are not covered by 
the free warranty.  
In addition, only original PREBENA fasteners may be used. Failure to observe this provision will void 
the product liability and consequently all warranty claims. The warranty does not cover wearing parts 
such as O-rings, etc. PREBENA may fulfil the warranty at its own discretion by either replacing the 
defective part or delivering a replacement device. Further claims shall not exist. 
In order to claim on the warranty, the fully completed warranty certificate with the dealer's stamp 
and date of sale must be enclosed with the returned device, or a receipt must be enclosed from 
which the data and information to be given in accordance with the warranty certificate can be 
derived. 
Shipping: The faulty device must be sent to PREBENA in a carefully packed, breakage-proof post-paid 
package. 


Warranty card 

Model designation: 

Date of purchase: 

Dealer: 

(stamp) 


Содержание 11-WP130

Страница 1: ...CHNOLOGY PREBENA Telefon 49 0 6044 9601 0 E mail info prebena de Wilfried Bornemann GmbH Co KG Telefax 49 0 6044 9601 820 www prebena de Seestraße 20 26 D 63679 Schotten Originalbetriebsanleitung für stationären druckluftbetriebenen Industrienagler MODUL 11 WP130 97514107 ...

Страница 2: ...t Personen ohne diese Kenntnisse müssen durch einen erfahrenen Benutzer in den Betrieb des Eintreibgeräts eingewiesen werden Diese Gebrauchsanweisung wendet sich an folgende Personen Personen die dieses Eintreibgerät bedienen Personen die dieses Eintreibgerät reinigen oder Personen die dieses Eintreibgerät entsorgen Jede dieser Personen muss den Inhalt dieser Gebrauchsanleitung zur Kenntnis genomm...

Страница 3: ...bgeräts vermeiden 6 Beschreibung 7 Angaben im Typenschild 8 Eintreibgerät vorbereiten 9 Eintreibgerät auspacken 9 Zustand prüfen 9 Montageanleitung 10 Montage Eintreibgerät 10 Eintreibgerät an Druckluftversorgung anschließen 10 Eintreibgerät an Steuerleitung anschließen 12 Magazin wechseln 13 Magazin entnehmen 13 Magazin montieren 14 Eintreibgerät bedienen 15 Eintreibgerät über den Betriebsdruck r...

Страница 4: ...20 Befestigungsmittel 20 Eintreibgerät entsorgen 21 Technische Daten 22 Herstelleradresse 23 Garantie 24 Schaltpläne 25 Pneumatikplan 25 Elektroplan 26 Einbauerklärung nach 2006 42 EG 27 Anhang zur Einbauerklärung 28 Ersatzteilliste 30 ...

Страница 5: ...den Sie ein Symbol das die Art der Gefahr darstellt Rechts davon sehen Sie ein weiteres Symbol und ein Signalwort das eine Beschreibung der Gefahrenquelle und Hinweise wie Sie diese Gefahr vermeiden können GEFAHR Hinweise mit dem Wort GEFAHR warnen vor Gefährdungen die unmittelbar zu schweren oder tödlichen Verletzungen führen WARNUNG Hinweise mit dem Wort WARNUNG warnen vor Gefährdungen bei denen...

Страница 6: ... Von eigenmächtig veränderten Eintreibgeräten Bei Verwendung von nicht originalen PREBENA Befestigungsmitteln siehe Seite 24 Die PREBENA WILFRIED BORNEMANN GMBH CO KG übernimmt keine Haftung für Schäden die durch bestimmungswidrigen Gebrauch entstehen Gefahr tödlicher Verletzungen vermeiden Das Anschließen des Eintreibgerätes an Steuerungs und Druckluftnetz ist verboten solange das Eintreibgerät n...

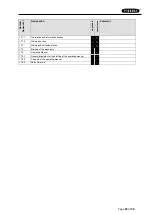
Страница 7: ...Seite 7 von 30 Beschreibung ...

Страница 8: ...haken Klammereinlauf 8 Entlüftungsöffnung 9 Anschlussbuchse Steuerung 10 Klemmmutter 11 Anschlagpuffer 12 Druckluftanschluss NW10 13 Treiber Angaben im Typenschild Das Typenschild ist auf der linken Seite des Gehäuses aufgeklebt Es enthält folgende Angaben Den Firmennamen und das Herkunftsland Die Typenbezeichnung des Eintreibgeräts Die Typenbezeichnung der verwendbaren Befestigungsmittel ...

Страница 9: ...iben eines beschädigten Eintreibgeräts oder bei nicht richtig befestigtem Zubehör Prüfen Sie den Zustand des Eintreibgeräts vor jedem Einsatz Stellen Sie den einwandfreien Zustand des Eintreibgeräts sicher Prüfen Sie insbesondere folgende Punkte Die Schlauchleitung muss unbeschädigt sein Alle Teile des Eintreibgeräts und alle Zubehörteile müssen sicher befestigt sein Die Sicherheitseinrichtungen d...

Страница 10: ... Ring Maulschlüssel SW24 Eintreibgerät auf ausgewiesen Montageplatz bringen und mithilfe der Befestigungsmutter und Werkzeug befestigen Befestigungsmutter mit 210 Nm anziehen Eine Höhenstellung ist über die Anlage vorzunehmen Eintreibgerät an Druckluftversorgung anschließen Schließen Sie das Eintreibgerät erst an eine Druckluftversorgung an wenn dieses entsprechend der Montageanleitung an der Prod...

Страница 11: ... auch bei der gewünschten Luftentnahme aufrecht halten können Der Innendurchmesser der Luftleitung muss mindestens 13 mm betragen Der Anschluss für das Eintreibgerät muss mit einer Schnellkupplung mit NW 10 und mit mindestens 10 mm Innendurchmesser ausgestattet sein VORSICHT Der Betrieb an Druckluftanlagen die nicht die vorher genannten Voraussetzungen erfüllen kann zu Schäden am Eintreibgerät füh...

Страница 12: ...st an eine Druckluftversorgung an wenn dieses entsprechend der Montageanleitung 2 an der Produktionsanlage befestigt ist Es ist ein Anschlussstecker des Typs XLR 6 polig zu verwenden Die Belegung der Pole ist im Teil Schaltpläne beschrieben WARNUNG Defekte Kabelverbindungen und offen liegende Kontakte können zu Personen und Sachschäden führen Prüfen Sie die Kabelverbindung auf evtl Schäden Schließ...

Страница 13: ... einer externen Station mit Klammern zu befüllen Da bei einem Eintreibgerät zwei Magazine zum Lieferumfang gehören kann der Klammervorgang durch den Magazinwechsel sofort wieder aufgenommen werden Die Heftklammern werden in einer Industrieverpackung geliefert um diese schnell und unkompliziert in die Magazine zu bringen Magazin entnehmen Drehen Sie den Sperrriegel 4 entsprechend der Pfeilrichtung ...

Страница 14: ...gazin 1 führt und es so festhält Das Magazin 1 wird bis zum Anschlagpuffer 2 mit leichtem Druck geschoben Reicht dieser Weg nicht aus muss die Kontermutter 3 gelöst und die Position des Anschlagpuffers 2 über das Gewinde neu eingestellt werden Anschließend neu kontern Der Magazinwechsel ist für alle Magazintypen gleich Die folgende Übersicht gibt Ihnen einen Überblick über die verwendbaren Magazin...

Страница 15: ...btiefe erreichen Dadurch erzielen Sie folgende Vorteile Sie sparen Energie Druckluft Sie verringern den Geräuschpegel und Sie reduzieren den Verschleiß am Eintreibgerät Um den Betriebsdruck einzustellen gehen Sie wie folgt vor Stellen Sie den Druck am Druckventil des Kompressors oder Druckluftanlage ein Beobachten Sie die Druckanzeige Eintreibtiefe prüfen Schießen Sie mit dem Eintreibgerät auf ein...

Страница 16: ...Achtung Beschädigung des Eintreibgeräts oder des Zubehörs durch nicht geeignete Reinigungsmittel Verwenden Sie zum Reinigen nur ein trockenes leicht angefeuchtetes oder ein mit milder Seifenlauge angefeuchtetes Tuch Leichte Verschmutzungen Wischen Sie das Gehäuse des Eintreibgeräts mit einem trockenen Tuch ab Starke Verschmutzung Wischen Sie das Gehäuse des Eintreibgeräts mit einem leicht mit mild...

Страница 17: ...hren Verwenden Sie nur PREBENA Spezial Nagler öl Wenn kein Öler montiert ist und die Länge der Luftleitung zum Eintreibgerät über 10 m beträgt ist eine ausreichende Schmierung nicht gewährleistet Füllen Sie in diesem Fall täglich vor Betriebsbeginn zwei bis fünf Tropfen PREBENA Spezial Nagleröl direkt in den Anschluss für die Druckluftquelle ein ...

Страница 18: ...ist defekt Kundendienst benachrichtigen Betriebsdruck zu hoch Ventil defekt Eintreibgerät sofort von der Druckluftversorgung trennen Kundendienst benachrichtigen Zu hoher Betriebsdruck eingestellt oder Eintreibgerät beschädigt Betriebsdruck verringern Falls das Problem weiterhin besteht Eintreibgerät sofort vom Druckluftschlauch trennen Kundendienst benachrichtigen Klammern werden nicht vollständi...

Страница 19: ...geführt Kundendienst benachrichtigen Der Treiber ist verbogen Kundendienst benachrichtigen Der Zyklus des Nachladevorgangs wird unterbrochen Durchgang der Drosselventile hat sich geändert Kundendienst benachrichtigen Klammerstab hat sich beim Nachladen verkeilt Eintreibgerät von der Druckluftversorgung trennen Klammern aus Nachladeeingriff entfernen Neue Klammern laden und Probe schießen Weitere S...

Страница 20: ...agazin für HK Type WP100 62251801 WP120 Wechselmagazin für HK Type WP120 62251203 WP130 Wechselmagazin für HK Type WP130 62251702 Ersatzteil Set Auflistung siehe Anhang Befestigungsmittel nachbestellen Das Eintreibgerät darf nur mit den jeweils auf dem Typenschild abgebildeten PREBENA Heftklammern verwendet werden Typ Länge Drahtmaß Rückenbreite WP75 CNKHA CSVHA CRFHA 75 mm 1 8 x 2 08 mm 26 7 mm W...

Страница 21: ...Entsorgen Befolgen Sie die geltenden Vorschriften für die Entsorgung von Öl Werfen Sie das Eintreibgerät oder Teile davon keinesfalls in den normalen Hausmüll Wenn Sie das Eintreibgerät entsorgen möchten senden Sie es an PREBENA Die sachgerechte Entsorgung des Eintreibgeräts erfolgt durch PREBENA Die Kontaktdaten finden Sie auf Seite 23 ...

Страница 22: ...5 bar Max Arbeitsdruck 8 3 bar Eintreibgegenstand PREBENA Heftklammer Type WP 75 130 Luftverbrauch 5 1 L Heftung bei 6 bar Auslösesystem Fremdauslösung durch SPS Programm Magazinsystem Oberlader durch Wechselmagazin Steueranschluss XLR Anschluss 6 polig siehe Elektroplan Einsatztemperatur 5 C bis 45 C ...

Страница 23: ...n 30 Herstelleradresse PREBENA Wilfried Bornemann GmbH Co KG Befestigungstechnik Seestraße 20 26 D 63679 Schotten Telefon 0 60 44 96 01 100 Telefax 0 60 44 96 01 820 E Mail info prebena de Homepage www prebena de ...

Страница 24: ... entfällt die Produkthaftung und somit der Garantieanspruch Die Garantie erstreckt sich nicht auf Verschleißteile wie z B O Ringe etc Es steht im Ermessen von PREBENA die Garantie durch Austausch des fehlerhaften Teils oder Ersatzlieferung vorzunehmen Weitergehende Ansprüche bestehen nicht Zur Inanspruchnahme der Garantie muss der vollständig ausgefüllte Garantieschein mit Händlerstempel und Verka...

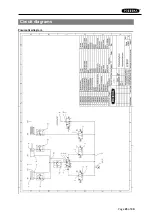
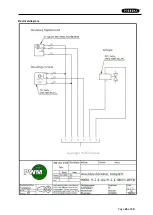
Страница 25: ...Seite 25 von 30 Schaltpläne Pneumatikplan Elektroplan ...

Страница 26: ...Seite 26 von 30 ...

Страница 27: ...mittlung erfolgt postalisch in Papierform oder auf elektronischem Datenträger Die Inbetriebnahme des Produkts ist so lange untersagt bis festgestellt wurde dass die Maschine in die das nachfolgend genannte Produkt eingebaut wird allen grundlegenden Anforderungen der Maschinenrichtlinie entspricht Das nachfolgend genannte Produkt erfüllt die Anforderungen oder Teile hieraus der folgenden einschlägi...

Страница 28: ...siko des Verlusts der Standsicherheit 1 3 2 Bruchrisiko beim Betrieb 1 3 3 Risiken durch herabfallende oder herausgeschleuderte Gegenstände 1 3 4 Risiken durch Oberflächen Kanten und Ecken 1 3 9 Risiko unkontrollierter Bewegungen 1 5 Risiken durch sonstige Gefährdungen 1 5 1 Elektrische Energieversorgung 1 5 2 Statische Elektrizität 1 5 3 Nichtelektrische Energieversorgung 1 5 4 Montagefehler 1 5 ...

Страница 29: ...formationen und Informationseinrichtungen 1 7 1 2 Warneinrichtungen 1 7 2 Warnung vor Restrisiken 1 7 3 Kennzeichnung der Maschinen 1 7 4 Betriebsanleitung 1 7 4 1 Allgemeine Grundsätze für die Abfassung der Betriebsanleitung 1 7 4 2 Inhalt der Betriebsanleitung 1 7 4 3 Verkaufsprospekte ...

Страница 30: ...materials Persons without this knowledge must be instructed in operation of the stapler by an experienced user This instruction manual is intended for use by the following persons persons operating this stapler persons cleaning this stapler or persons disposing of this stapler Each of these persons must have read and understood the contents of this instruction manual This instruction manual is an ...

Страница 31: ... type plate 8 Preparing the stapler 9 Unpacking the stapler 9 Checking the condition 9 Assembly instructions 10 Assembling the stapler 10 Connecting the stapler to the compressed air supply 10 Connecting the stapler to the control line 12 Changing the magazine 13 Removing the magazine 13 Installing the magazine 14 Operating the stapler 15 Regulating the stapler with the operating pressure 15 Servi...

Страница 32: ...he stapler 21 Technical details 22 Manufacturer s address 23 Warranty 24 Circuit diagrams 25 Pneumatics diagram 25 Electrical diagram 26 Declaration of Incorporation in accordance with 2006 42 EC 27 Appendix to the Declaration of Incorporation 28 Spare parts list 30 ...

Страница 33: ...ut On the left is a symbol indicating the type of danger On the right is another symbol and a signal word describing the source of the danger and notes on how to avoid it DANGER Notes with the word DANGER warn about hazards that will directly result in serious or fatal injury WARNING Notes with the word WARNING warn about hazards that could result in serious or fatal injury CAUTION Warnings with t...

Страница 34: ... with a bridged circuit breaker after it has been modified by the operator without authorisation using fasteners that do not originate from PREBENA see page 24 PREBENA WILFRIED BORNEMANN GMBH CO KG will not accept any liability for damage caused as the result of improper use Avoiding risk of fatal injury Connecting the stapler to the regulating and compressed air network is prohibited as long as t...

Страница 35: ...Page 7 of 30 Description ...

Страница 36: ...el 7 Barb staple infeed 8 Venting hole 9 Regulator connection socket 10 Clamping nut 11 Bump stop 12 NW10 compressed air connection 13 Driver Information on the type plate The type plate is affixed to the left hand side of the housing It contains the following information company name and country of origin type designation of the stapler type designation of the fasteners to be used ...

Страница 37: ...rating a damaged stapler or if the accessories are not attached properly Check the condition of the stapler every time before using it Make sure that the stapler is in a flawless condition In particular check the following points The hose line must be undamaged All parts of the stapler and all accessories must be securely fastened The safety mechanisms must not be blocked or otherwise impaired in ...

Страница 38: ...ol ready at hand ring open ended wrench SW24 Place the stapler in the designated assembly position and secure it with the fastening nut and tool Tighten the fastening nut to 210 Nm The height is adjusted on the plant Connecting the stapler to the compressed air supply Only connect the stapler to the compressed air supply after it has been attached to the production system as described in the insta...

Страница 39: ...ting it into operation The compressed air system must be capable of maintaining the operating pressure even with the desired air extraction The inside diameter of the air line must be at least 13 mm The connection for the stapler must be fitted with a quick coupling with NW 10 and an inside diameter of at least 10 mm CAUTION Operating the stapler with compressed air systems that do not meet the ab...

Страница 40: ...essor pressure gauge Connecting the stapler to the control line Only connect the stapler to the compressed air supply after it has been attached to the production system as described in installation instruction 2 A 6 pin XLR type connector plug must be used The pin assignment is described in the chapter Circuit diagrams WARNING Defective cable connections and exposed contacts can result in persona...

Страница 41: ...lled with staples at an external station Since two magazines are supplied with the stapler the stapling procedure can be resumed immediately by changing the magazine The staples are delivered in an industrial packaging for quick and easy charging of the magazines Removing the magazine Turn the locking bolt 4 in the direction of the arrow so that it turns back out of the retaining piece 5 Pull the ...

Страница 42: ...the magazine 1 holding it in place Push the magazine 1 up to the stop buffer 2 by exerting slight pressure on it If this does not work loosen the lock nut 3 and readjust the position of the stop buffer 2 with the thread Then tighten the nut again The procedure for changing the magazine is the same for all magazine types Which magazines can be used is shown below Magazine design PREBENA staples Typ...

Страница 43: ...rating pressure to achieve the required penetration depth This has the following benefits you save energy compressed air you reduce the noise level and you reduce the wear of the stapler Proceed as follows to set the operating pressure Adjust the pressure at the pressure valve of the compressor or compressed air system Observe the pressure reading Checking the penetration depth Shoot a staple into...

Страница 44: ...feed bridge Cleaning the housing and outer surface Important The stapler or accessories can be damaged by using unsuitable cleaning agents Only use a dry slightly moistened cloth or a cloth moistened with mild soapy water for cleaning the stapler Light soiling Wipe the stapler housing clean with a dry cloth Severe soiling Wipe the stapler housing clean with a cloth lightly moistened with mild soap...

Страница 45: ...y use PREBENA special nailer oil If an oiler is not fitted and the length of the air line to the stapler exceeds 10m adequate lubrication cannot be assured In this case pour two to five drops of PREBENA special nailer oil directly into the connection for the compressed air source every day before putting the stapler into operation ...

Страница 46: ...e Immediately disconnect the stapler from the compressed air supply Notify customer service Operating pressure set too high or stapler damaged Reduce operating pressure If the problem persists Immediately disconnect the stapler from the compressed air hose Notify customer service Staples are not being fully driven in The operating pressure is too low Increase operating pressure The driver tip on t...

Страница 47: ... driver is bent Notify customer service The reloading cycle is interrupted Passage of the throttle valves has changed Notify customer service Staple block has become wedged during reloading Disconnect stapler from the compressed air supply Remove staples from reloading opening Load new staples and fire a test discharge Other malfunctions If other malfunctions of the stapler have occurred which can...

Страница 48: ...0 Interchangeable magazine for HK type WP100 62251801 WP120 Interchangeable magazine for HK type WP120 62251203 WP130 Interchangeable magazine for HK type WP130 62251702 Spare part set listing see attachment Ordering additional fasteners The stapler may only be used with the respective PREBENA staples shown on the type plate Type Length Wire size Spine width WP75 CNKHA CSVHA CRFHA 75 mm 1 8 x 2 08...

Страница 49: ...nner Clean the stapler before disposing of it Observe the applicable regulations governing the disposal of oil Do not throw the stapler or any part of it into the regular household waste If you want to dispose of the stapler send it to PREBENA who will disposed of it in a proper manner See page 23 for contact details ...

Страница 50: ... working pressure 8 3 bar Fastener type PREBENA staple type WP 75 130 Air consumption 5 1 l stapling at 6 bar Triggering system External triggering by PLC program Magazine system Top loader through interchangeable magazine Control connection XLR 6 pin connection see electrical diagram Operating temperature 5 C to 45 C ...

Страница 51: ...0 Manufacturer s address PREBENA Wilfried Bornemann GmbH Co KG Befestigungstechnik Seestraße 20 26 D 63679 Schotten Telephone 0 60 44 96 01 100 Telefax 0 60 44 96 01 820 Email info prebena de Website www prebena de ...

Страница 52: ...ms The warranty does not cover wearing parts such as O rings etc PREBENA may fulfil the warranty at its own discretion by either replacing the defective part or delivering a replacement device Further claims shall not exist In order to claim on the warranty the fully completed warranty certificate with the dealer s stamp and date of sale must be enclosed with the returned device or a receipt must ...

Страница 53: ...Page 25 of 30 Circuit diagrams Pneumatics diagram ...

Страница 54: ...Page 26 of 30 Electrical diagram ...

Страница 55: ...est to the national bodies The documentation shall be forwarded by post in paper form or on an electronic data carrier Commissioning of the product is prohibited until it has been established that the machine into which the product named below is installed complies with all the essential requirements of the Machinery Directive The product named below fulfils the requirements or parts thereof of th...

Страница 56: ...mechanical hazards 1 3 1 Risk of loss of stability 1 3 2 Risk of break up during operation 1 3 3 Risks due to falling or ejected objects 1 3 4 Risks due to surfaces edges or corners 1 3 9 Risk of uncontrolled movements 1 5 Risks due to other hazards 1 5 1 Electricity supply 1 5 2 Static electricity 1 5 3 Energy supply other than electricity 1 5 4 Errors of fitting 1 5 5 Extreme temperatures 1 5 6 ...

Страница 57: ... Information and information devices 1 7 1 2 Warning devices 1 7 2 Warning about residual risks 1 7 3 Marking of the machinery 1 7 4 Operating Manual 1 7 4 1 General principles for the drafting of the operating manual 1 7 4 2 Contents of the operating manual 1 7 4 3 Sales literature ...

Страница 58: ...Page 30 of 30 Spare parts list ...

Страница 59: ...Seite 30 von 30 Ersatzteilliste ...

Отзывы: